Preamble
This Warehouse Setup and Cargo Handling Guide provides a comprehensive overview of how to configure warehouses, manage cargo operations, and track shipments effectively within the system. The guide is designed to help warehouse personnel, logistics coordinators, and system administrators navigate the essential functionalities required for efficient warehouse and cargo management.
It includes step-by-step instructions, required permissions, and system behaviors, ensuring compliance with operational procedures. Throughout the document, relevant screenshots and system notifications are indicated to enhance clarity and usability.
Warehouse Setup
Creating/updating a Warehouse
First of all, you need to make the setup to proceed with any further operation with this module.
To create a warehouse, navigate to Home → Settings → System Setup → Locations/Stations.
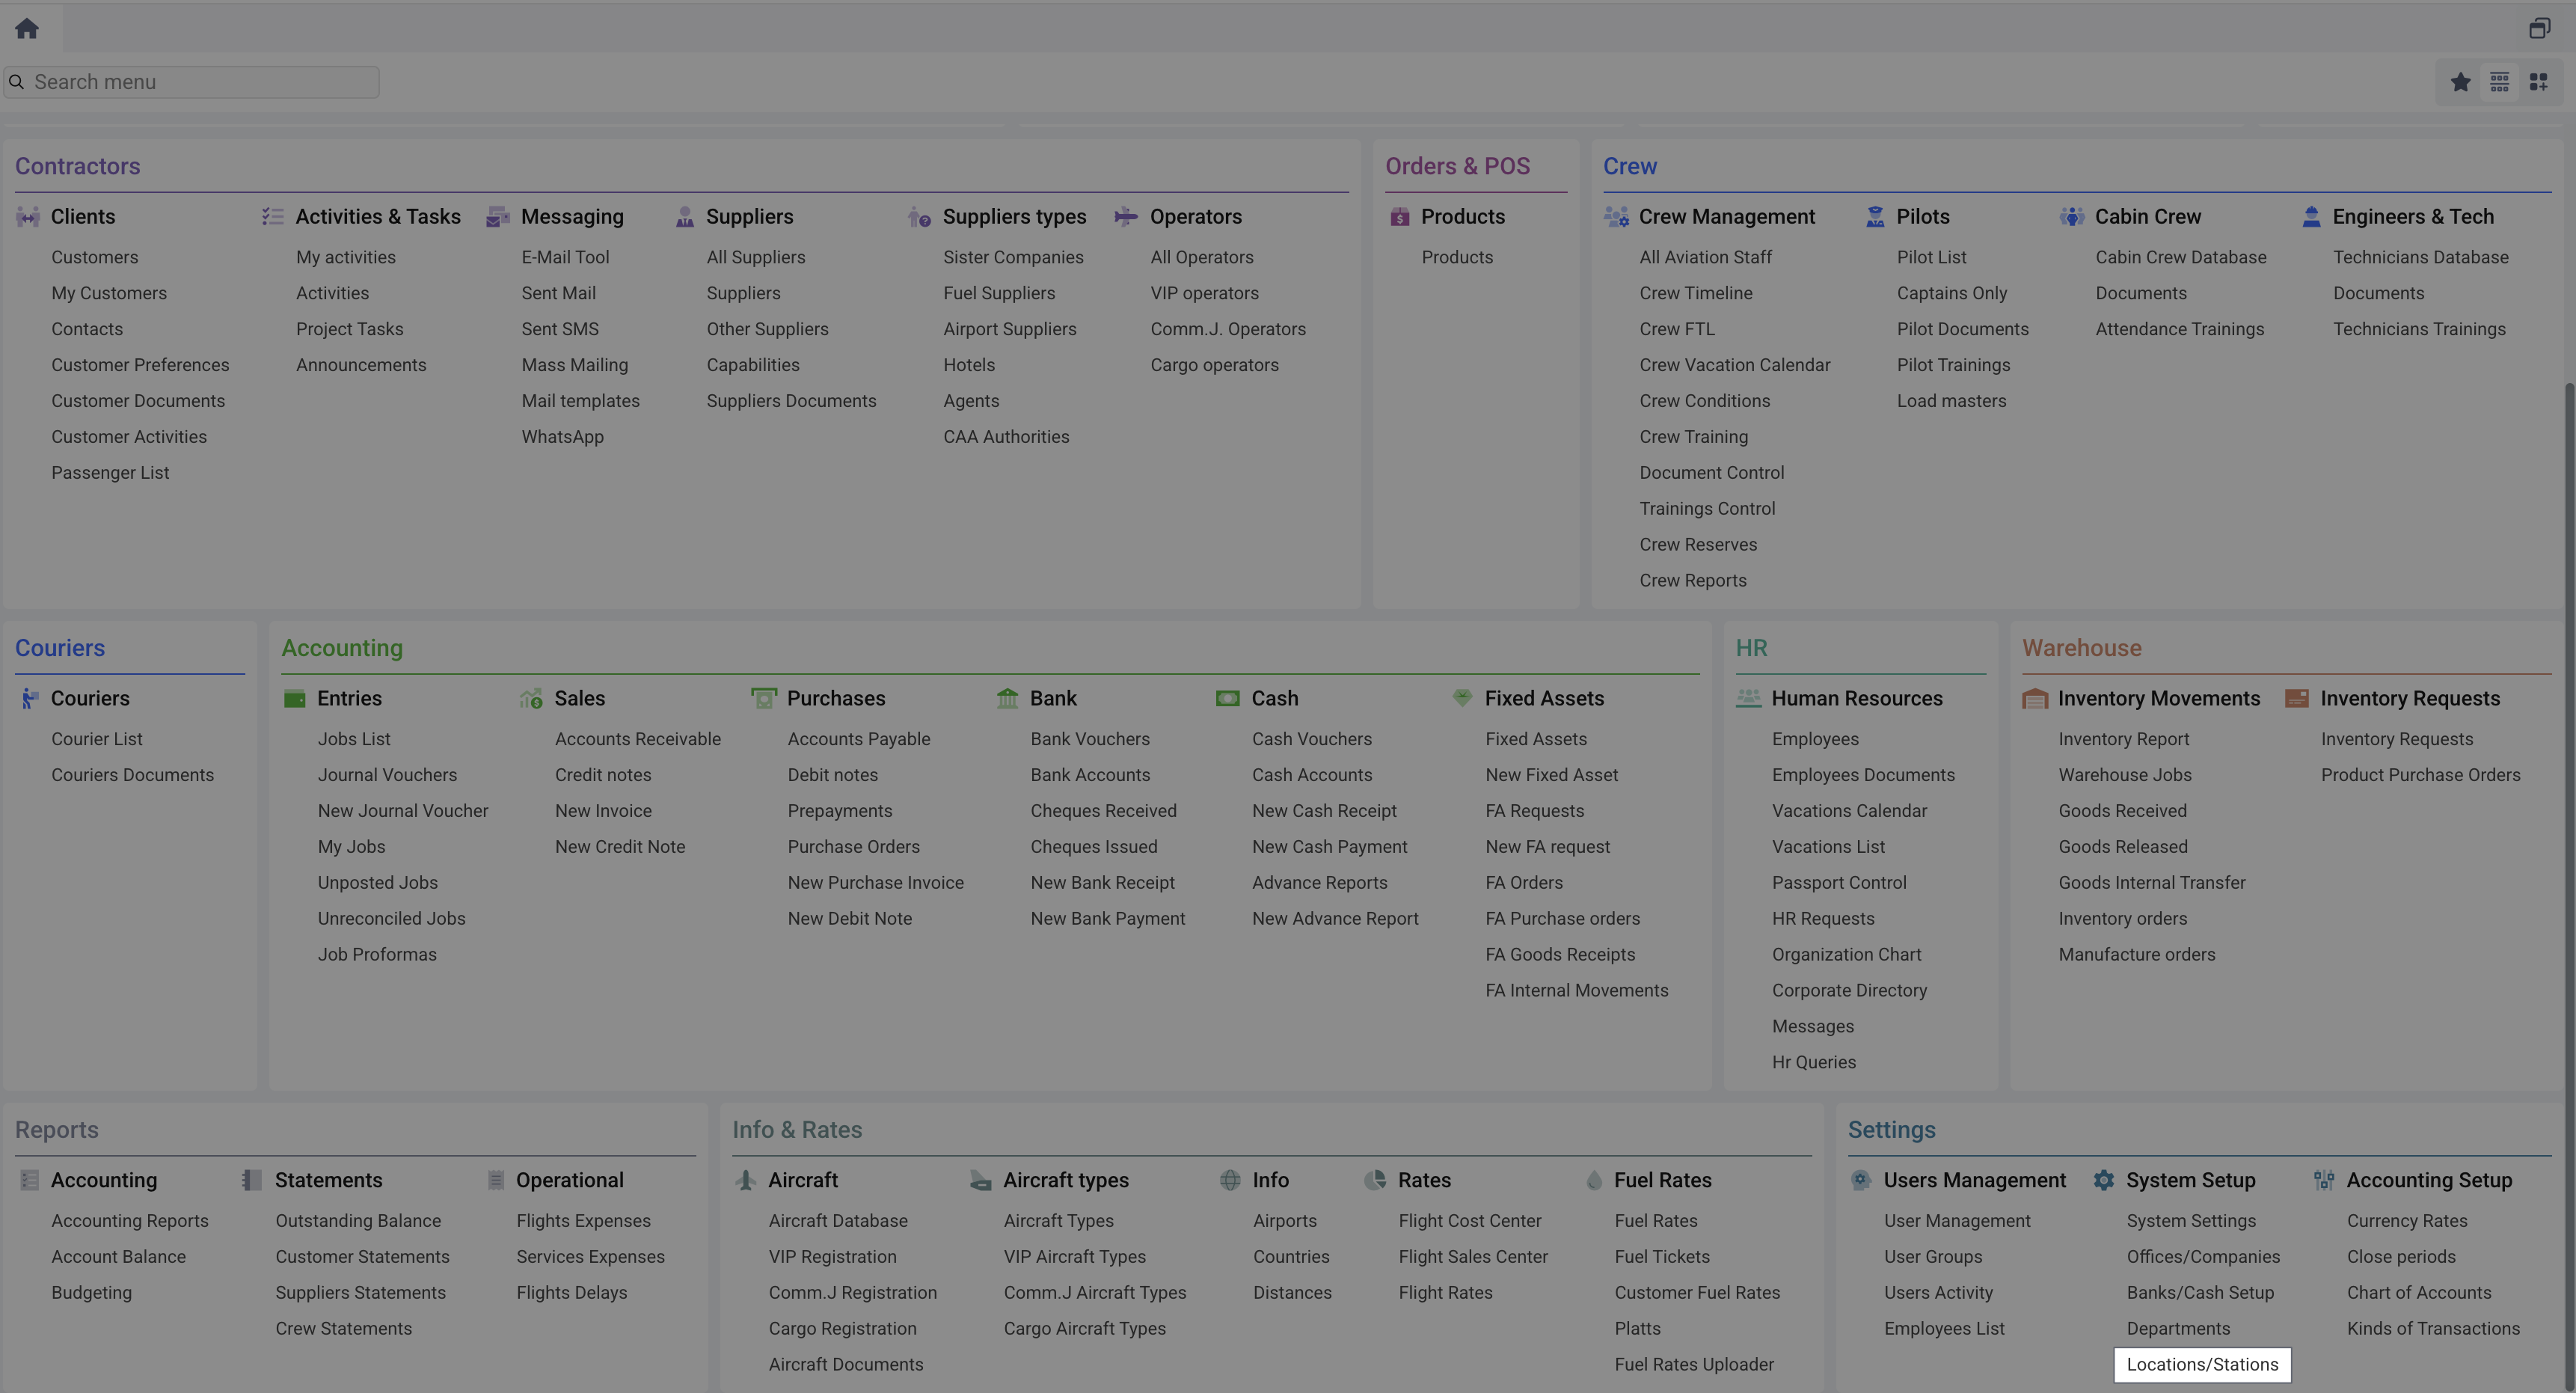
In the Locations/Stations module, you will find a list of all warehouses. To create a warehouse for cargo, select the Warehouse type in the same-named drop-list. The rest of the types used in the system for an additional module are not directly related to the management of cargo operations.
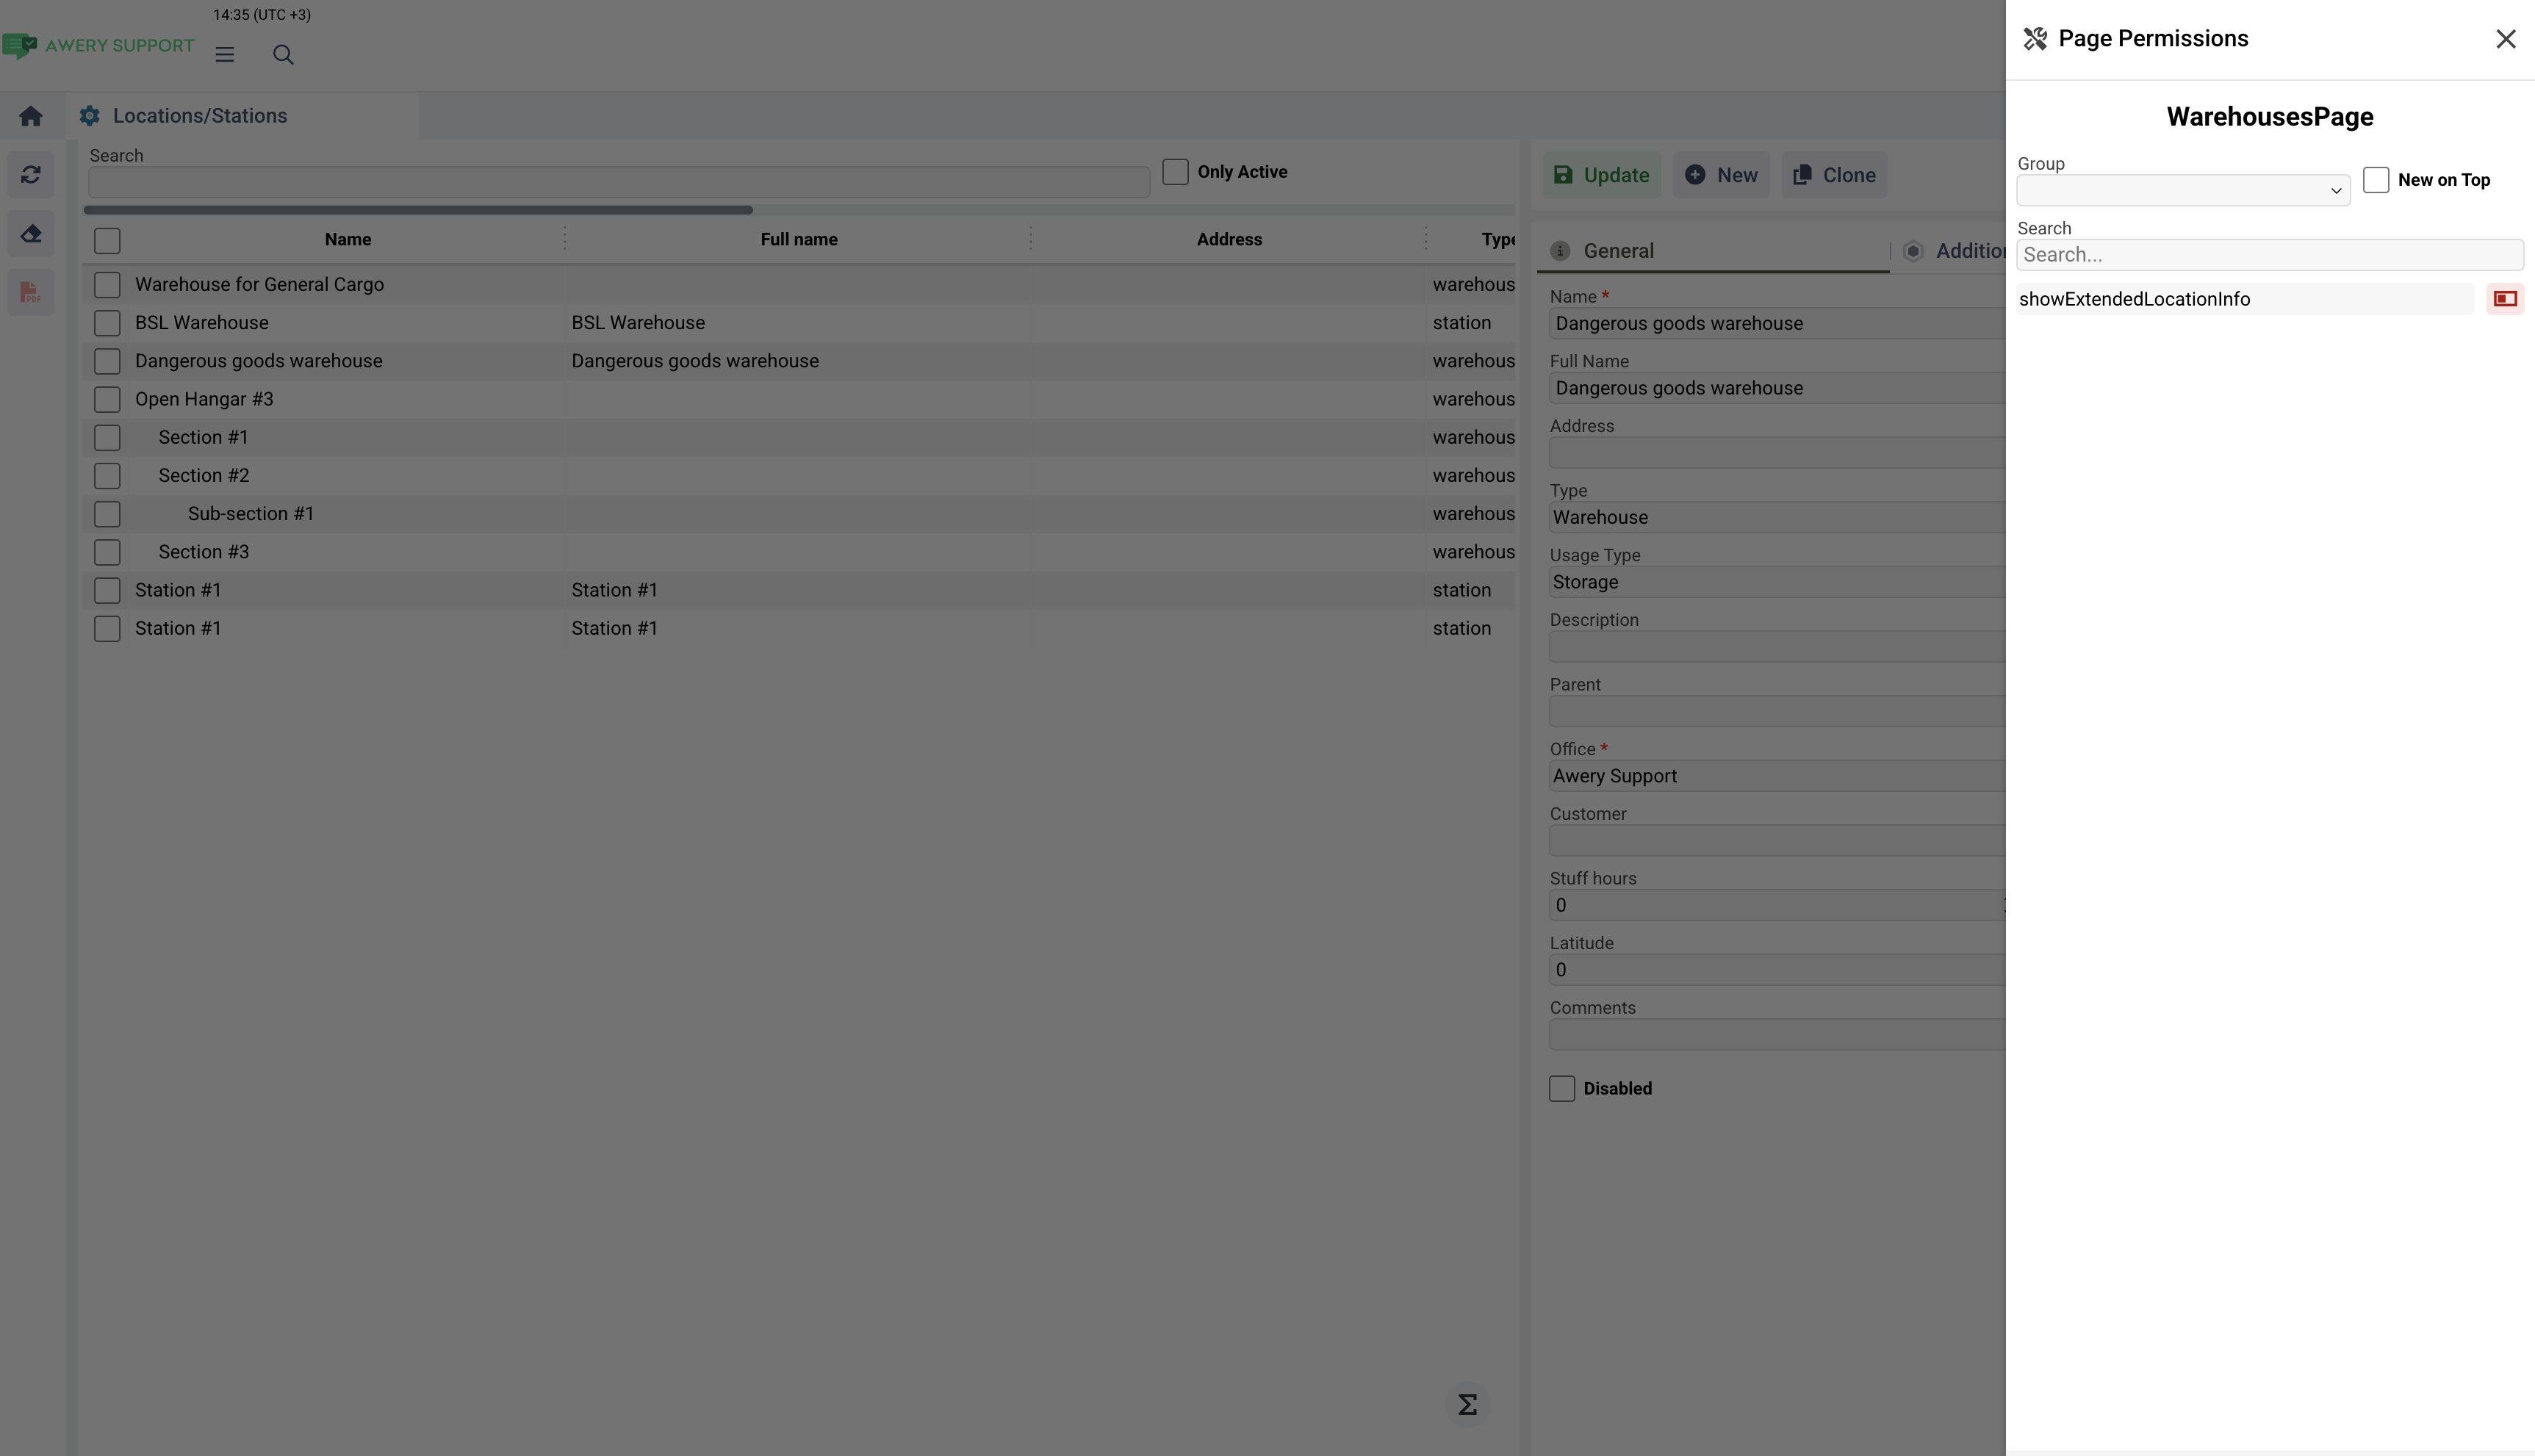
Be sure that the ShowExtendedLocationInfo permission is disabled for your user. If enabled, not all required fields for Cargo operating will be visible. If you have any problems or issues with the permissions, you can always contact our support departments by writing to support@awery.aero.
Management of warehouse data
-
Warehouses cannot be deleted from the system, but can be disabled, which will make inaccessible for most of the components in the system.
-
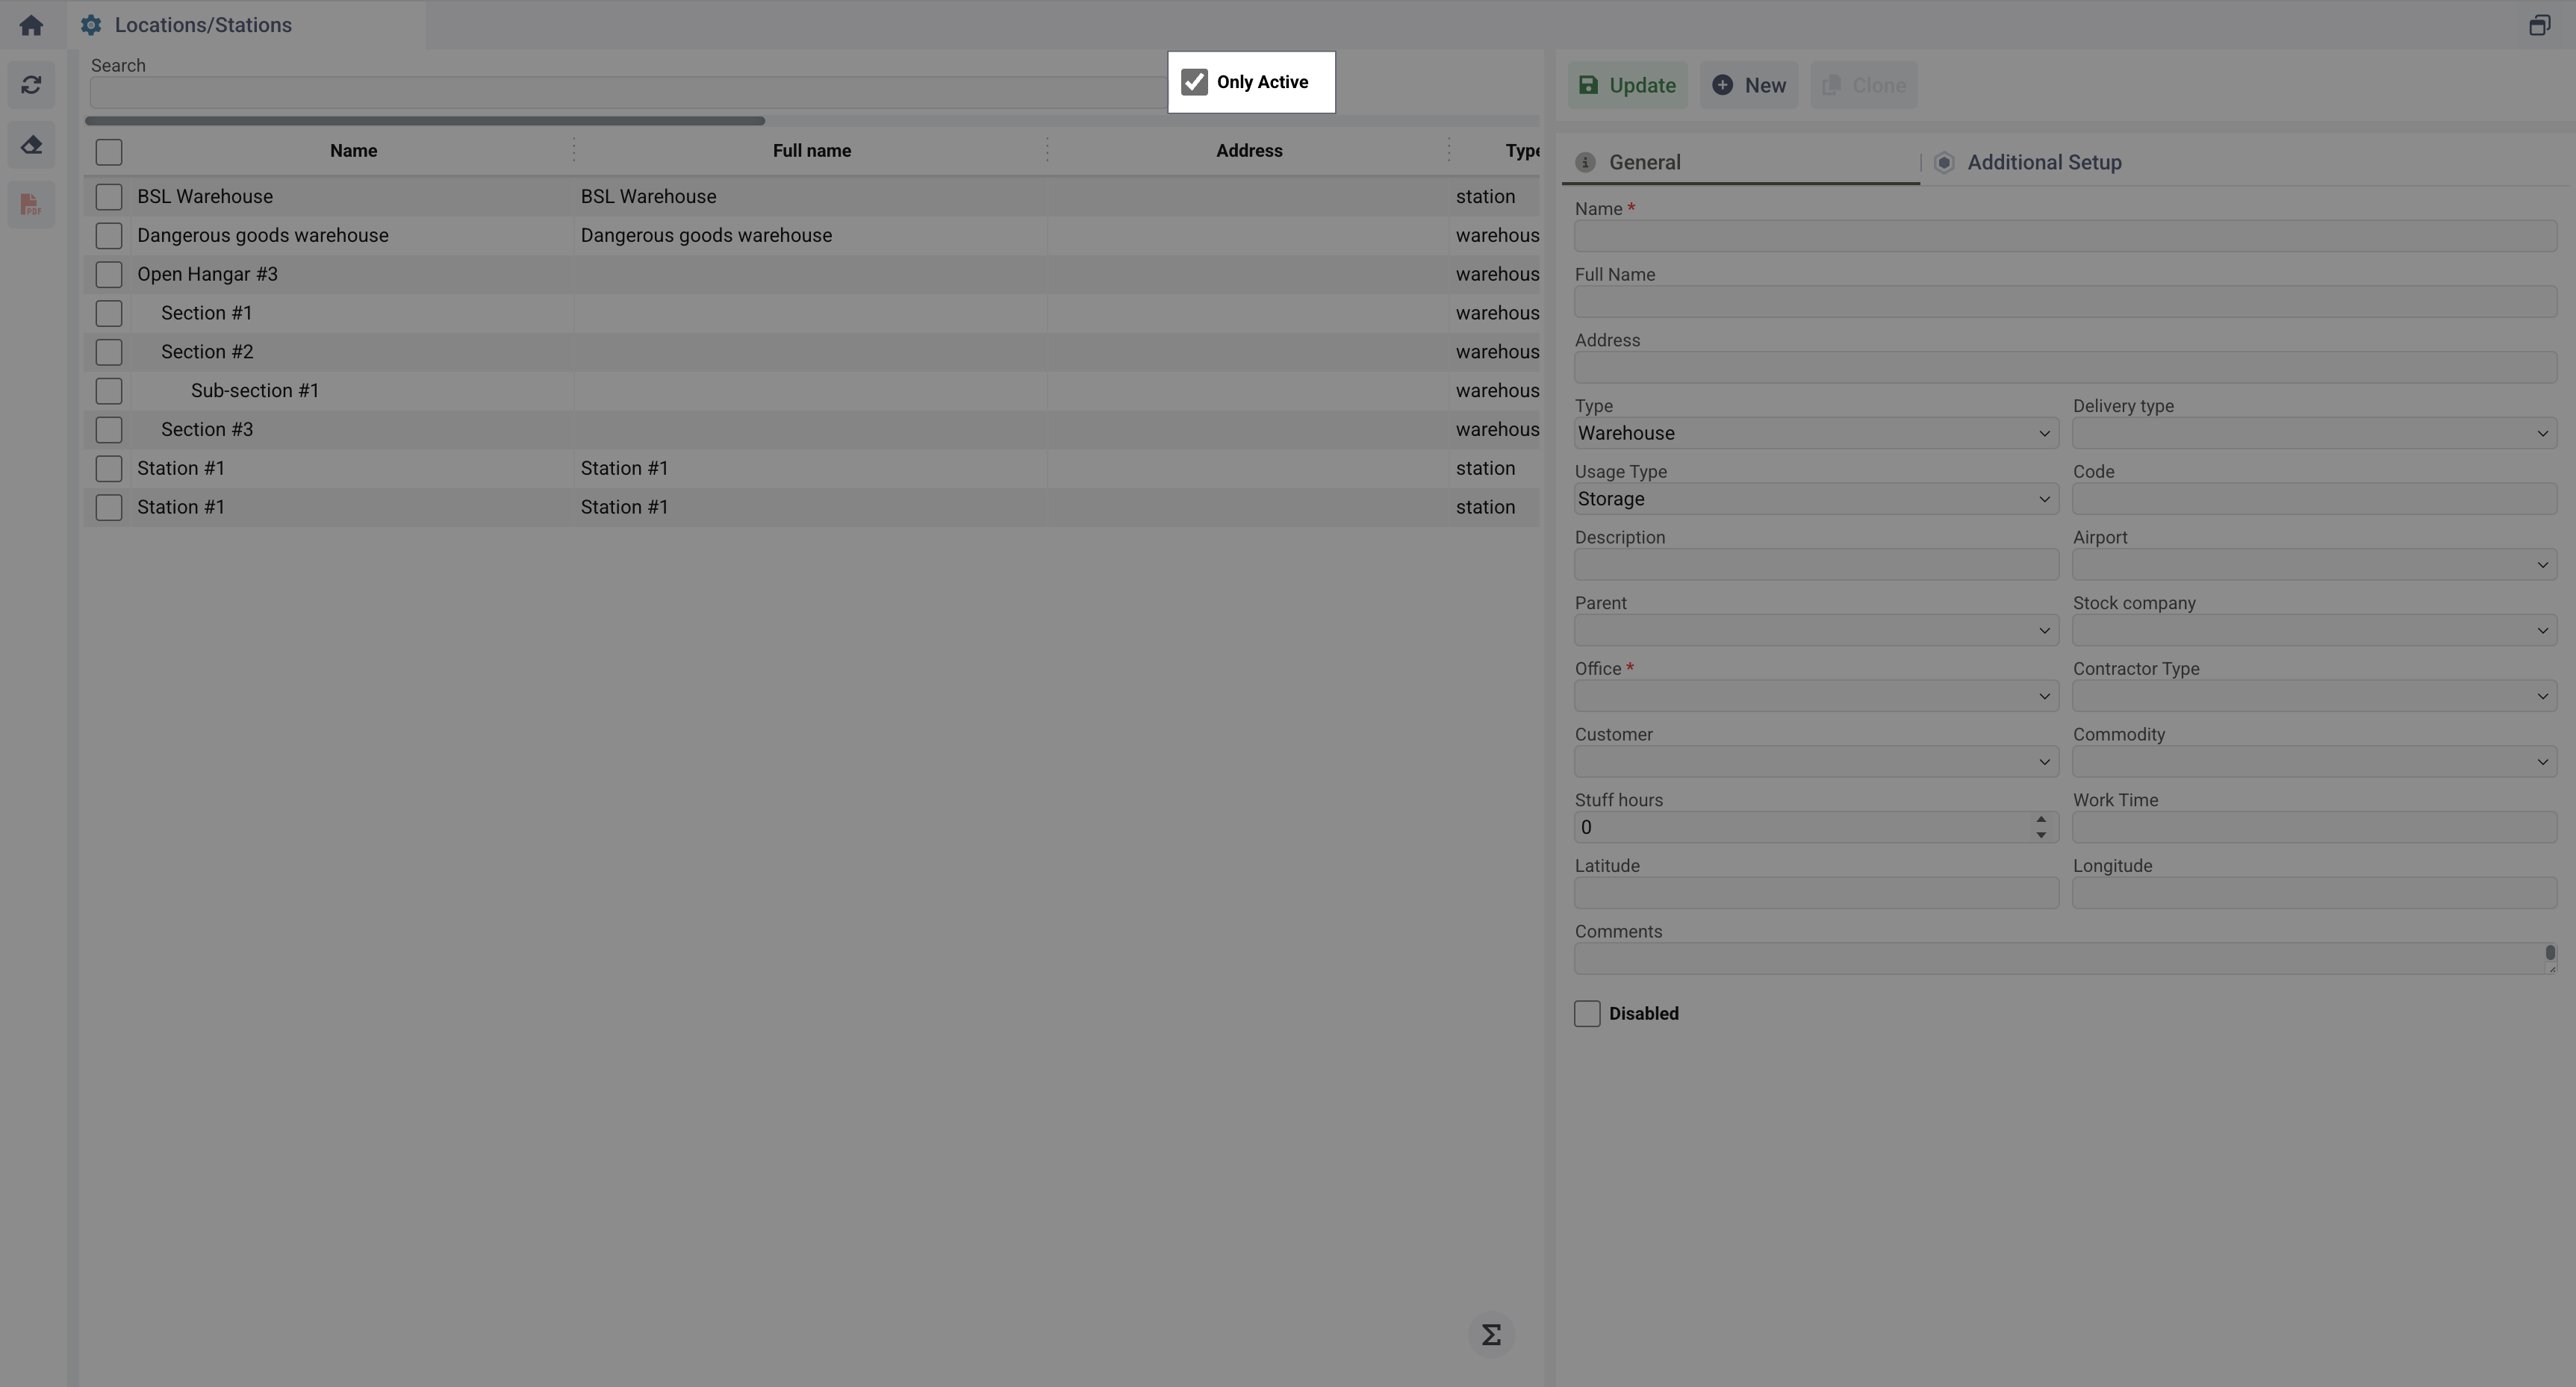
System-wide permissions allow filtering Active warehouses or Disabled warehouses.
-
Checking the Disabled checkbox marks a warehouse as inactive.
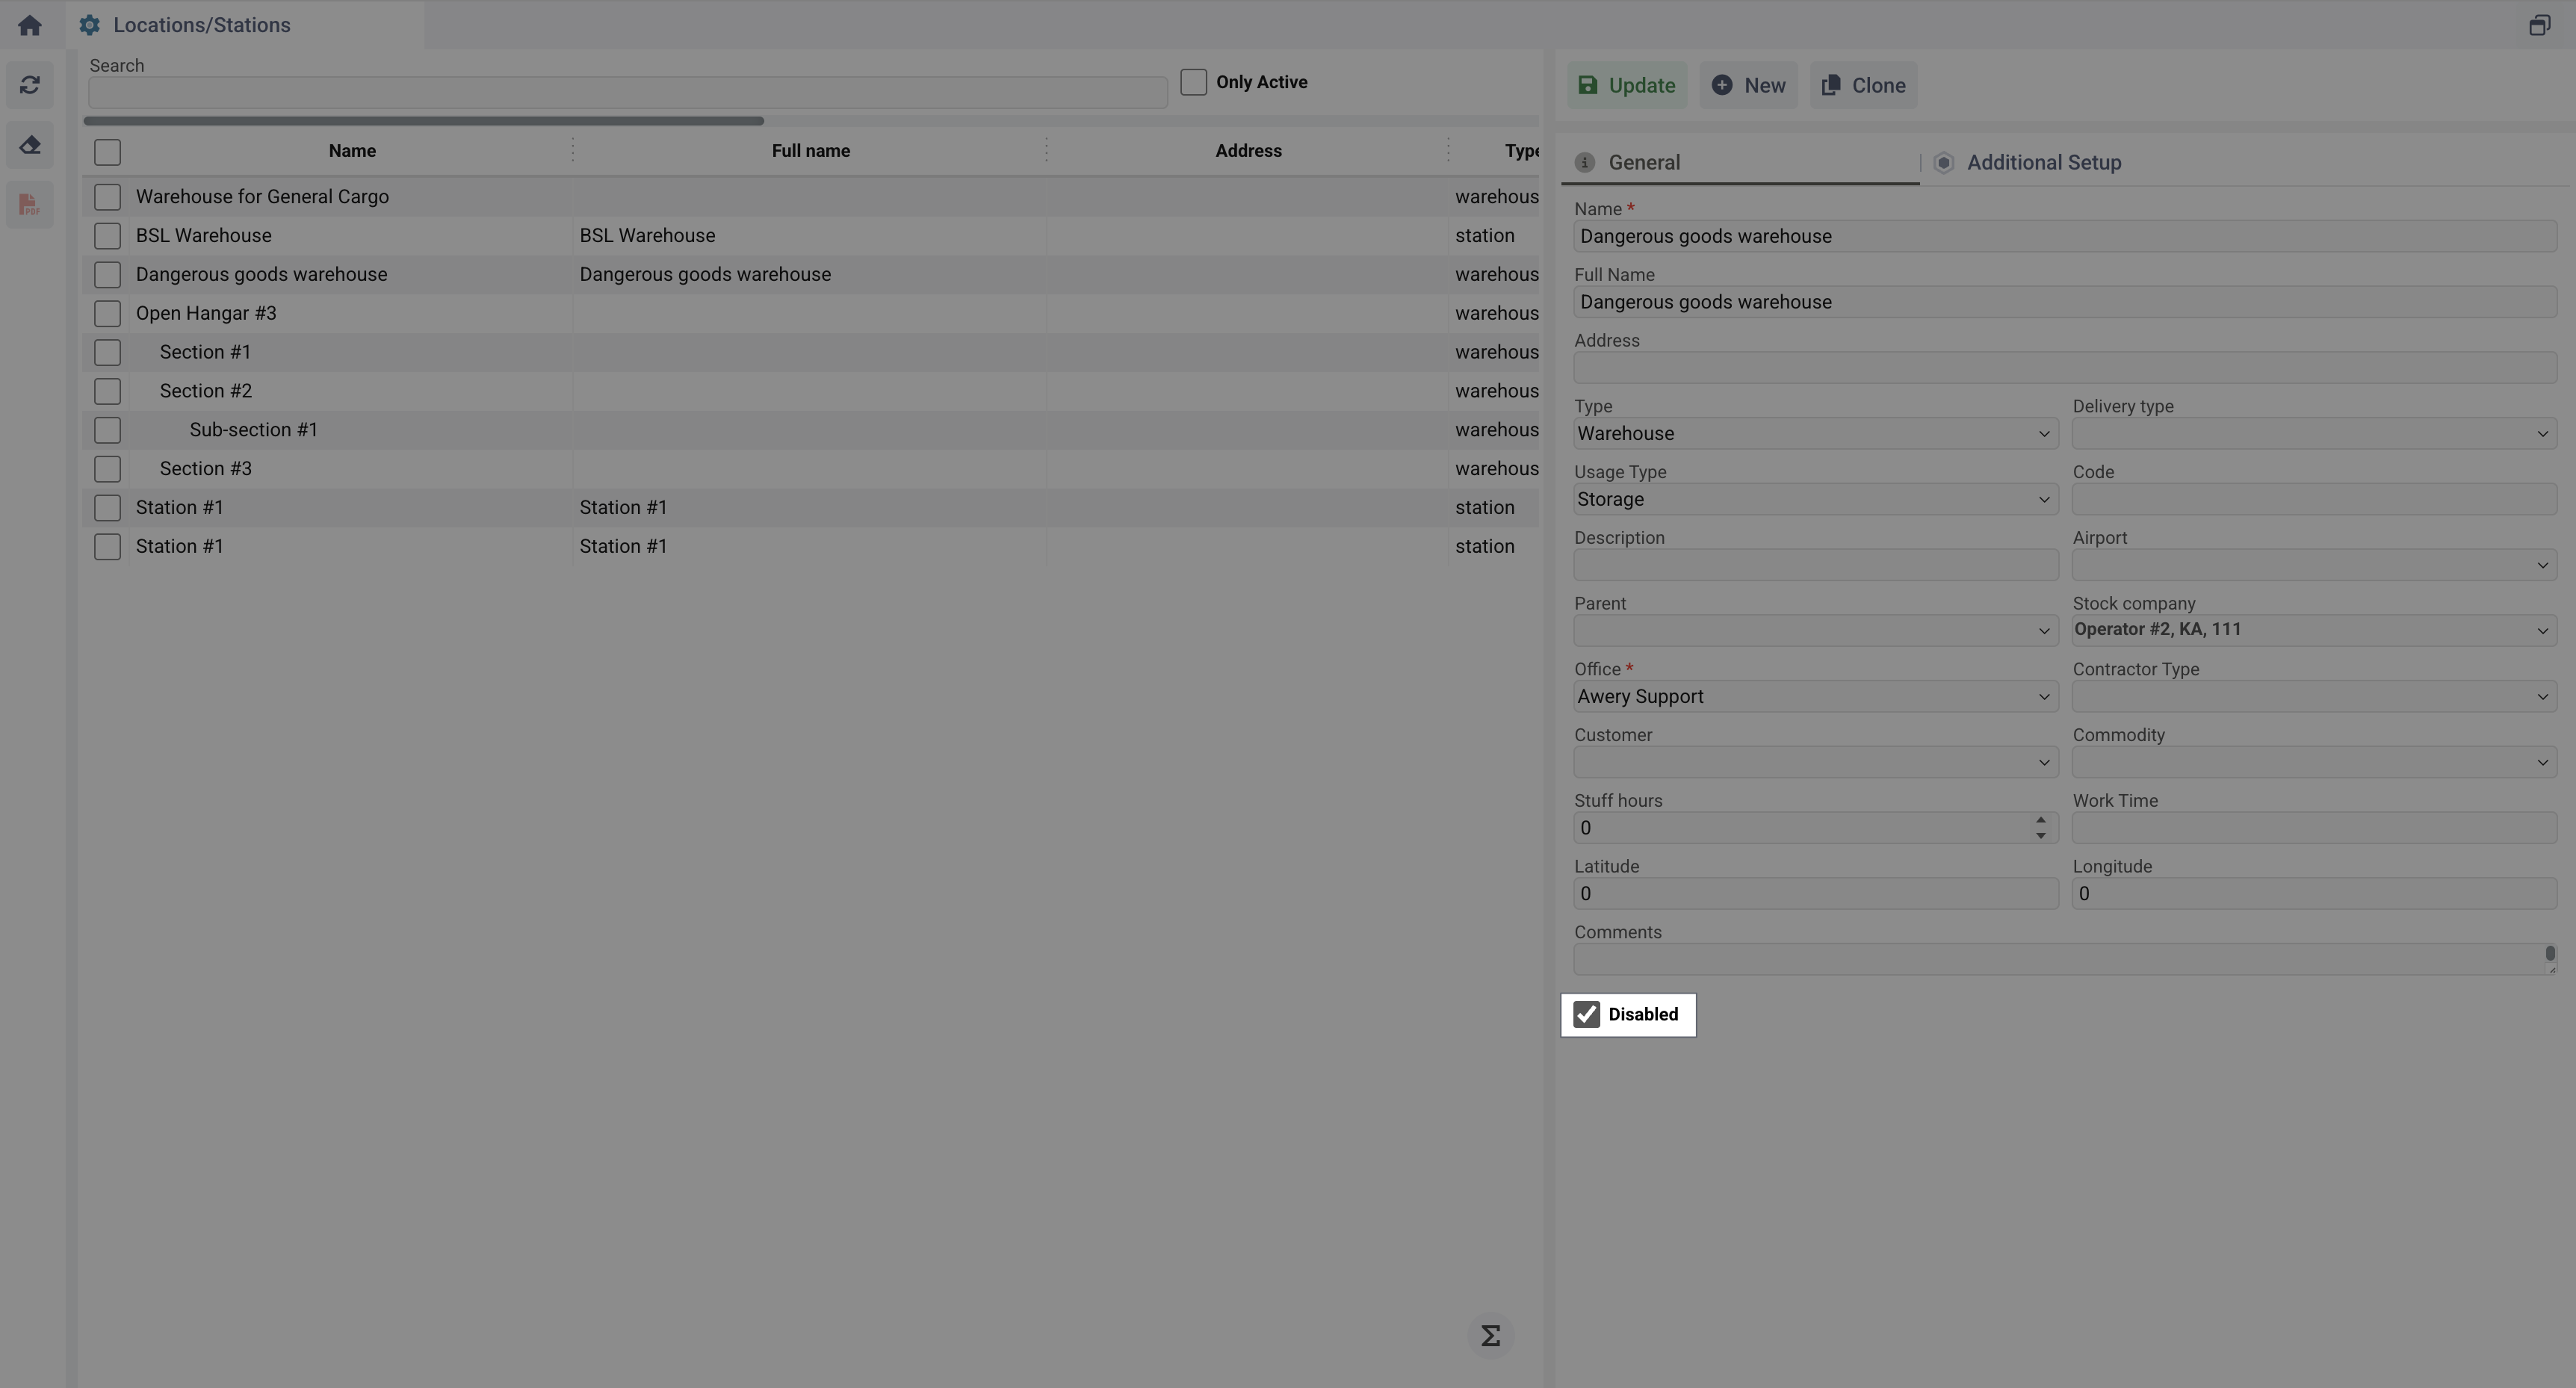
You can check all disabled warehouses by unticking the Only Active checkbox
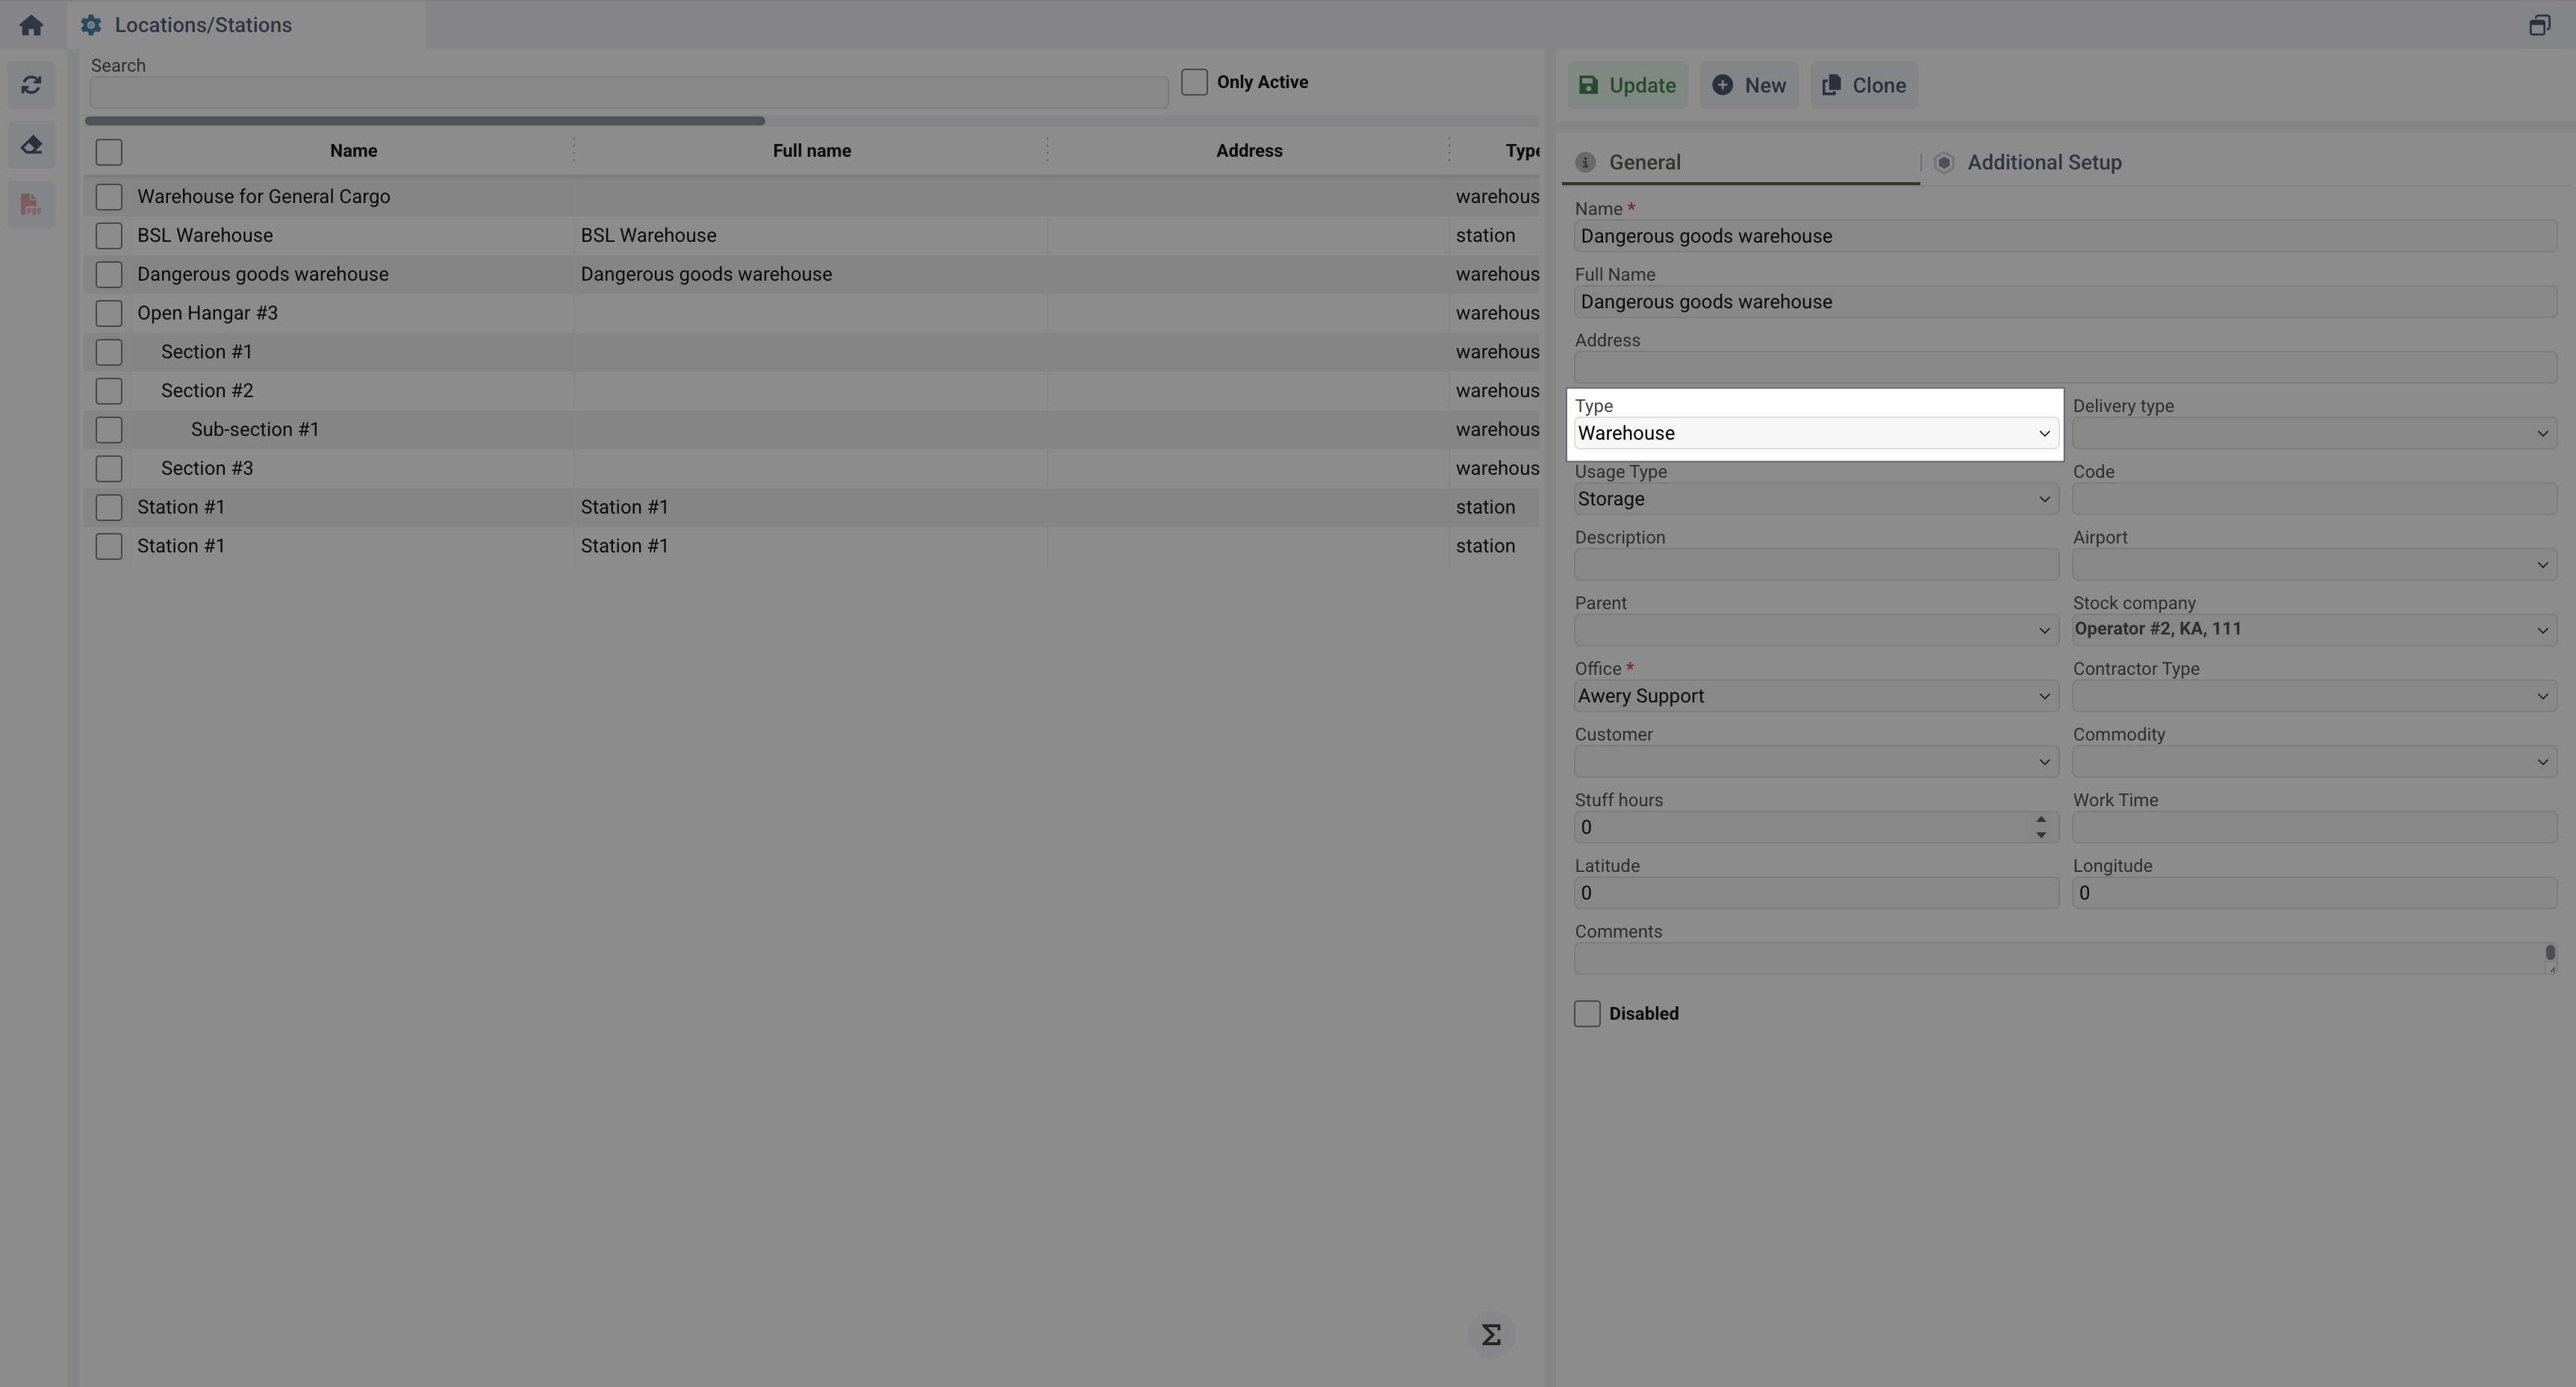
Main fields for Warehouse
To create a new warehouse, click New and fill in the following fields:
-
Name – Warehouse name. Used to display in all WH dropdown lists in the system.
-
Full Name – Full warehouse name. Information field to display.
-
Address – Address displayed on documents. Information field to display.
-
Type – Select warehouse type. Functional field, no need to set other from 'Warehouse' if looking for Cargo management.
-
Delivery Type – Specify warehouse purpose from the list of available in the system. Information field to display.
-
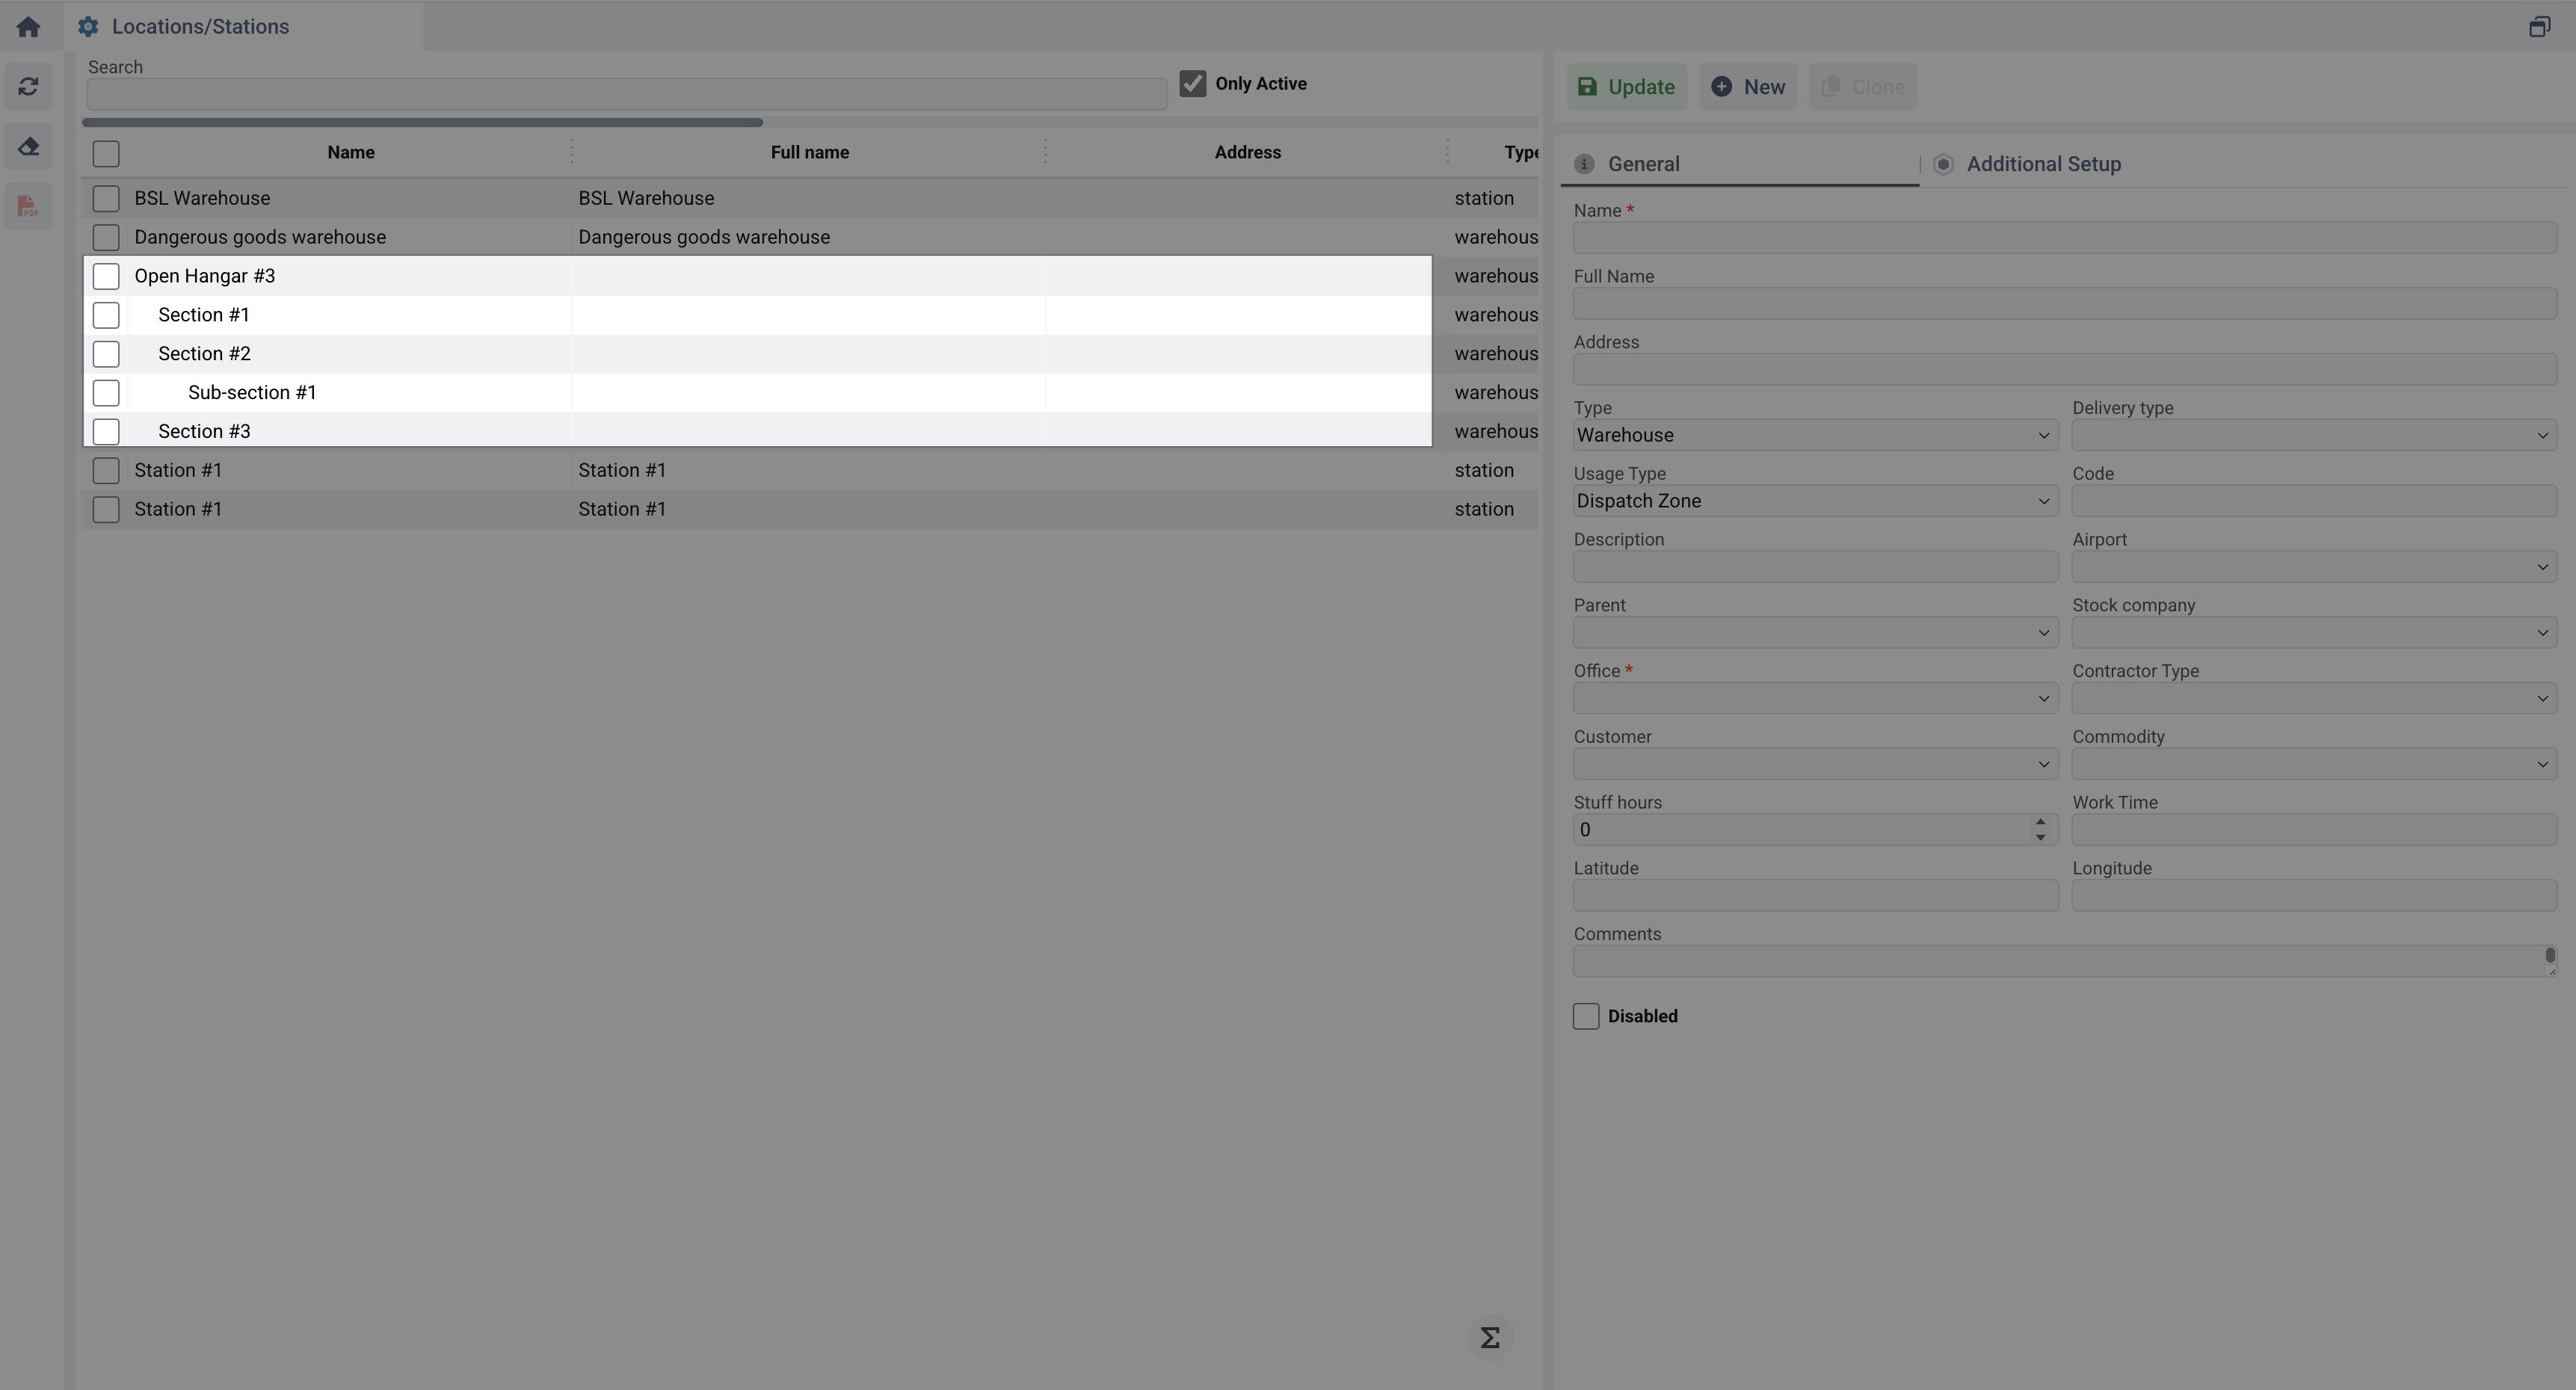
Usage Type - It’s the special type that describe how Cargo warehouse entry will be used with the airports. This type will appear for every entry in WH autocomplete system-wide. Current list of usage types:
-
Storage - The default warehouse type, where simple cargo storage occurs.
-
Acceptance Zone - Area (part of a warehouse or a separate building) where cargo will be received from the consignor (shipper).
-
X-Ray Zone - Area where cargo will be screened before shipment or upon receipt.
-
Outgoing Customs - Area for cargo that is or has not been inspected by the customs authority before shipment (export).
-
Ingoing Customs - Area for cargo that is or has not been inspected by the customs authority before receipt (import).
-
Build Up Area - An area where inspected cargo is stacked onto pallets or containers for further shipment.
-
Break Down Area - Area where pallets or containers received from a flight must be dismantled.
-
Dispatch Zone - An area where cargo awaits shipment, or an area where cargo is immediately unloaded upon arrival.
-
-
Code & Description – Identification details. Information field to display.
-
Airport – Nearest airport to the WH. Functional field where you can link certain Wh with airport. Used in filtering to automate WH selection for the shipment. Check the guide below
-
Parent – Main warehouse association. Used to define hierarchy in the list of Warehouse. For example, you have 1 hangar divided into different sections, so "Hangar" will be the main one, "Section #1", "Section #2", "Section #3" will be its children.
-
Stock Company – Airlines using the warehouse. The list of available options will be filtered by specified office. Multiple can be selected.
-
Office – System office related to the warehouse.
-
Contractor Type – Select Customer and choose a client. Information field to display.
-
Commodity – Type of stored cargo.
-
Staff Hours – Working hours of warehouse staff. Information field to display.
-
Work Time – Warehouse operation hours. Information field to display.
-
Latitude & Longitude – Warehouse coordinates. Information field to display.
-
Comments - Fields for any remarks related to the Warehouse.
-
Disabled – Mark warehouse as inactive if needed.
Hierarchical warehouse setup
As mentioned in the previous point, to divide the main warehouse into smaller sections or create group of WH, fill in the Parent field and specify the main warehouse it belongs to. The interface will display it as a tree.
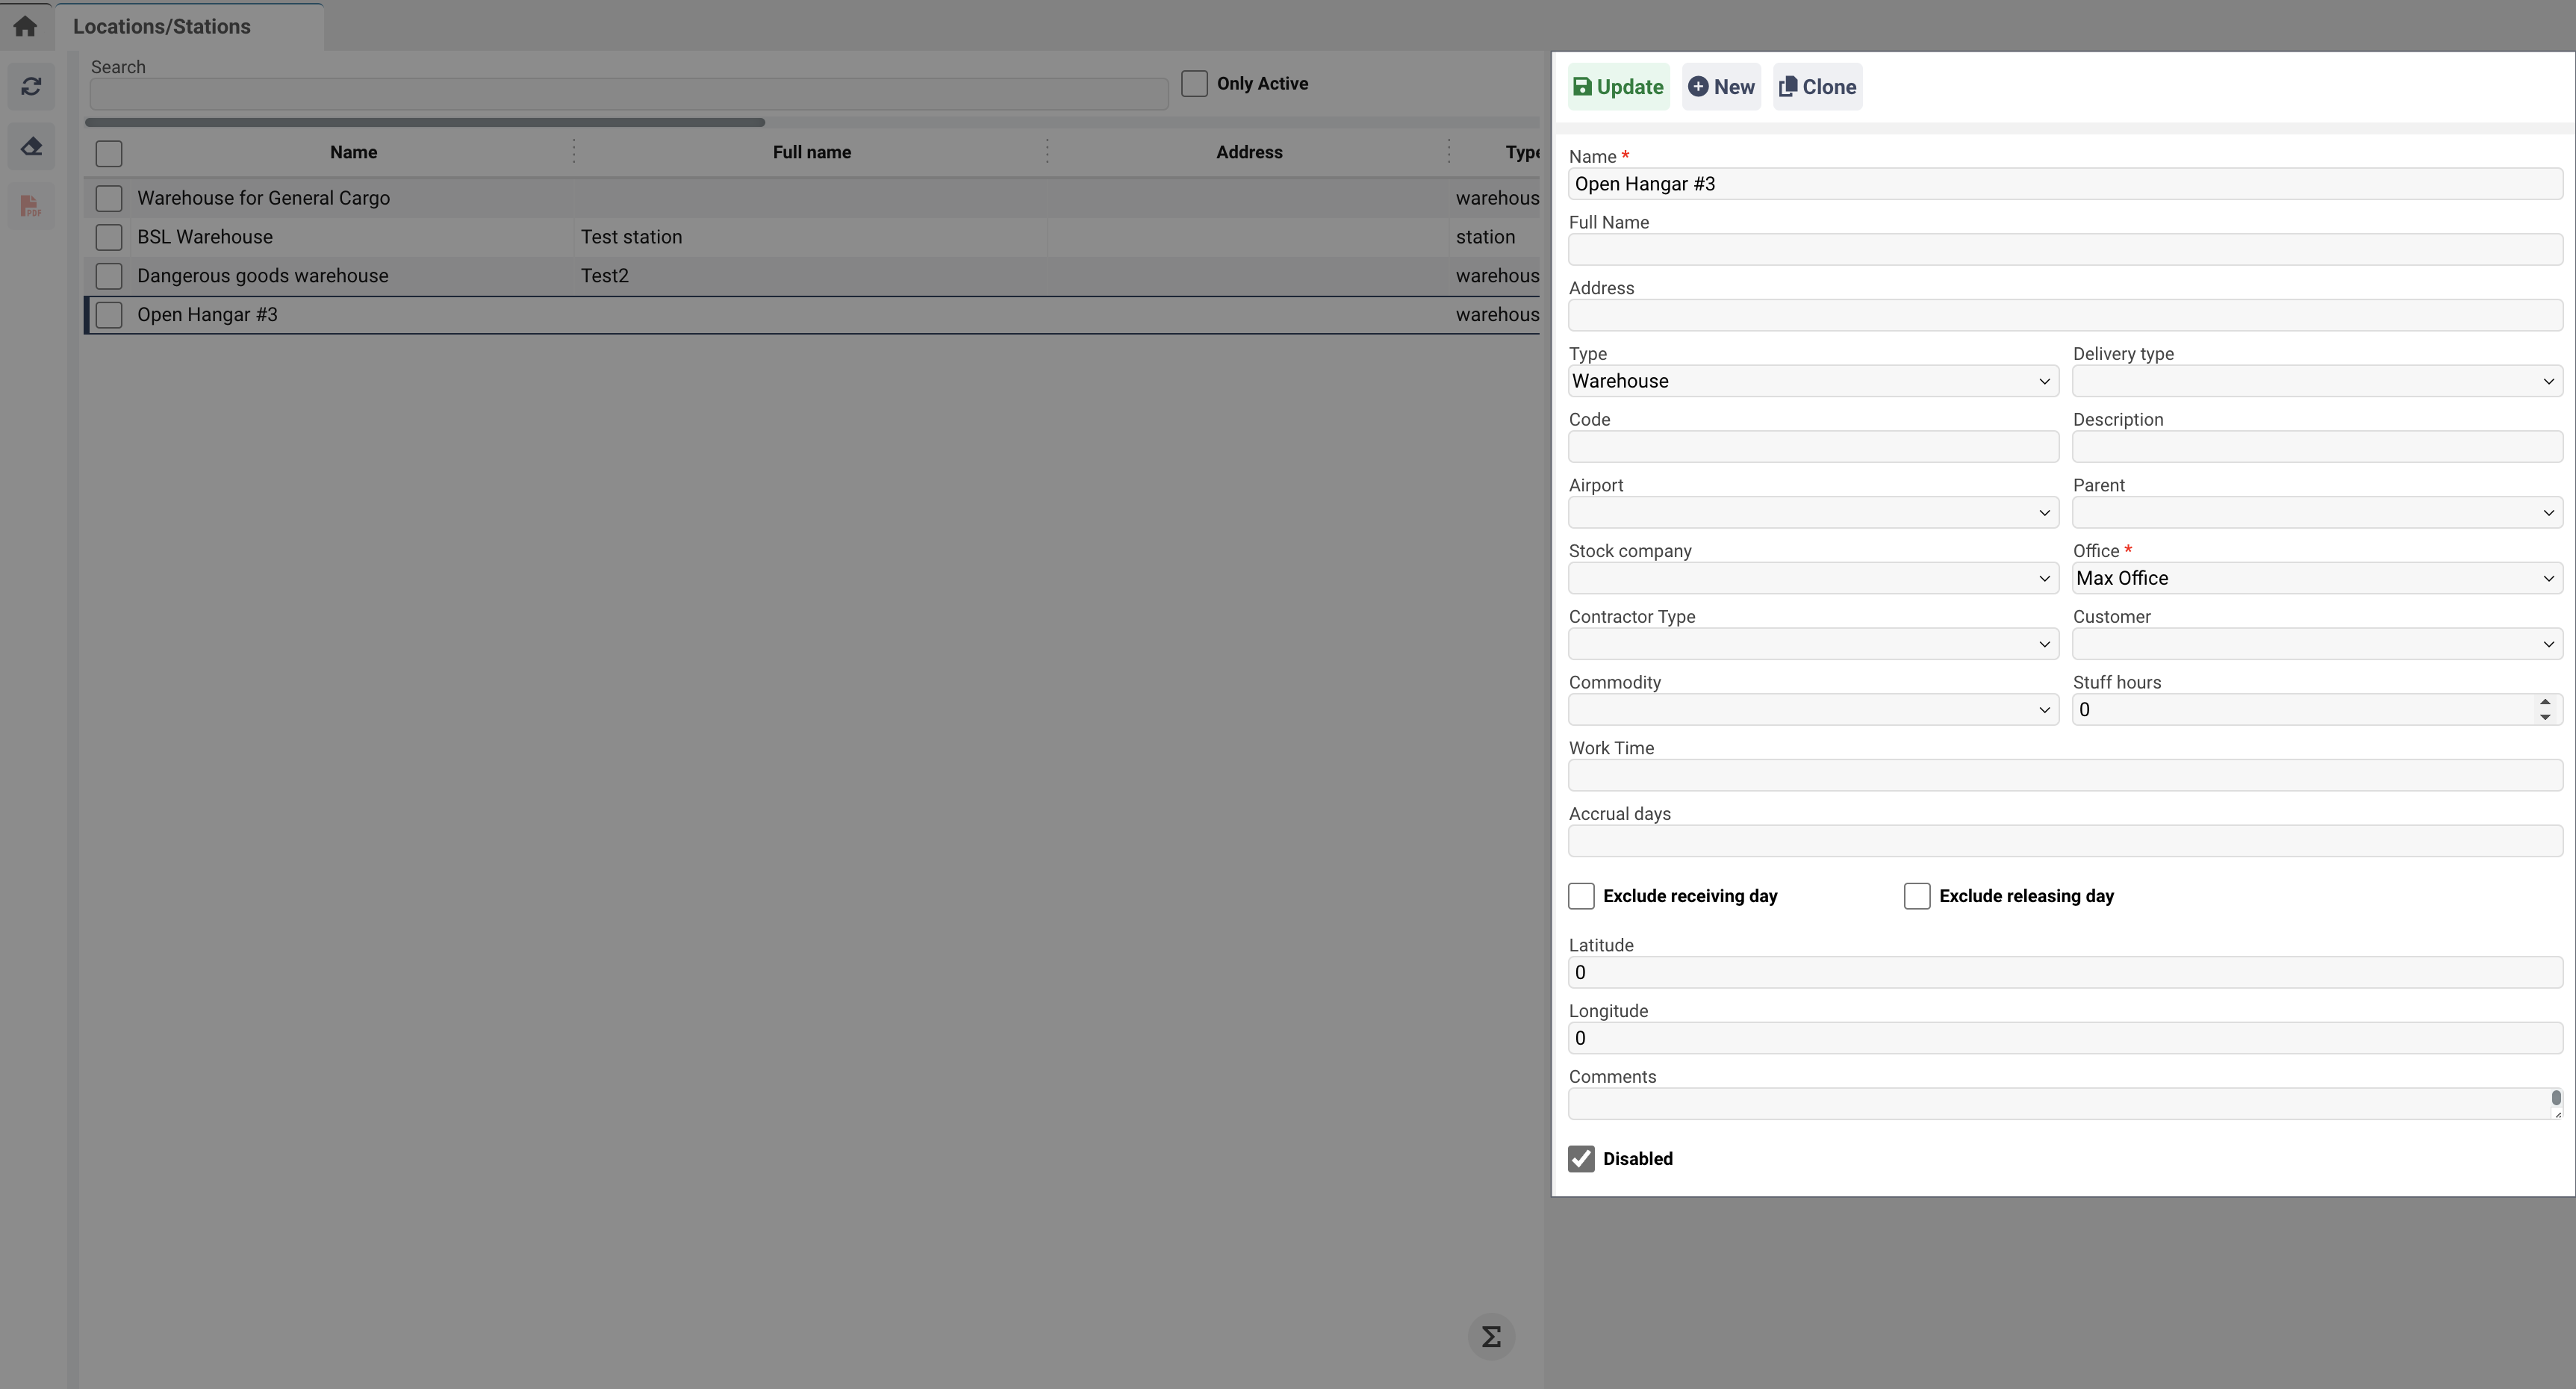
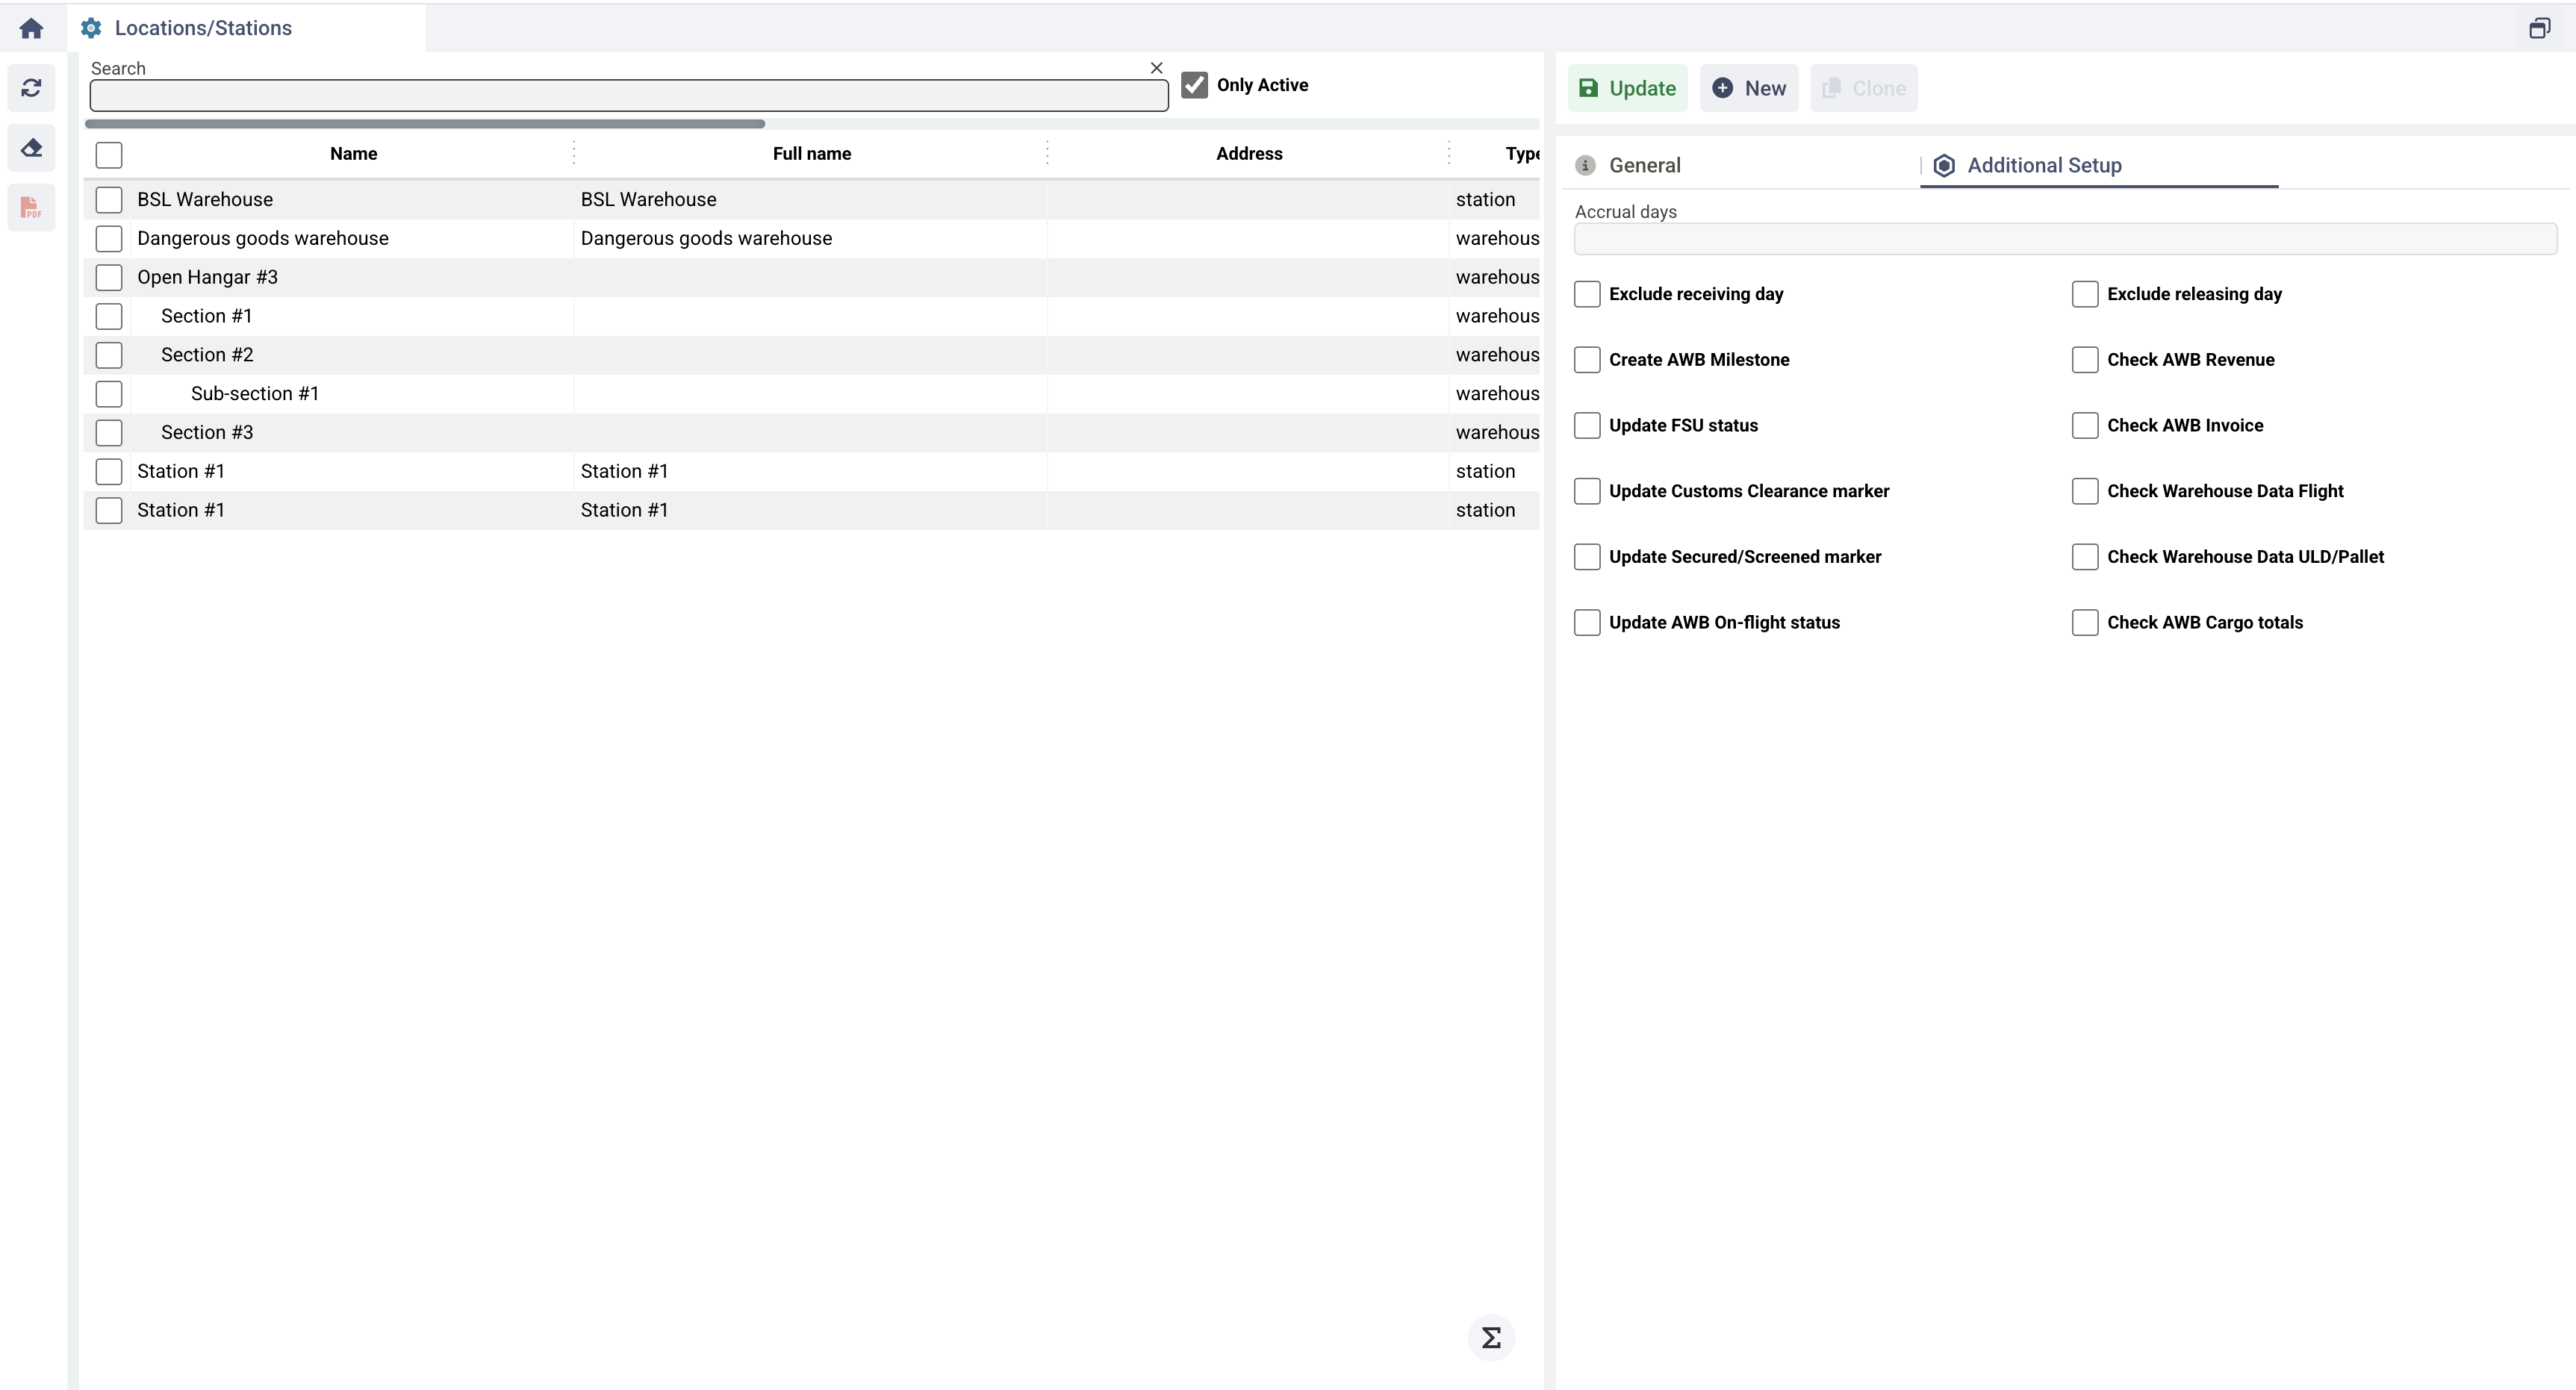
Additional fields for additional Warehouse setup
In the Additional Setup tab, you can find some additional markers and fields that can be useful for various processes, such as importing and exporting cargo.
-
Accrual Days - Free storage days. Used when calculating the cost of storage.
-
Exclude Receiving Day - Exclude the first day of storage from the calculation of cost.
-
Exclude Release Day - Exclude the last day of storage from the calculation of cost.
-
Create AWB Milestone - When the cargo is received at the warehouse, the system will create the AWB Milestone based on the 'Usage Type' selected in WH.
-
Check AWB Revenue - The system will not allow the cargo to be accepted into WH if the revenue was not created based on Warehouse Data.
-
Update FSU status - When the cargo is received at the warehouse, the system will update the AWB FSU status based on the 'Usage Type' selected in WH.
-
Check AWB Invoice - The system will not allow the cargo to be accepted into WH if the Invoiсe was not issues for AWB.
-
Update Customs Clearance marker - When the cargo is received at the warehouse, the system will mark shipment as Customs Cleared.
-
Check Warehouse Data Flight - The system will not allow the cargo to be accepted into WH if flight is not specified.
-
Update Secured/Screened marker - When the cargo is received at the warehouse, the system will mark shipment as Secured/Screened.
-
Check Warehouse Data ULD/Pallet - The system will not allow the cargo to be accepted into WH if ULD/Pallet is not specified.
-
Update AWB On-flight status - When the cargo is received at the warehouse, the system will update the AWB On-Flight status based on the 'Usage Type' selected in WH.
-
Check AWB Cargo totals - When cargo arrives at the warehouse, the system will check whether more cargo has been received than indicated in the AWB.
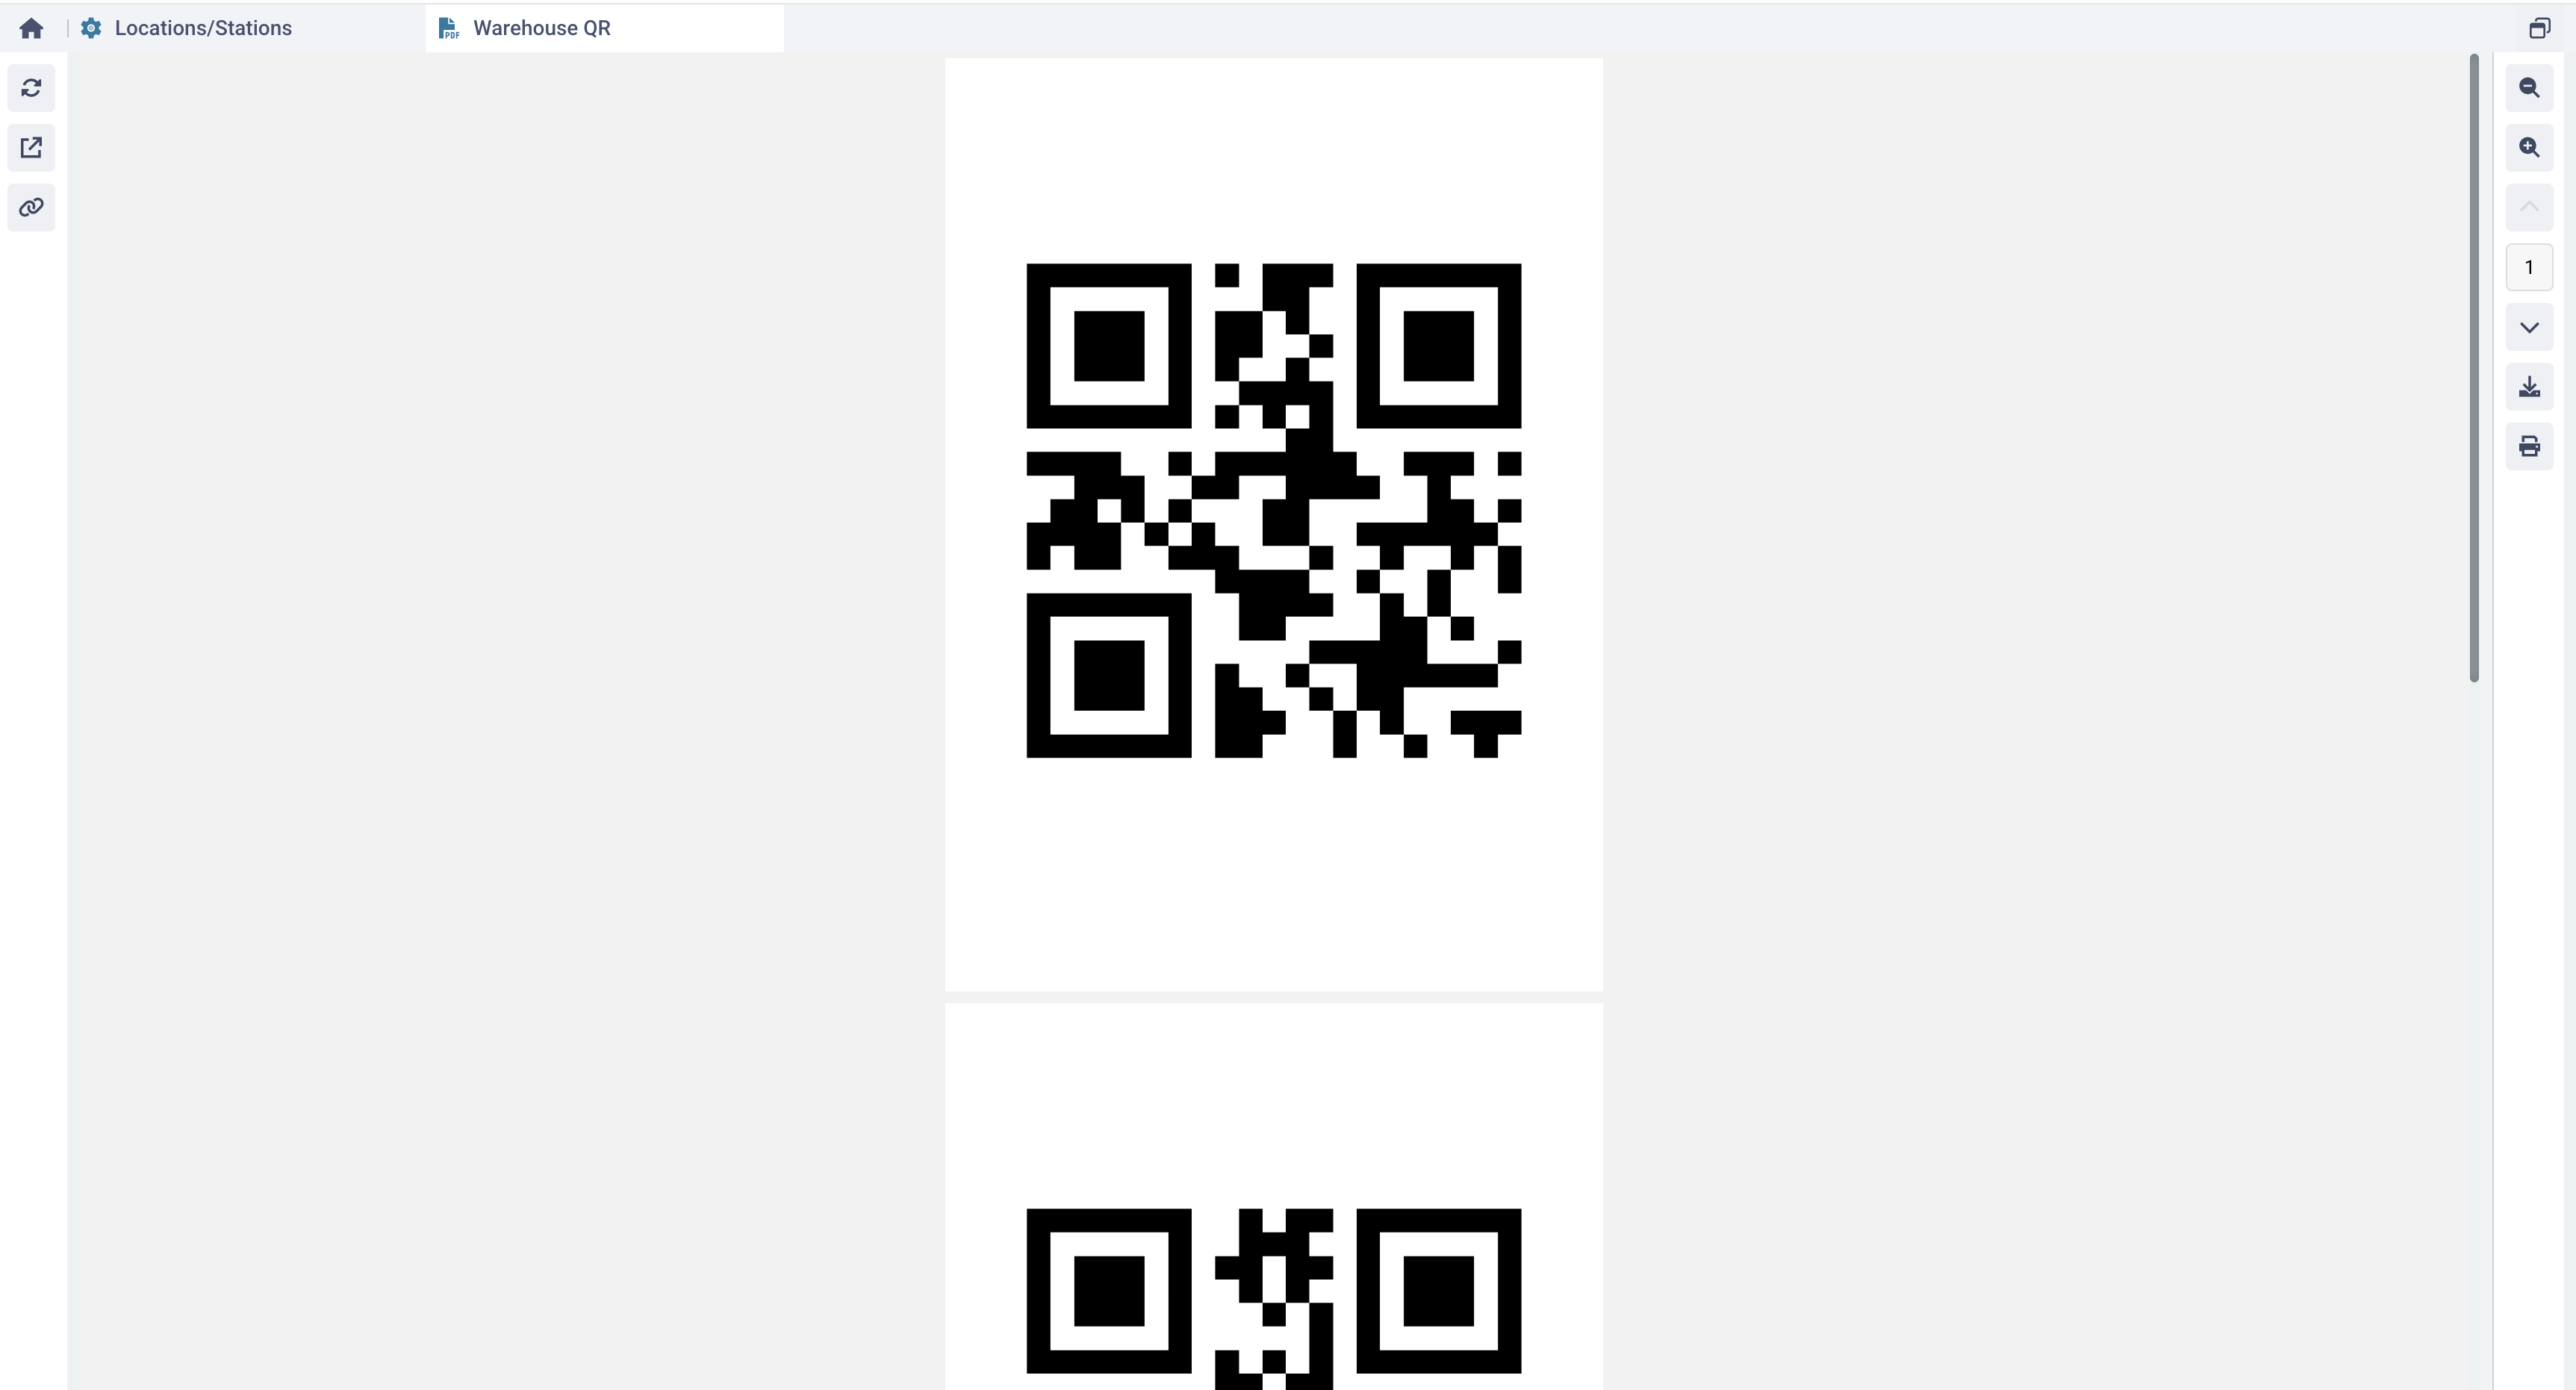
Generating a QR Code
You can generate a special QR code for a warehouse in Locations/Stations. It can be used to identify the warehouse on-site using the Awery ERP mobile app. For it
-
Select one or many create WHs from the list
-
Click Generate QR Code in the left side-bar
-
The QR code contains the internal Warehouse identifier.
-

AWB & Warehouse Management
Shipment Database
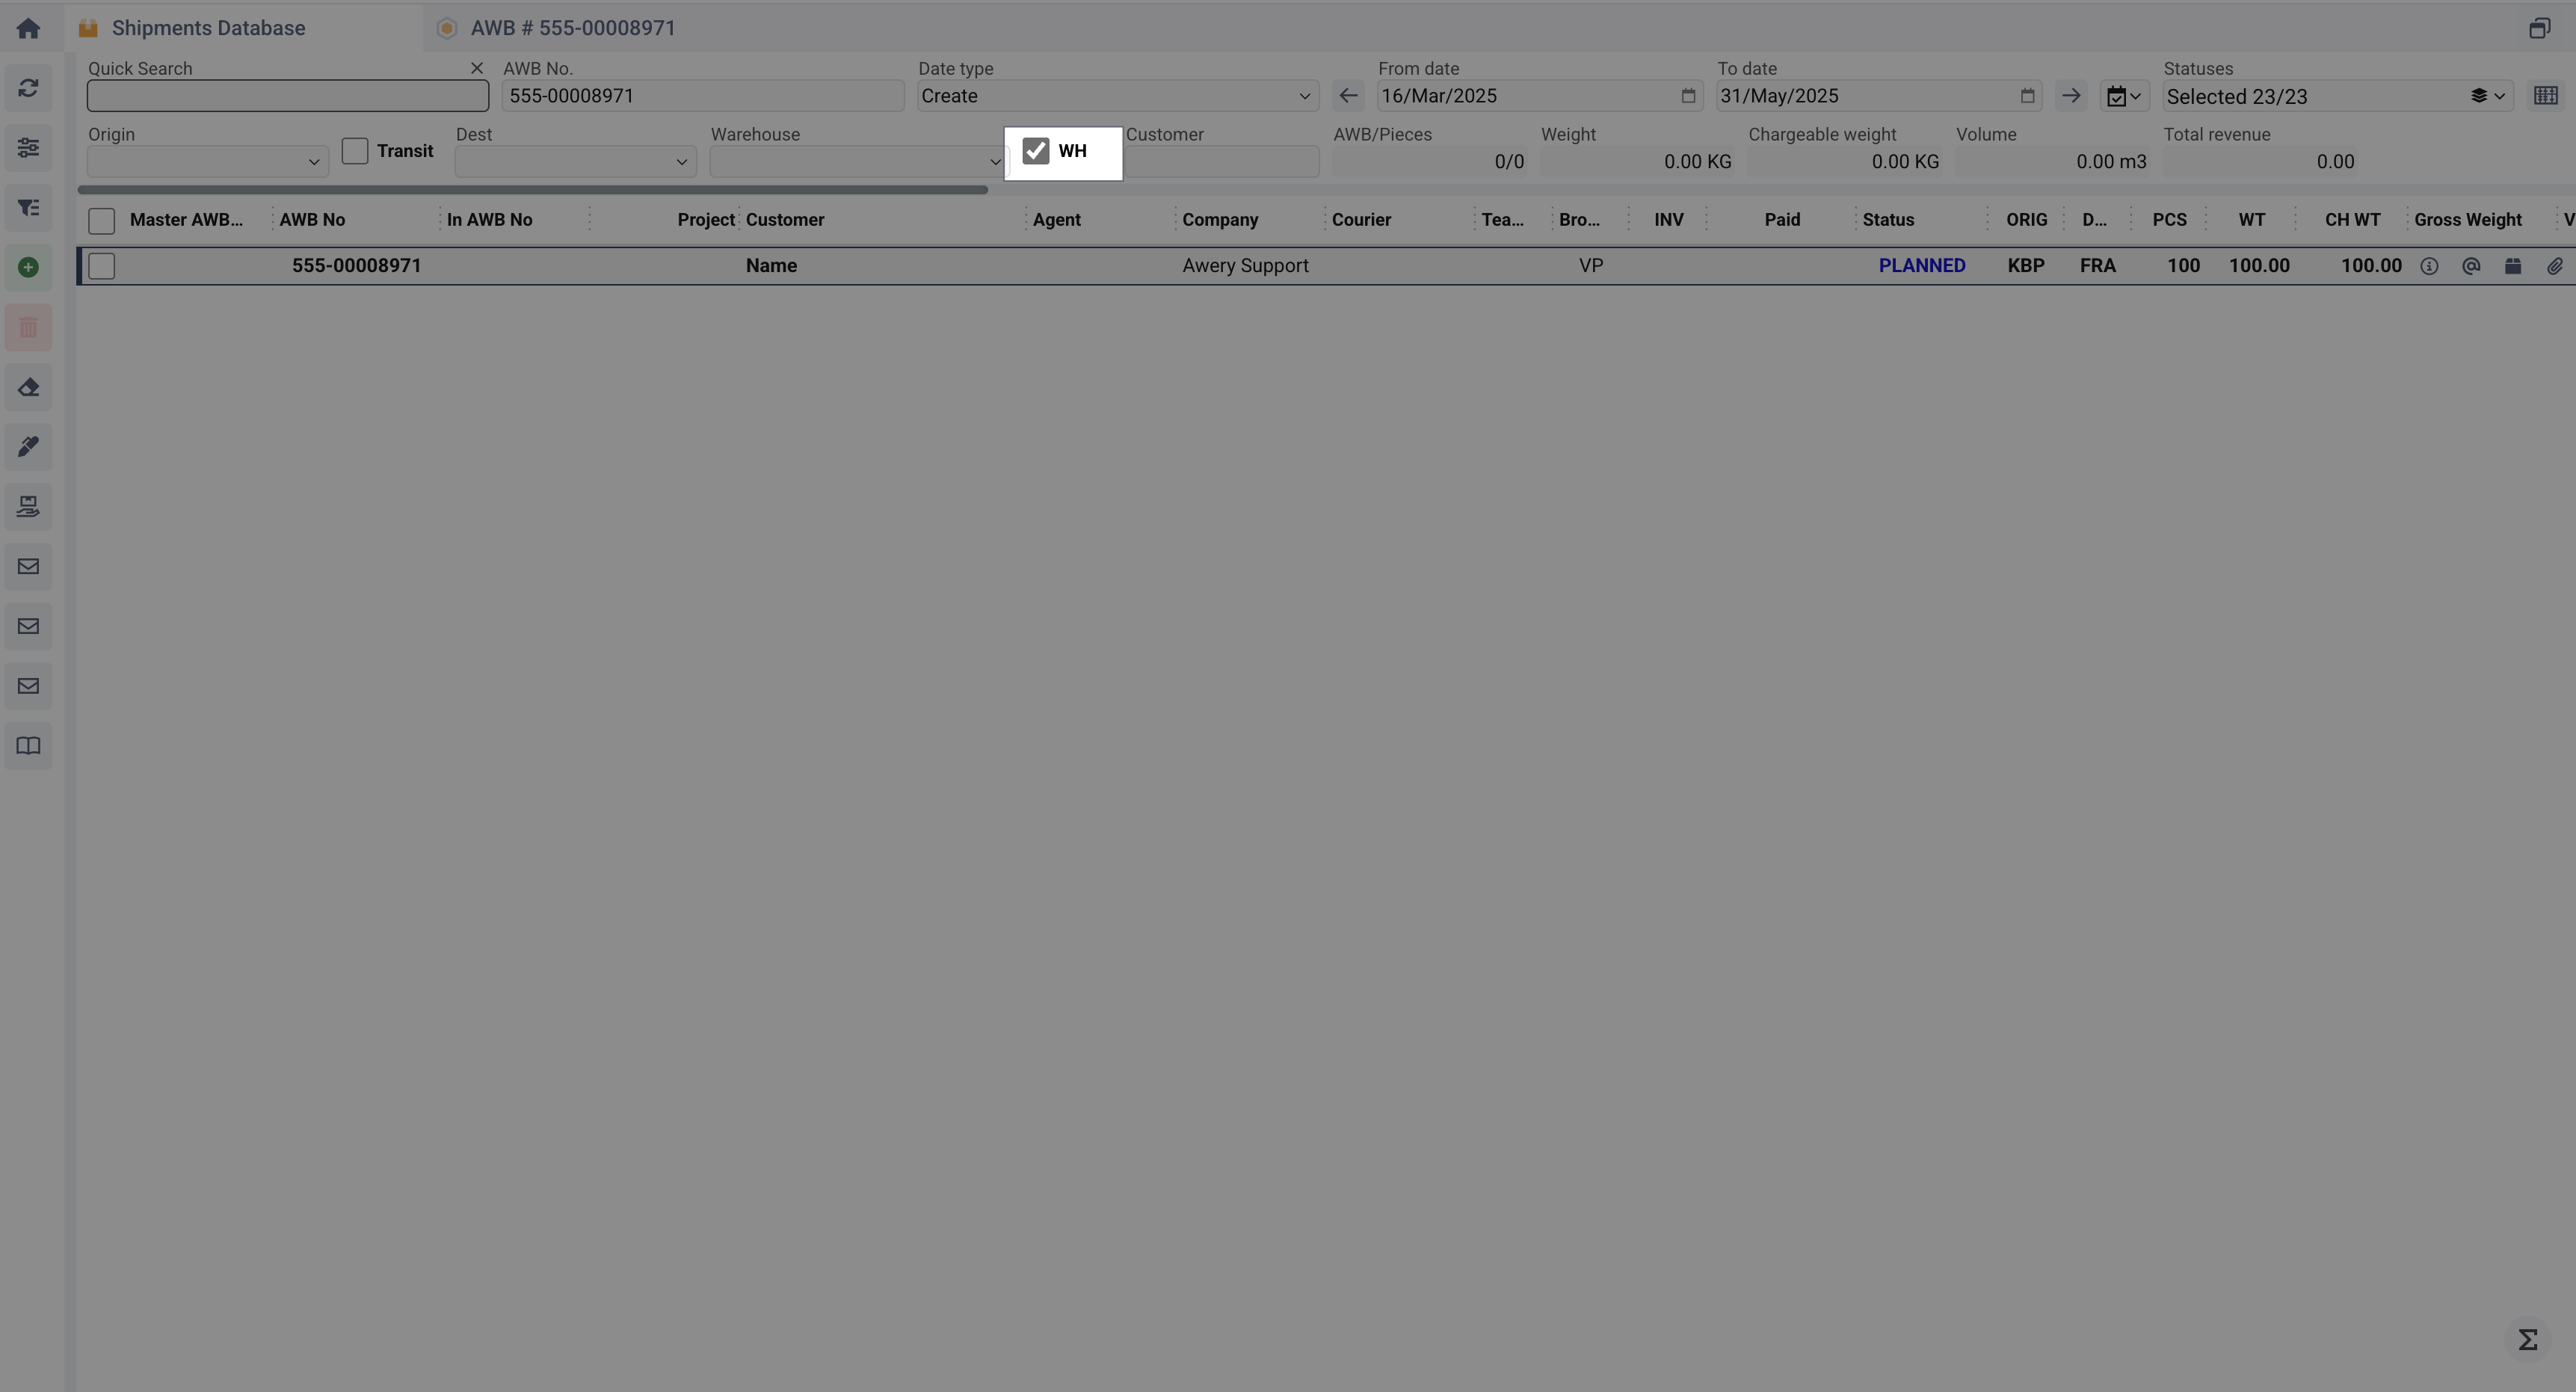
You can filter AWBs by specific warehouse in the Shipment Database.
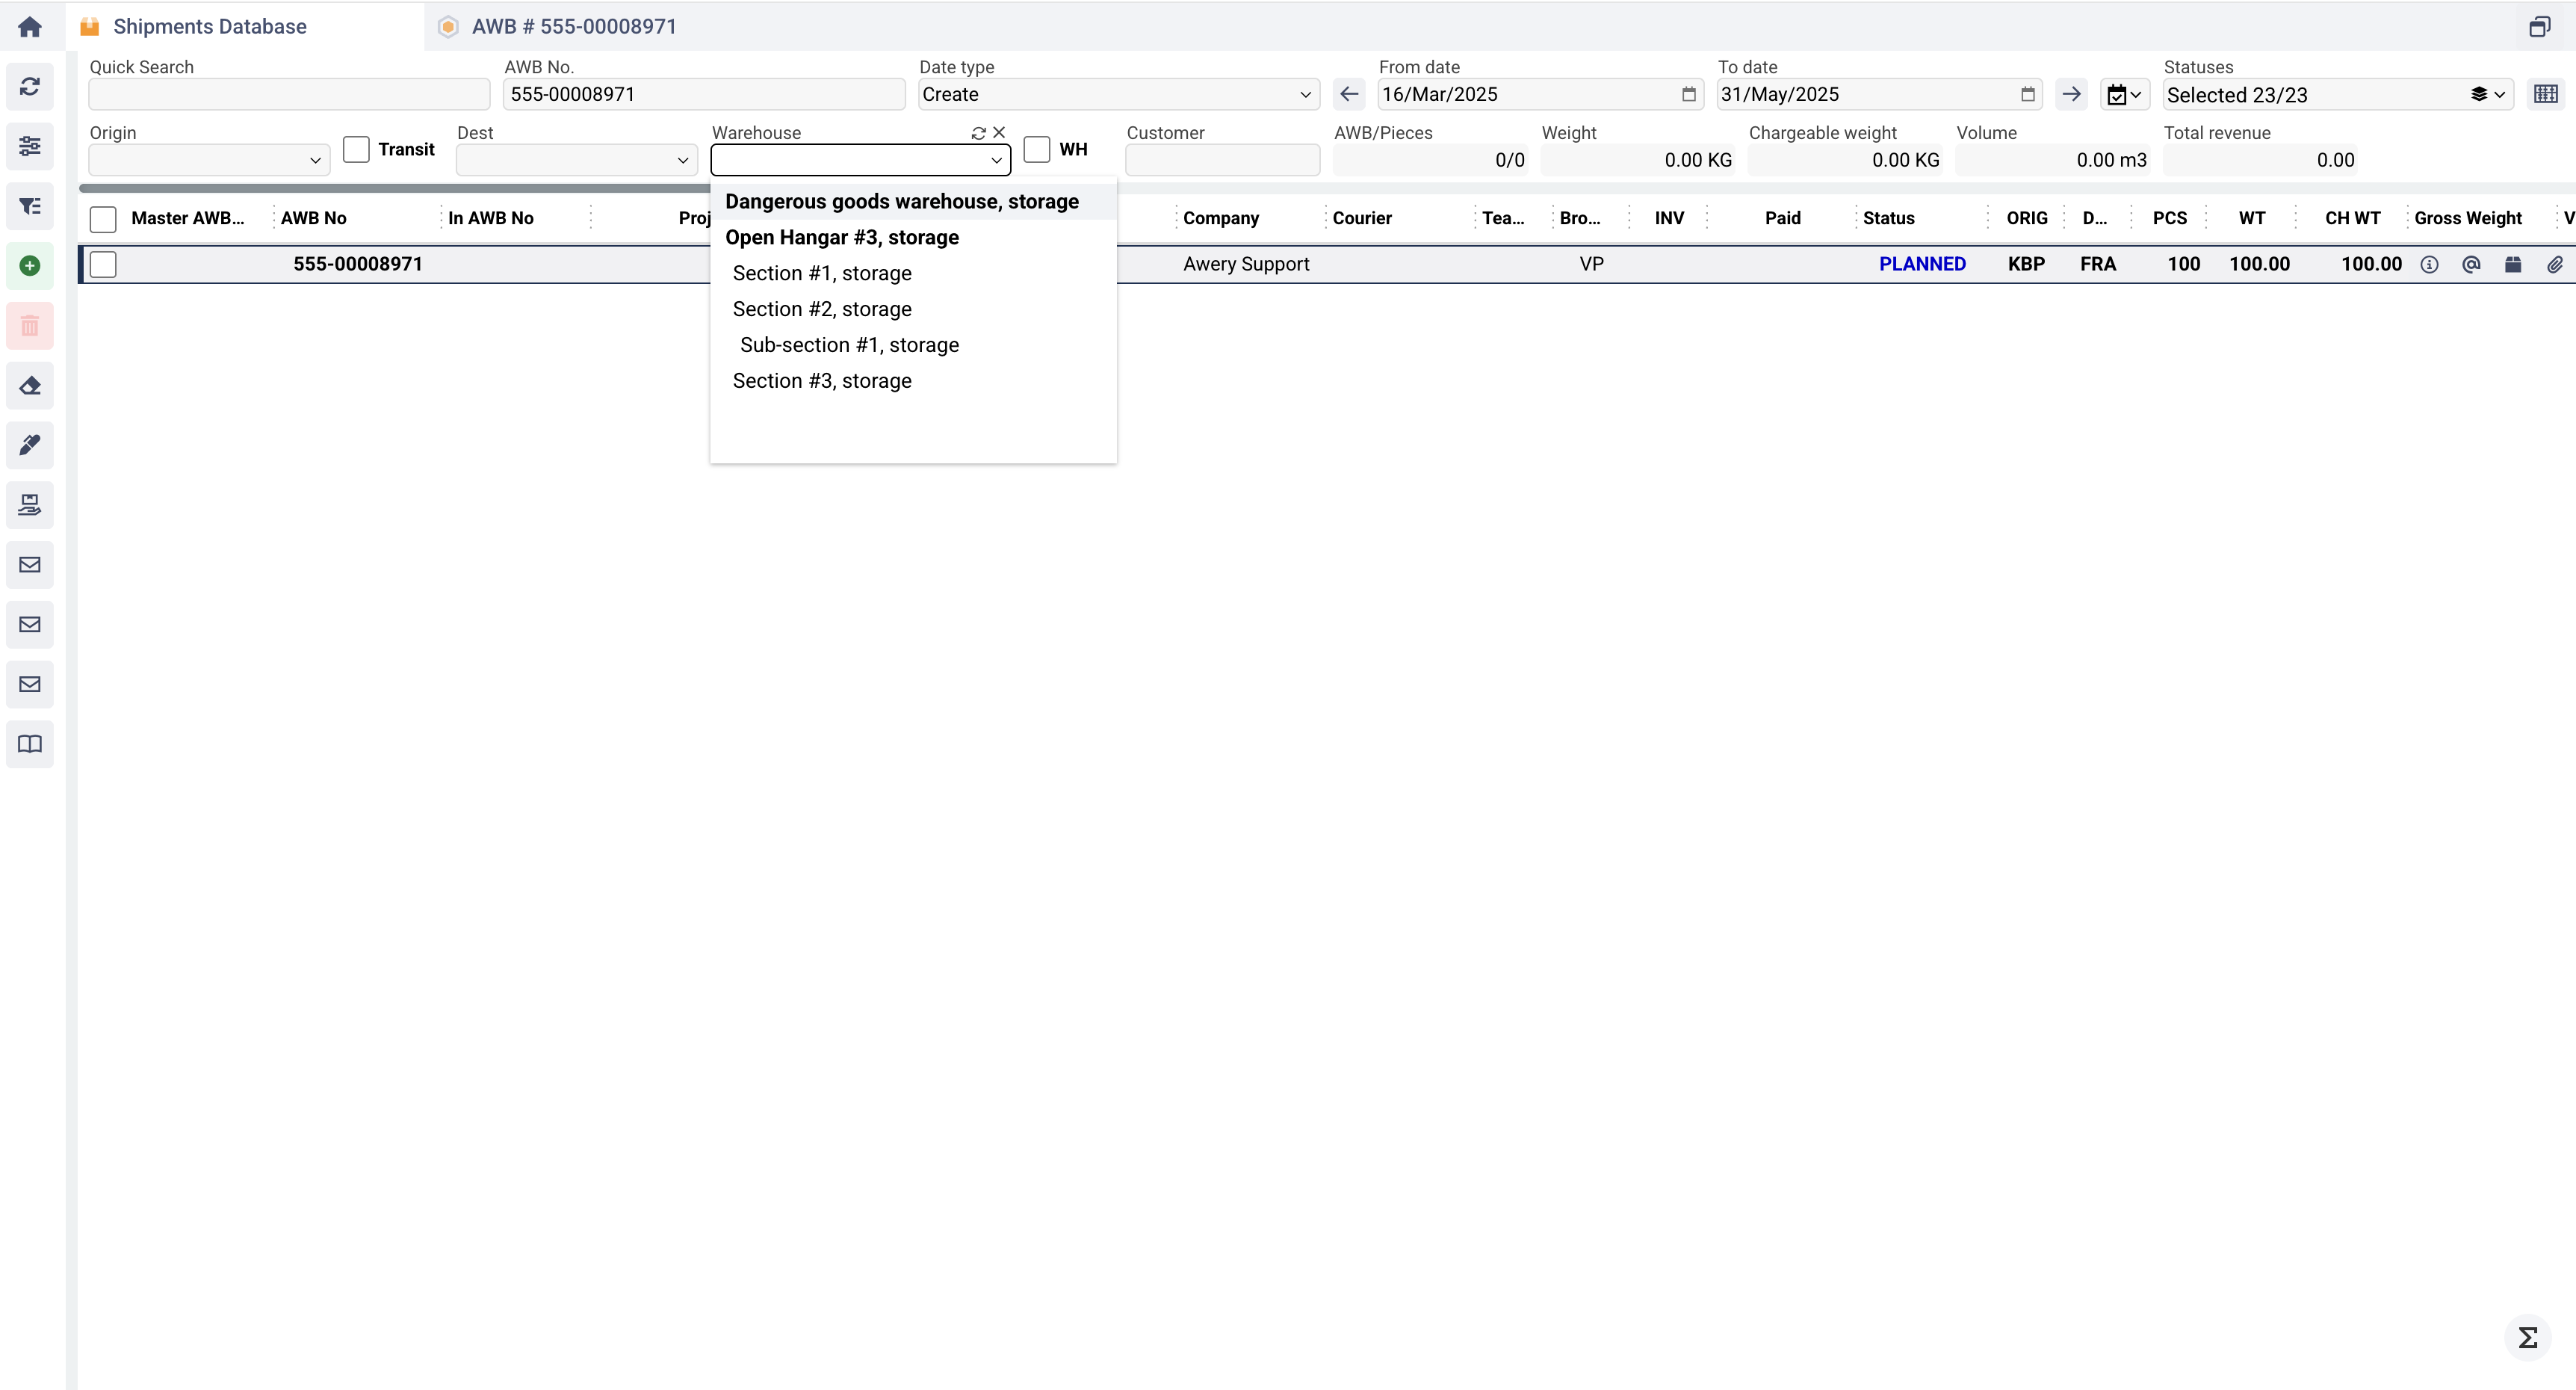
When the WH checkbox is selected, all AWBs are displayed in which at least one undeleted record has been created for warehouse data without an Out Date.
Warehouse Fields in AWB
-
The WH (Warehouse) field indicates where the cargo is stored at the point of departure.
-
The Dest. WH (Destination Warehouse) field indicates where the cargo will be stored at the point of arrival.
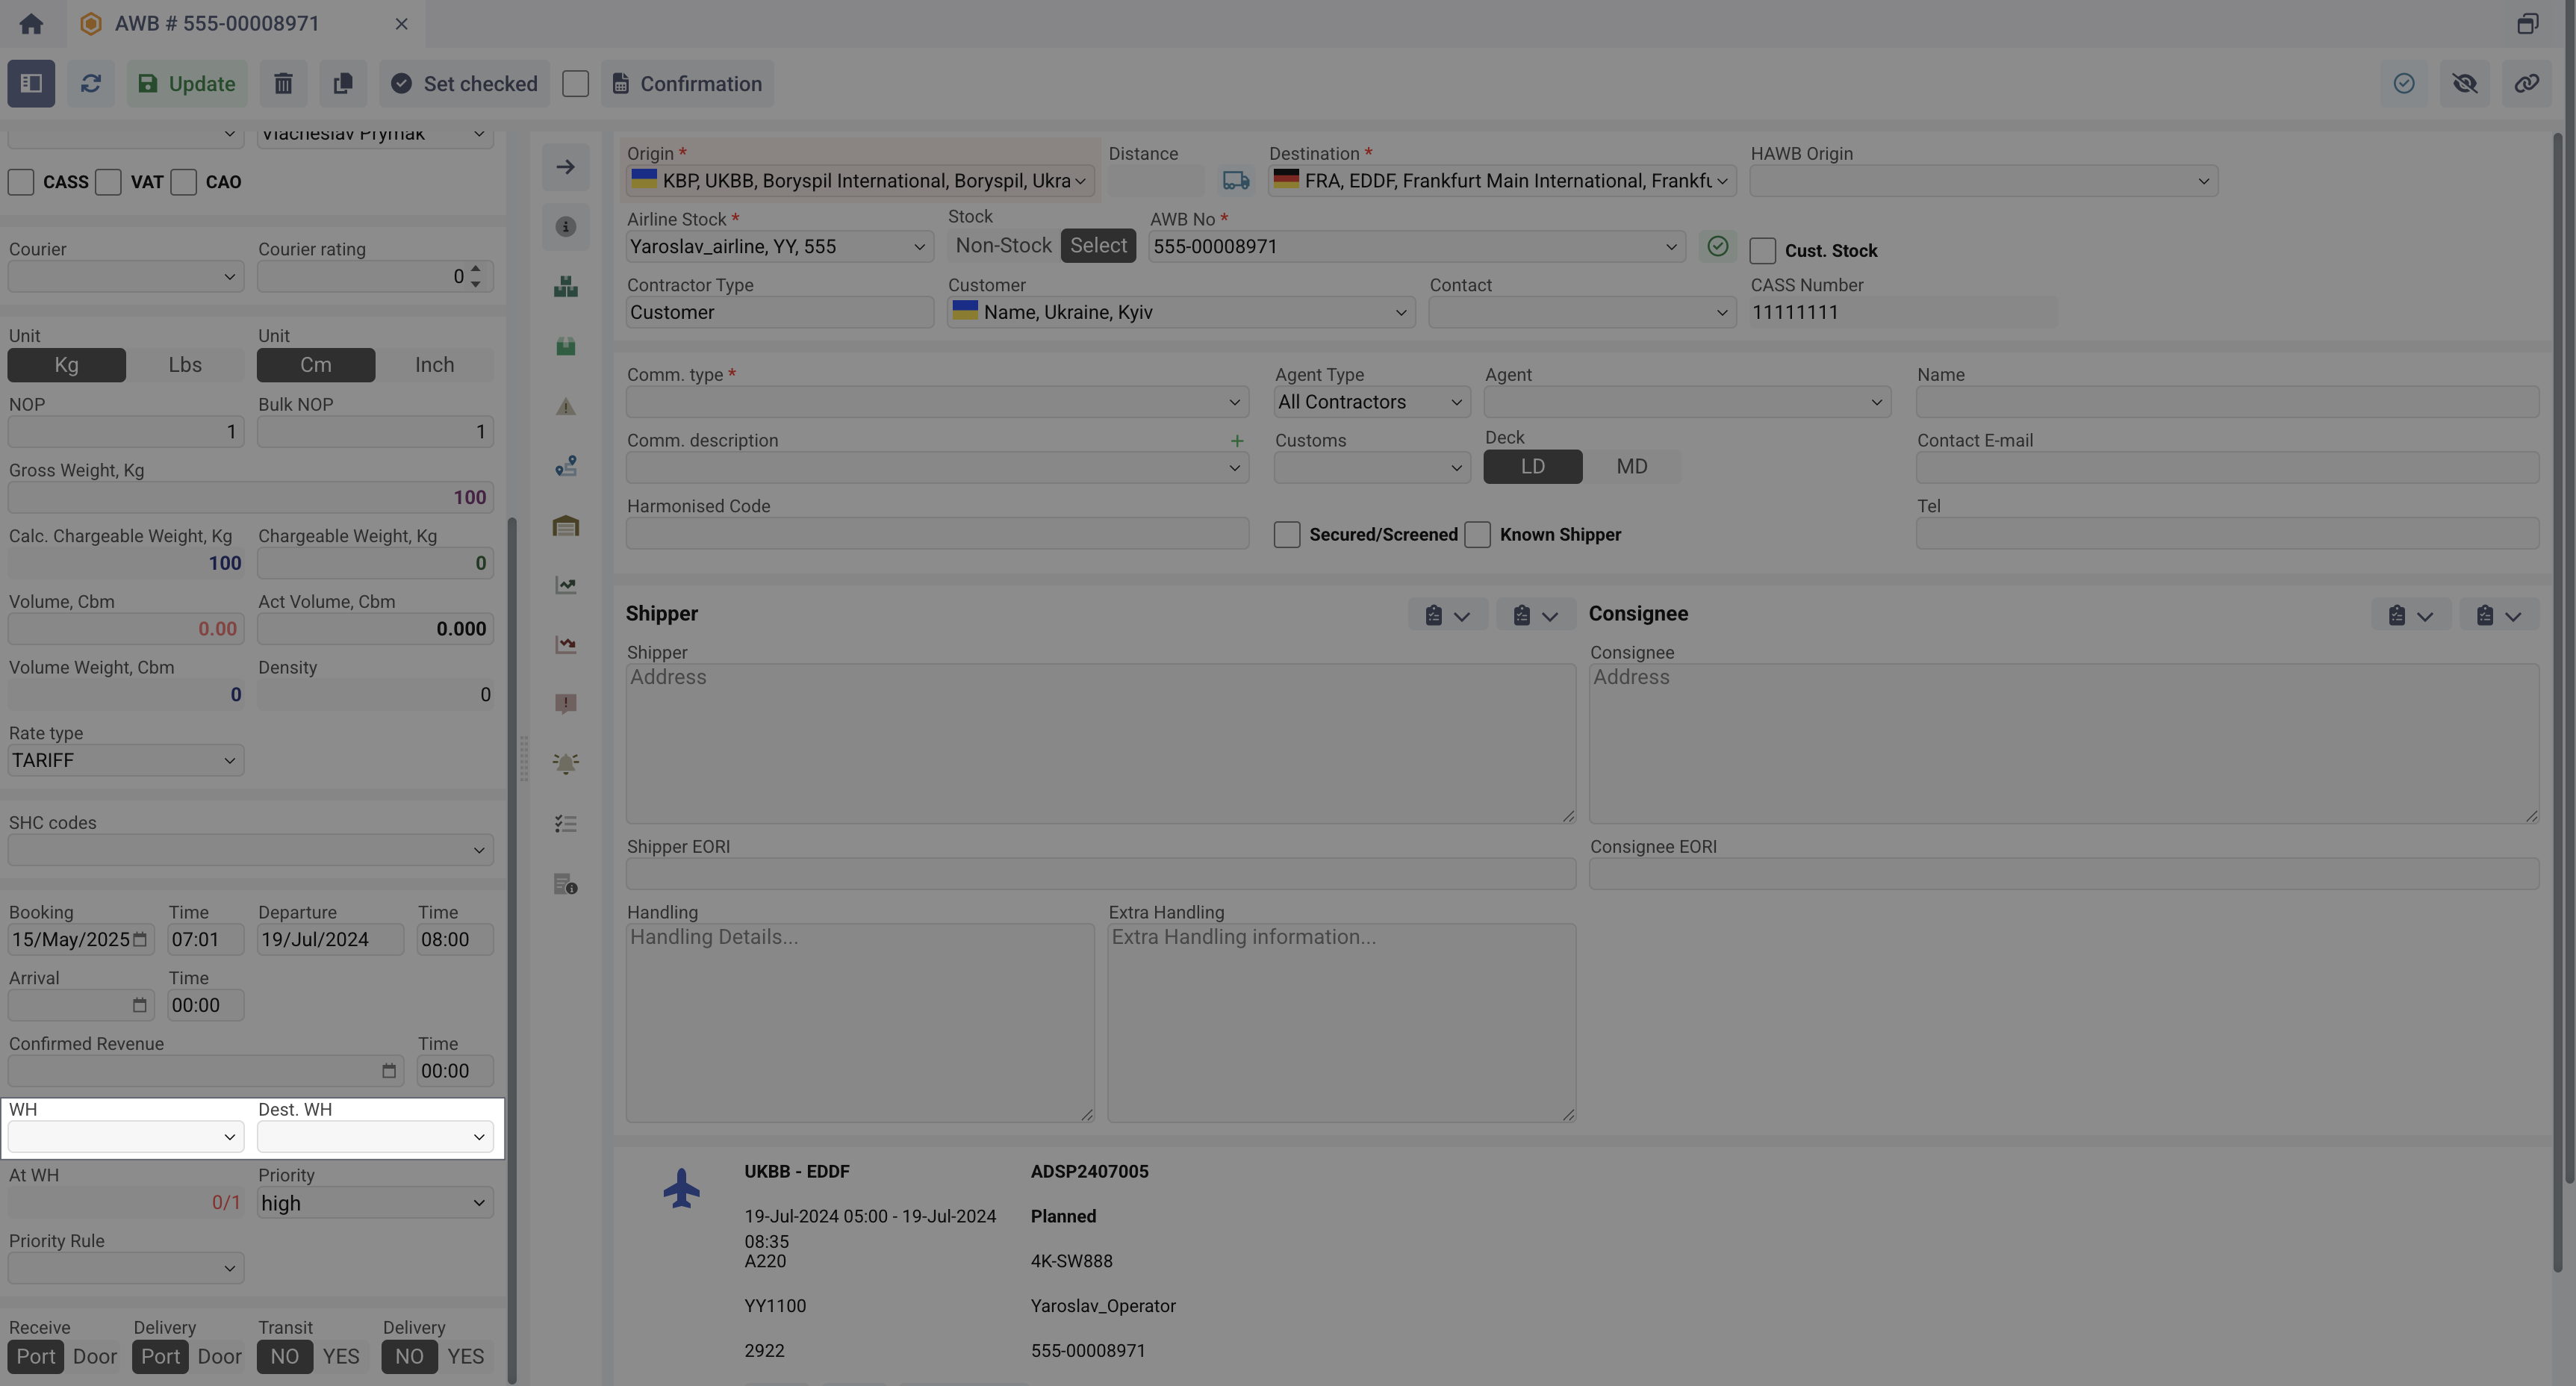
Both fields can be hidden by permissions if your business process requires it. WH can be set as required for shipment.
Also when creating an AWB, you can also specify the WH field.
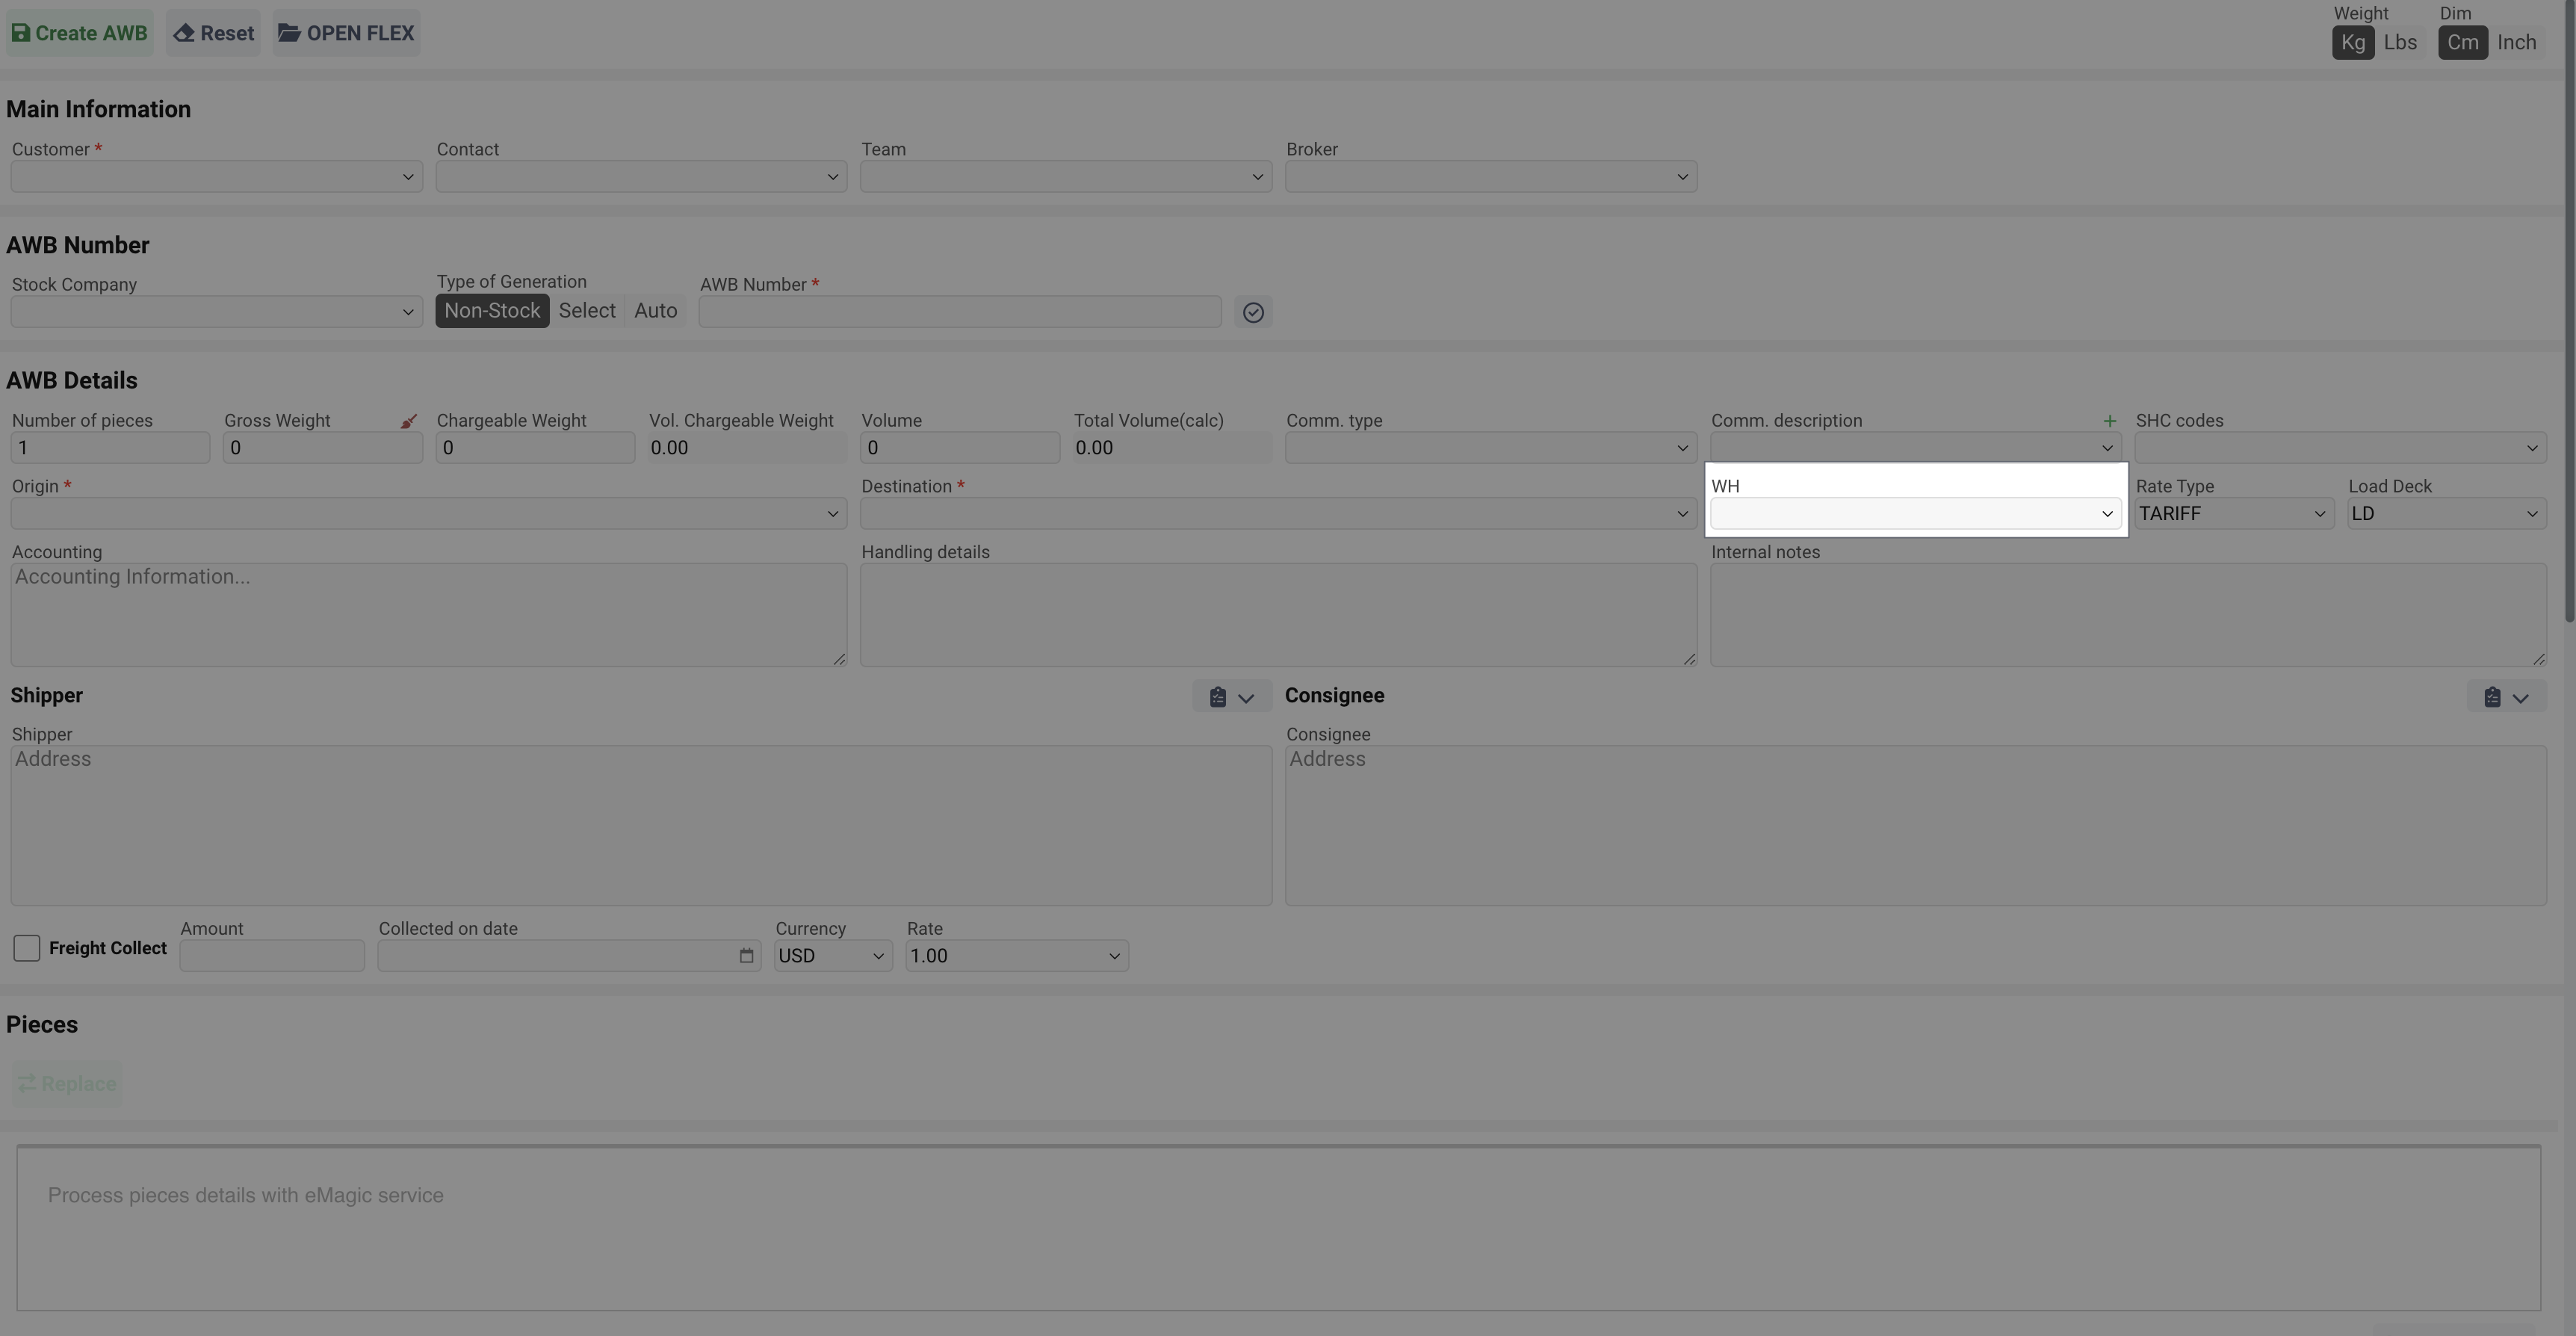
If the warehouse is set up correctly, it will be automatically filled when creating an AWB. Based on the specified Airline (Stock Company), Origin Airport and AWB Company system will try find required WH. For this to happen, all fields from the AWB must match the fields from the WH setting. If there are multiple warehouses with the same setup, a random one will be added.
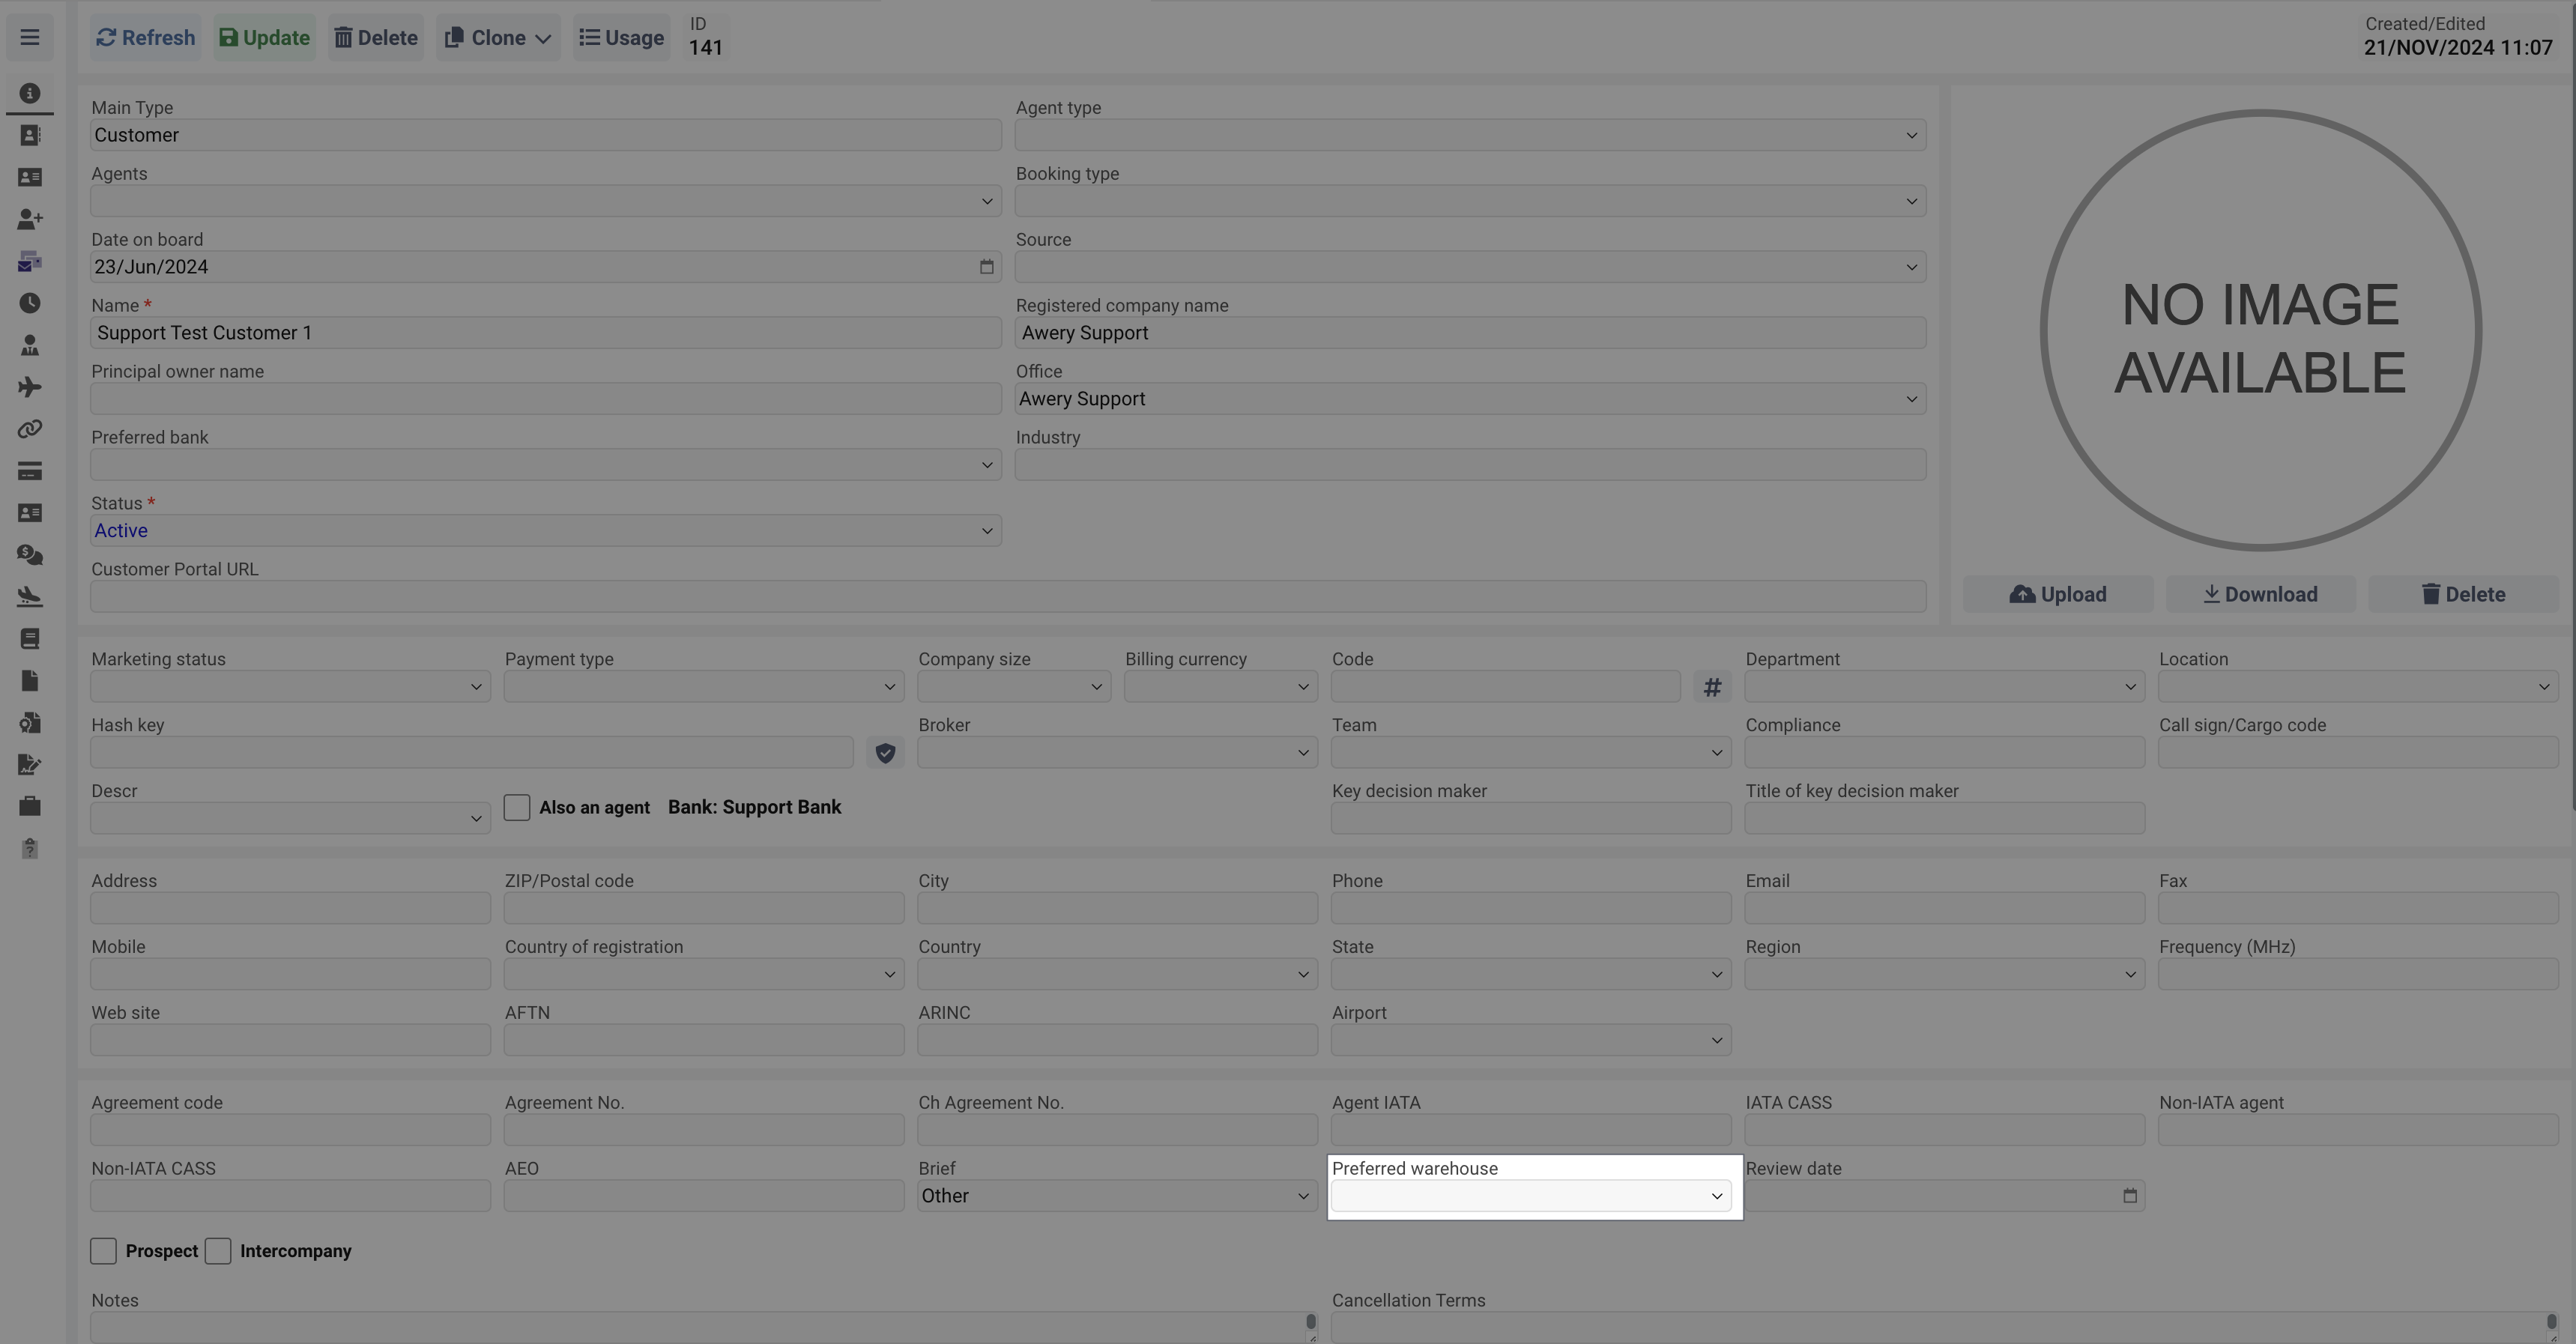
The Destination Warehouse will be automatically populated based on the AWB Customer’s data, in particular from the Preferred Warehouse, further filtered by AWB Destination and AWB Airline.
-
The At WH field shows the number of pieces currently in the warehouse compared to the total pieces in the AWB.

Accepting cargo fro export via Pieces Cargo tab
When you open the Piece Details tab in the page header, you will see the Accept Cargo button, intended as a form for completing the first steps of receiving cargo from the shipper for further export.
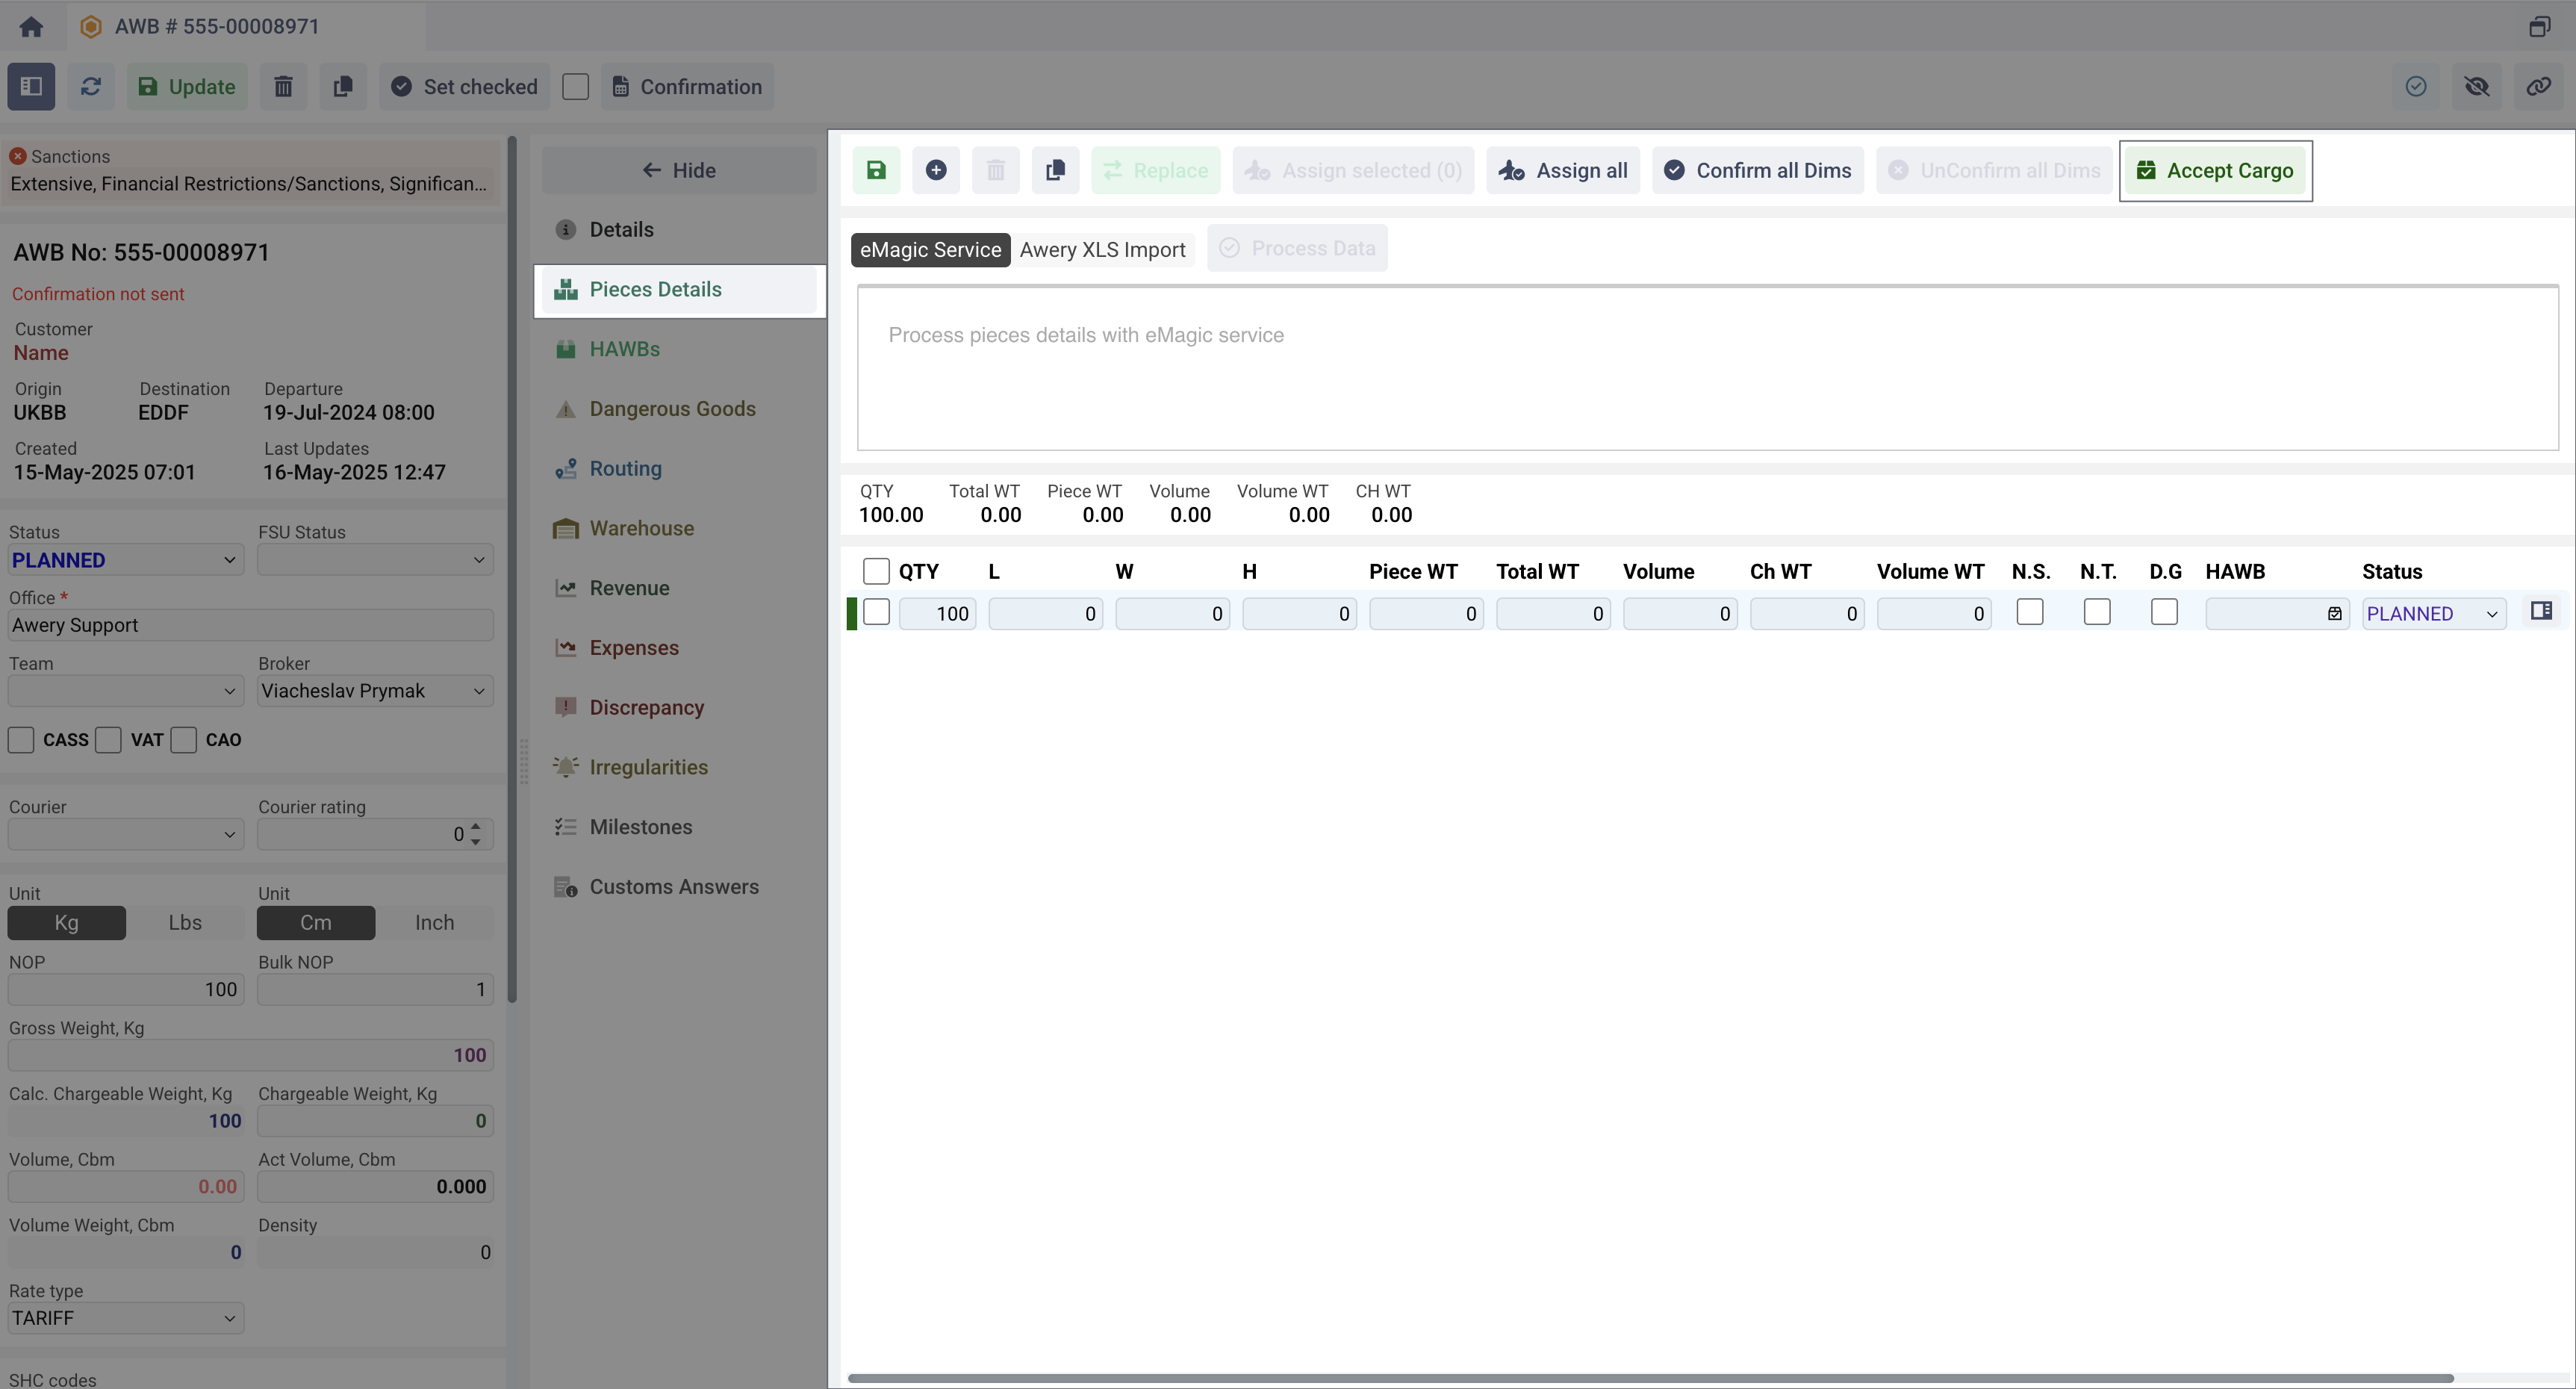
Upon clicking, the system checks:
-
Whether the Shipper and Consignee information is entered in the AWB and whether it is valid
-
Without a Shipper and Consignee, the cargo cannot be accepted for the shipment.
-
-
Whether all saved AWB pieces have filled in qty, width, height, length
-
Without physical attributes, information cannot be provided to the customs authority for verification.
-
If any field is not filled in, then a message will be displayed to the user.
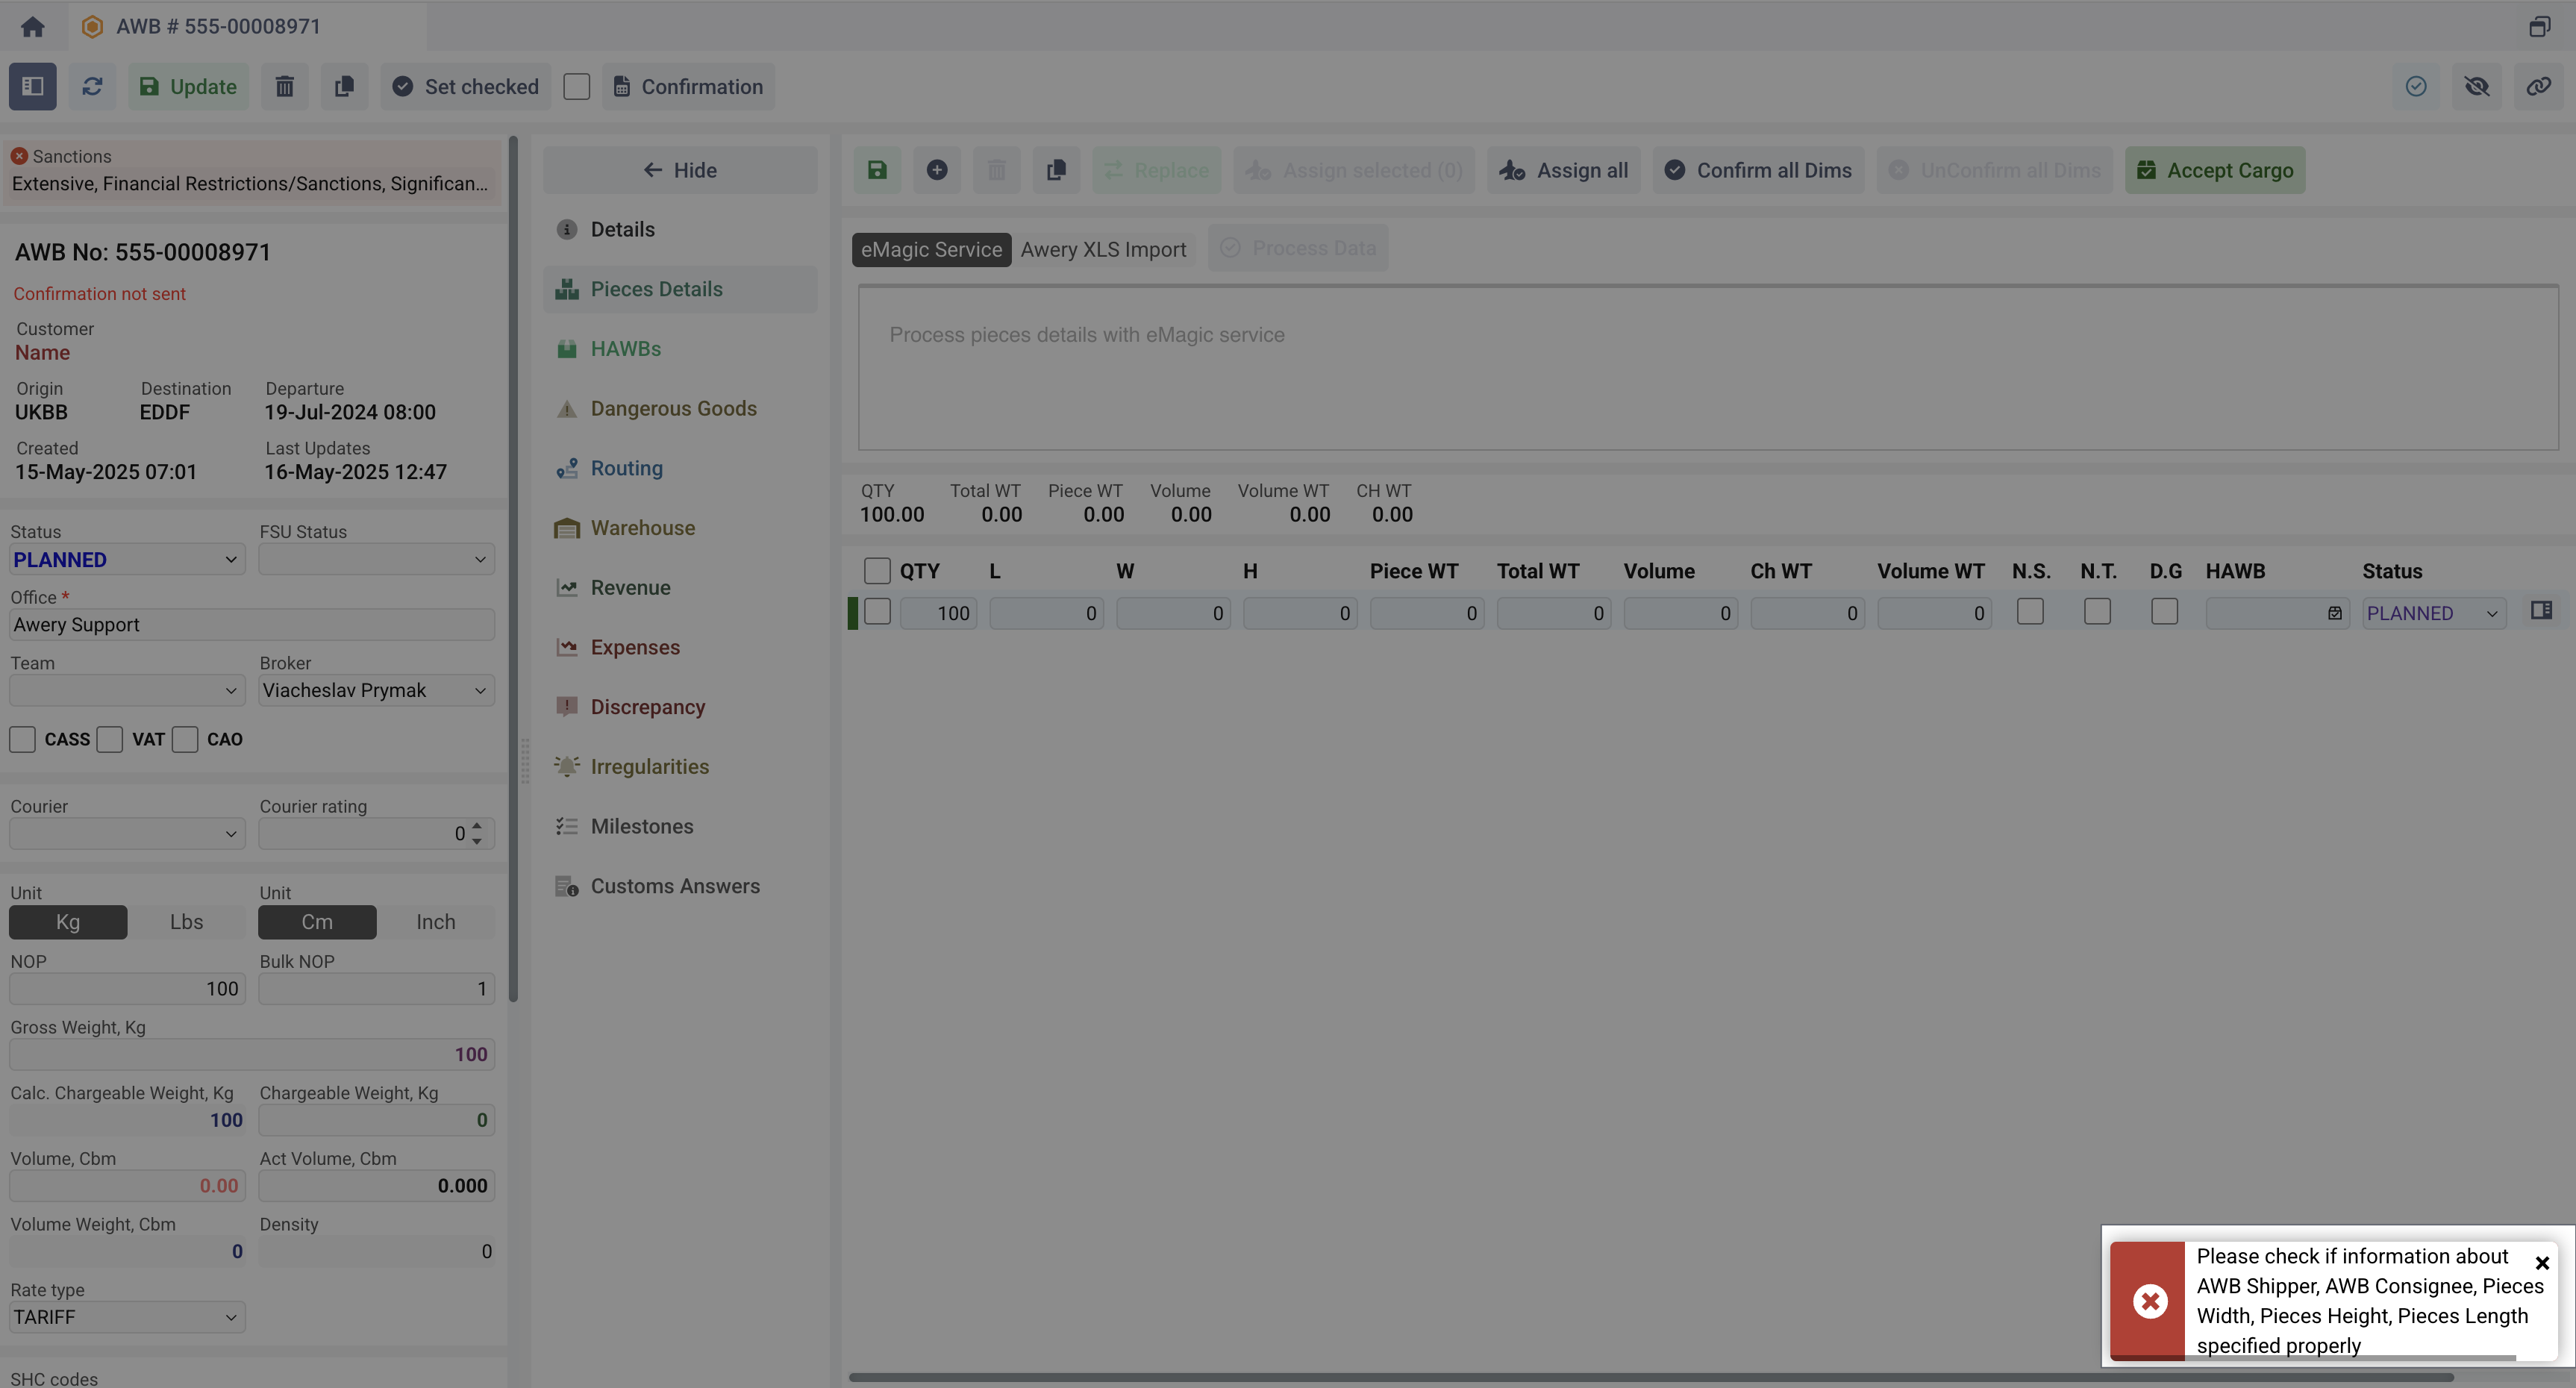
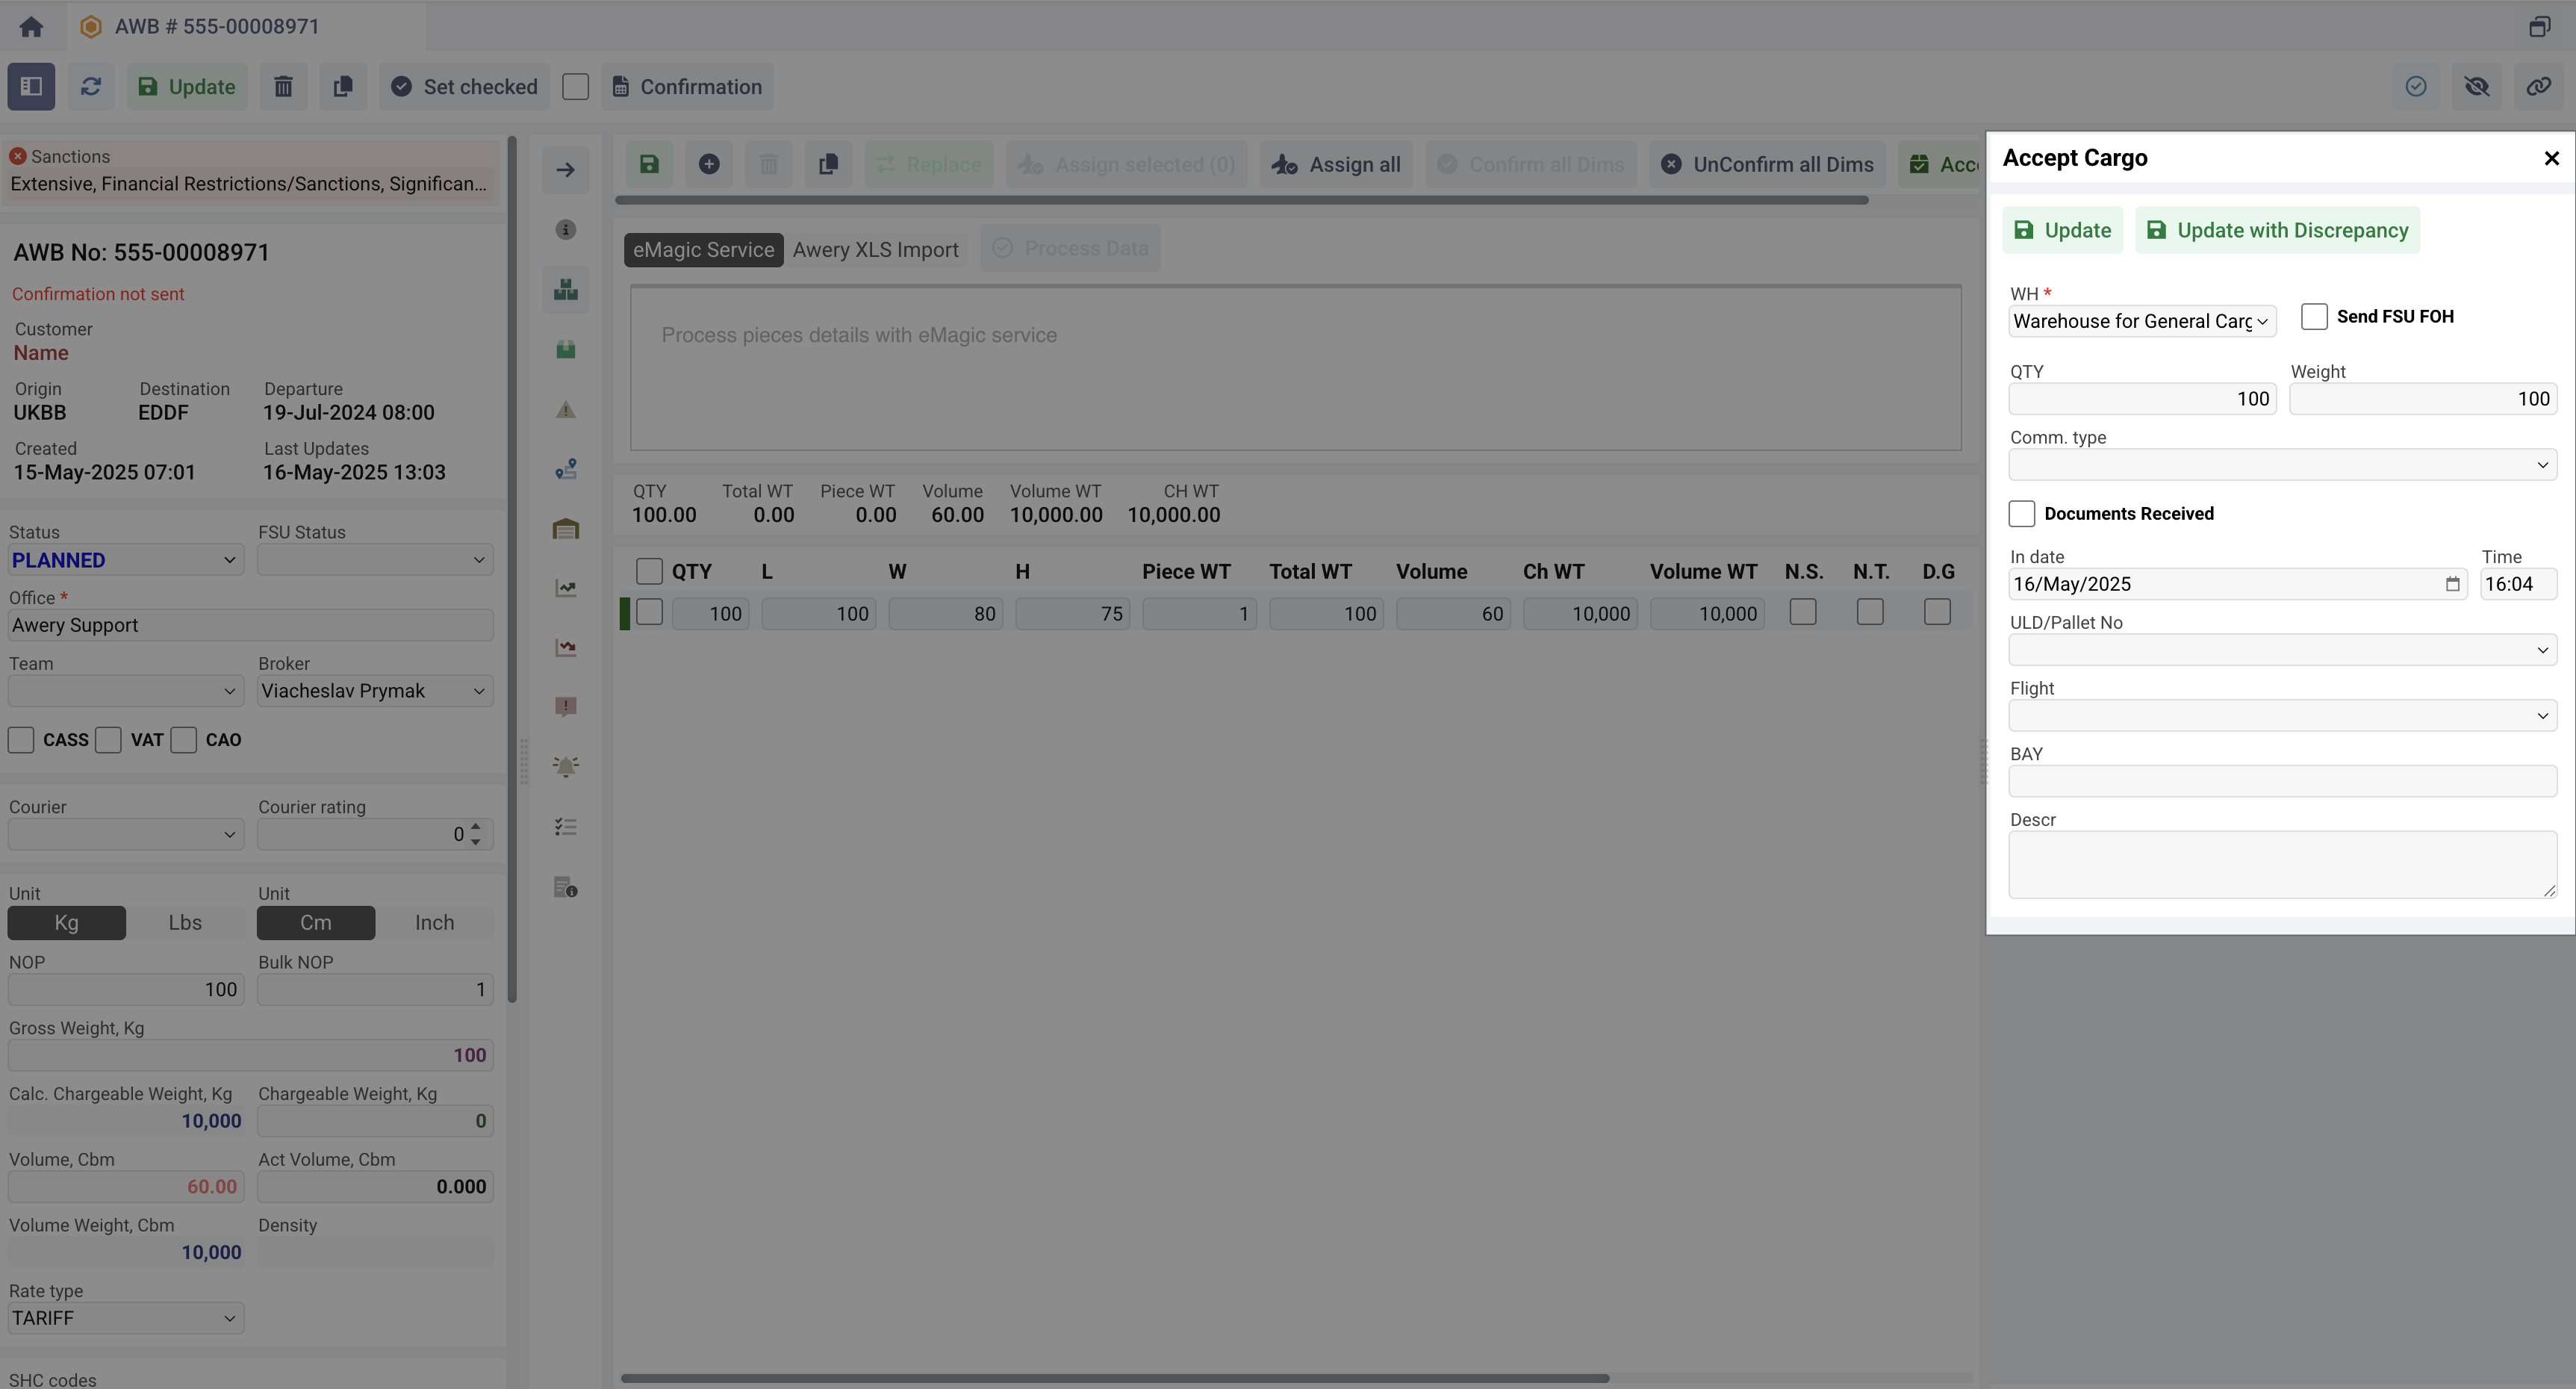
System will not make any actions until the user fills in all the information. After that, the system will open a form in the sidebar where you can provide the necessary details at this stage.
-
WH
-
Warehouse where cargo will be received. By default, the system sets the warehouse with the Acceptance Zone usage type, where the airport is the same as the AWB origin airport.
-
At the same time, the system will ask if FSU FOH message needs to be send.
-
-
QTY
-
The number of units will be received. Defaults to the maximum number of units specified in the AWB.
-
-
Weight
-
The weight quantity will be received. Default is set to the maximum pieces weight specified in the AWB.
-
-
Comm.Type
-
Cargo product type. By default, it is set from the AWB field of the same name.
-
-
Documents Received
-
Marker means that AWB documents has been received.
-
-
In Date & Time
-
Time cargo is received to the Warehouse
-
-
ULD/Pallet No
-
Optional field, which specifies the number of the ULD/Pallet on which the cargo will be built. List from the ULD/Pallets database of the system.
-
-
Flight
-
Optional field, which specifies the future flight in which cargo will be departed. The list of available flights will be displayed based on the flights on which AWB is currently planned on.
-
-
BAY
-
Optional field of Storage location.
-
-
Descr
-
Optional filed dedicated for different notes and remarks.
-
After entering the information, the system will create a new record in the Warehouse tab for the shipment.
However, if the Update with discrepancy option is selected instead of a regular Update, the Awery system will create a record for the same Warehouse tab and will also prompt the user to confirm whether a discrepancy should be created (for example, for missing or damaged cargo, or for dimensions/weights that differ from those specified in the documents).
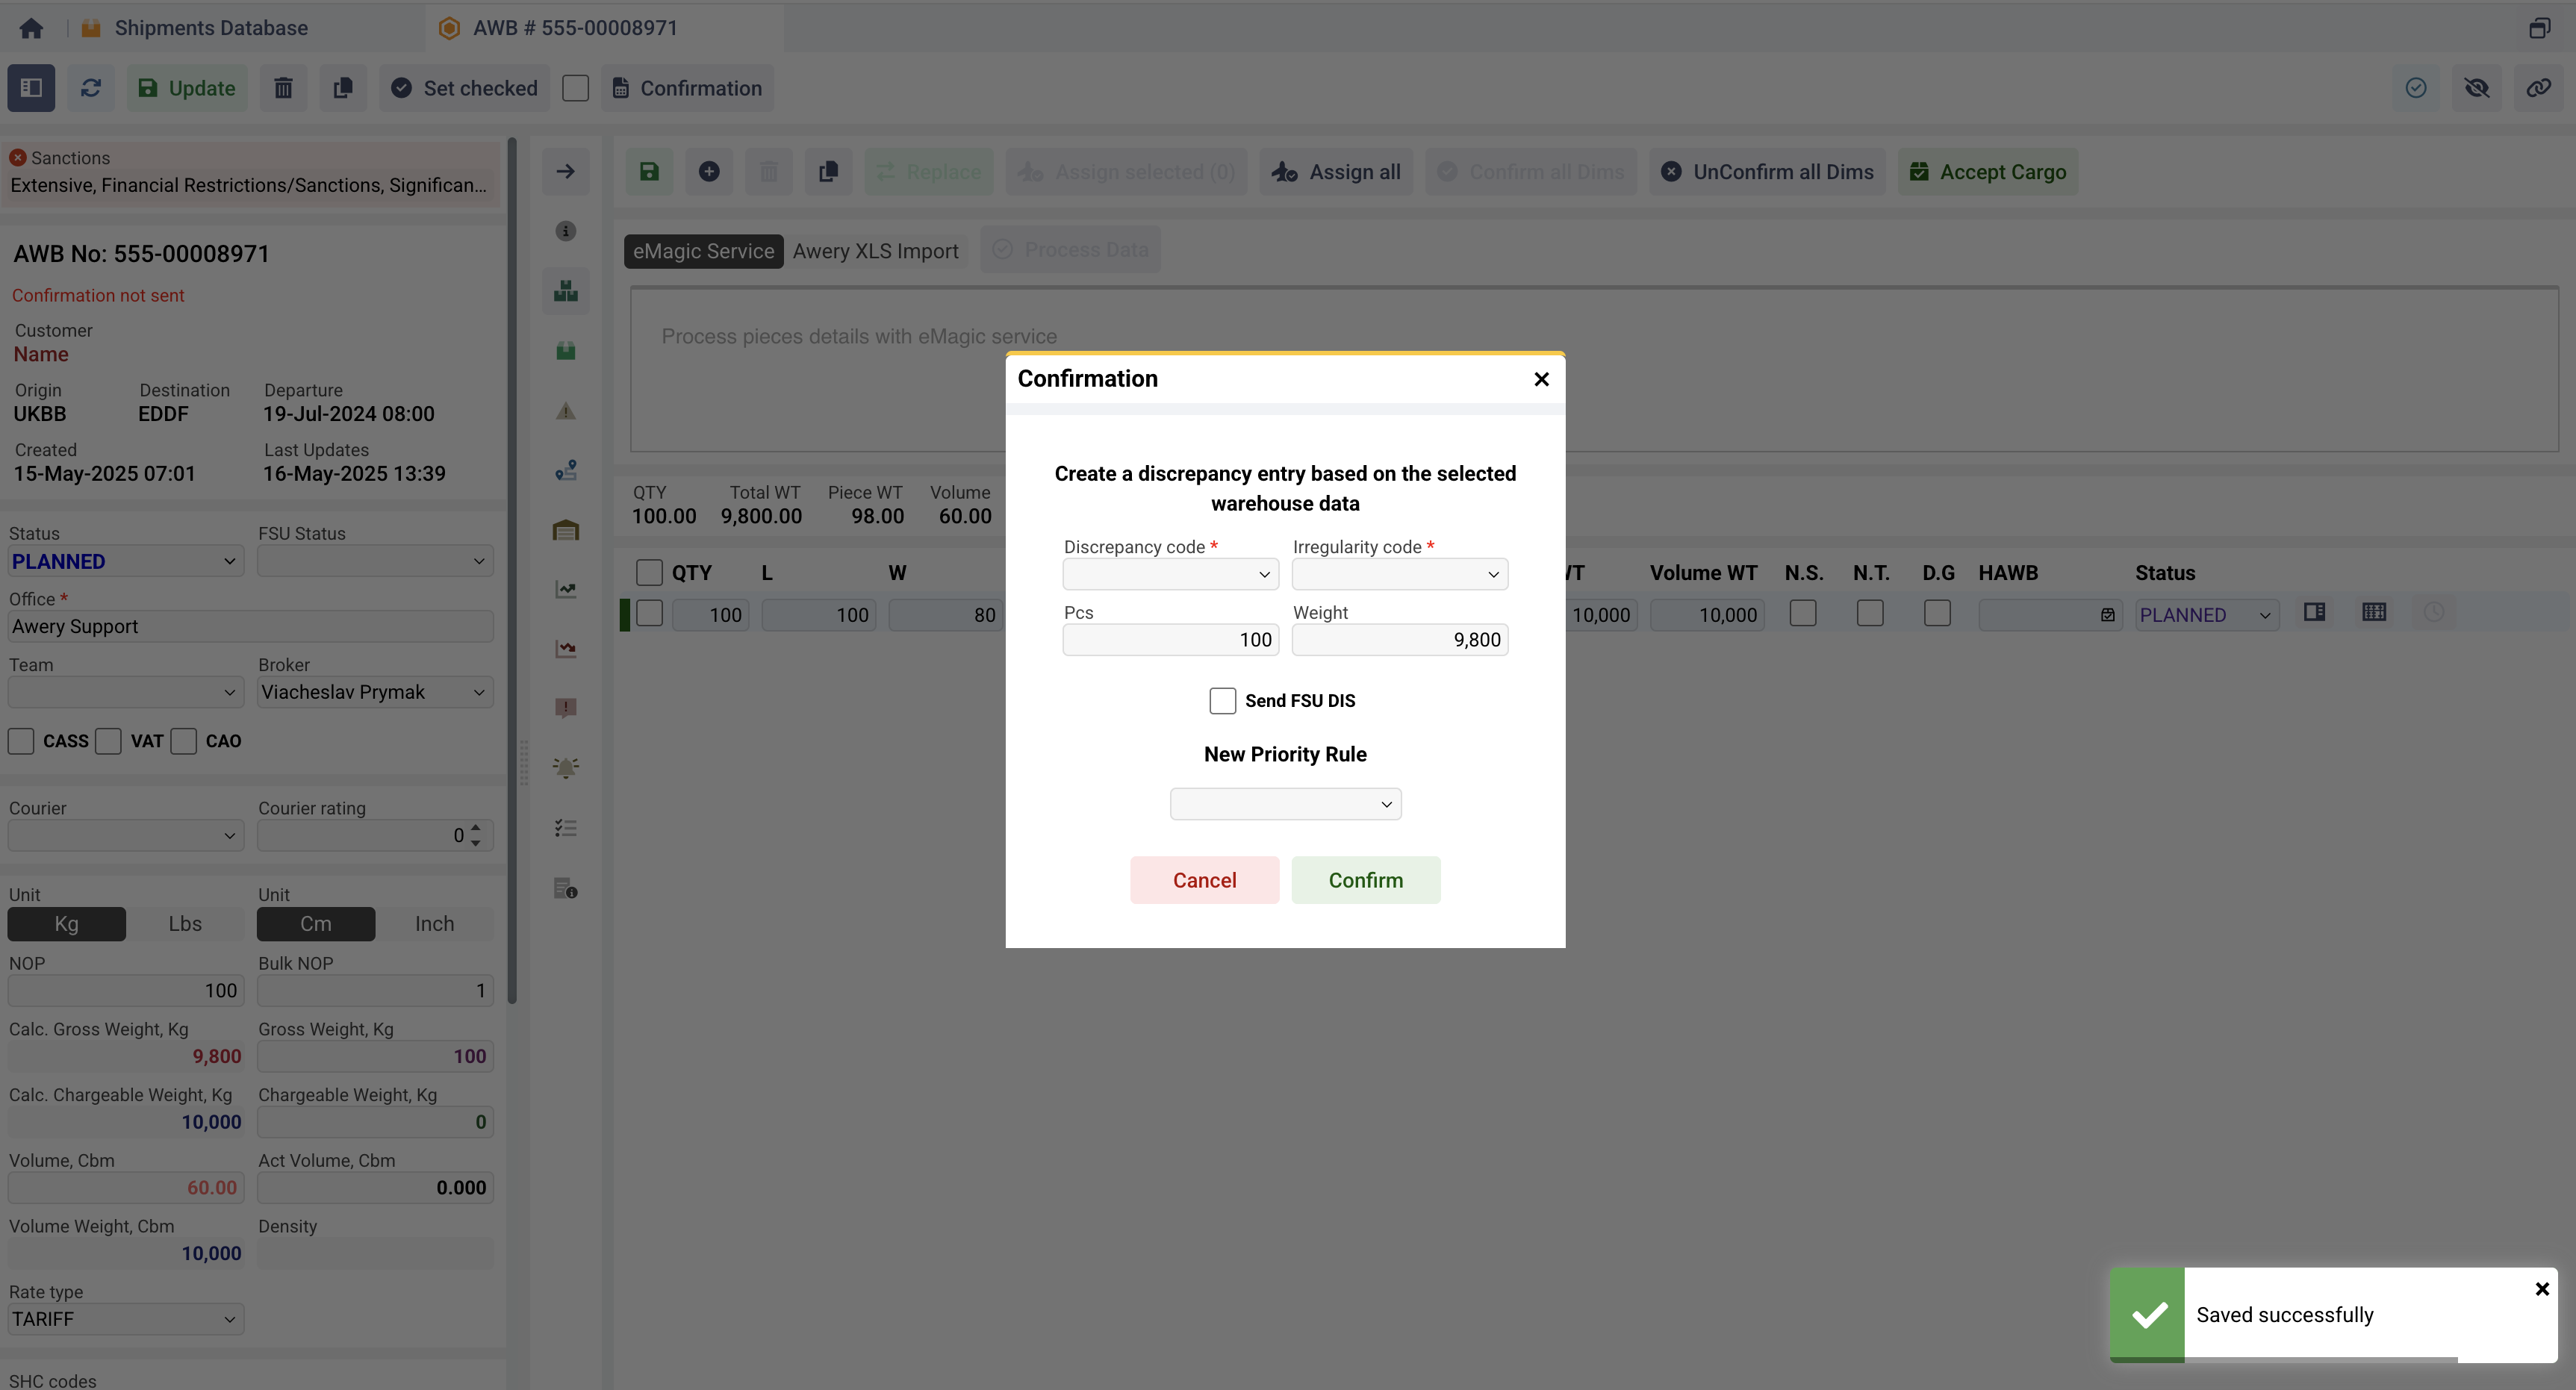
So, when creating a discrepancy, users need to specify the discrepancy and irregularities codes, the quantity and weight of the cargo corresponding to the discrepancy. The system also asks whether to create an FSU DIS message.
Please note that all rules configured in Additonal Warehouse Setup apply to this and all other subsequent steps.
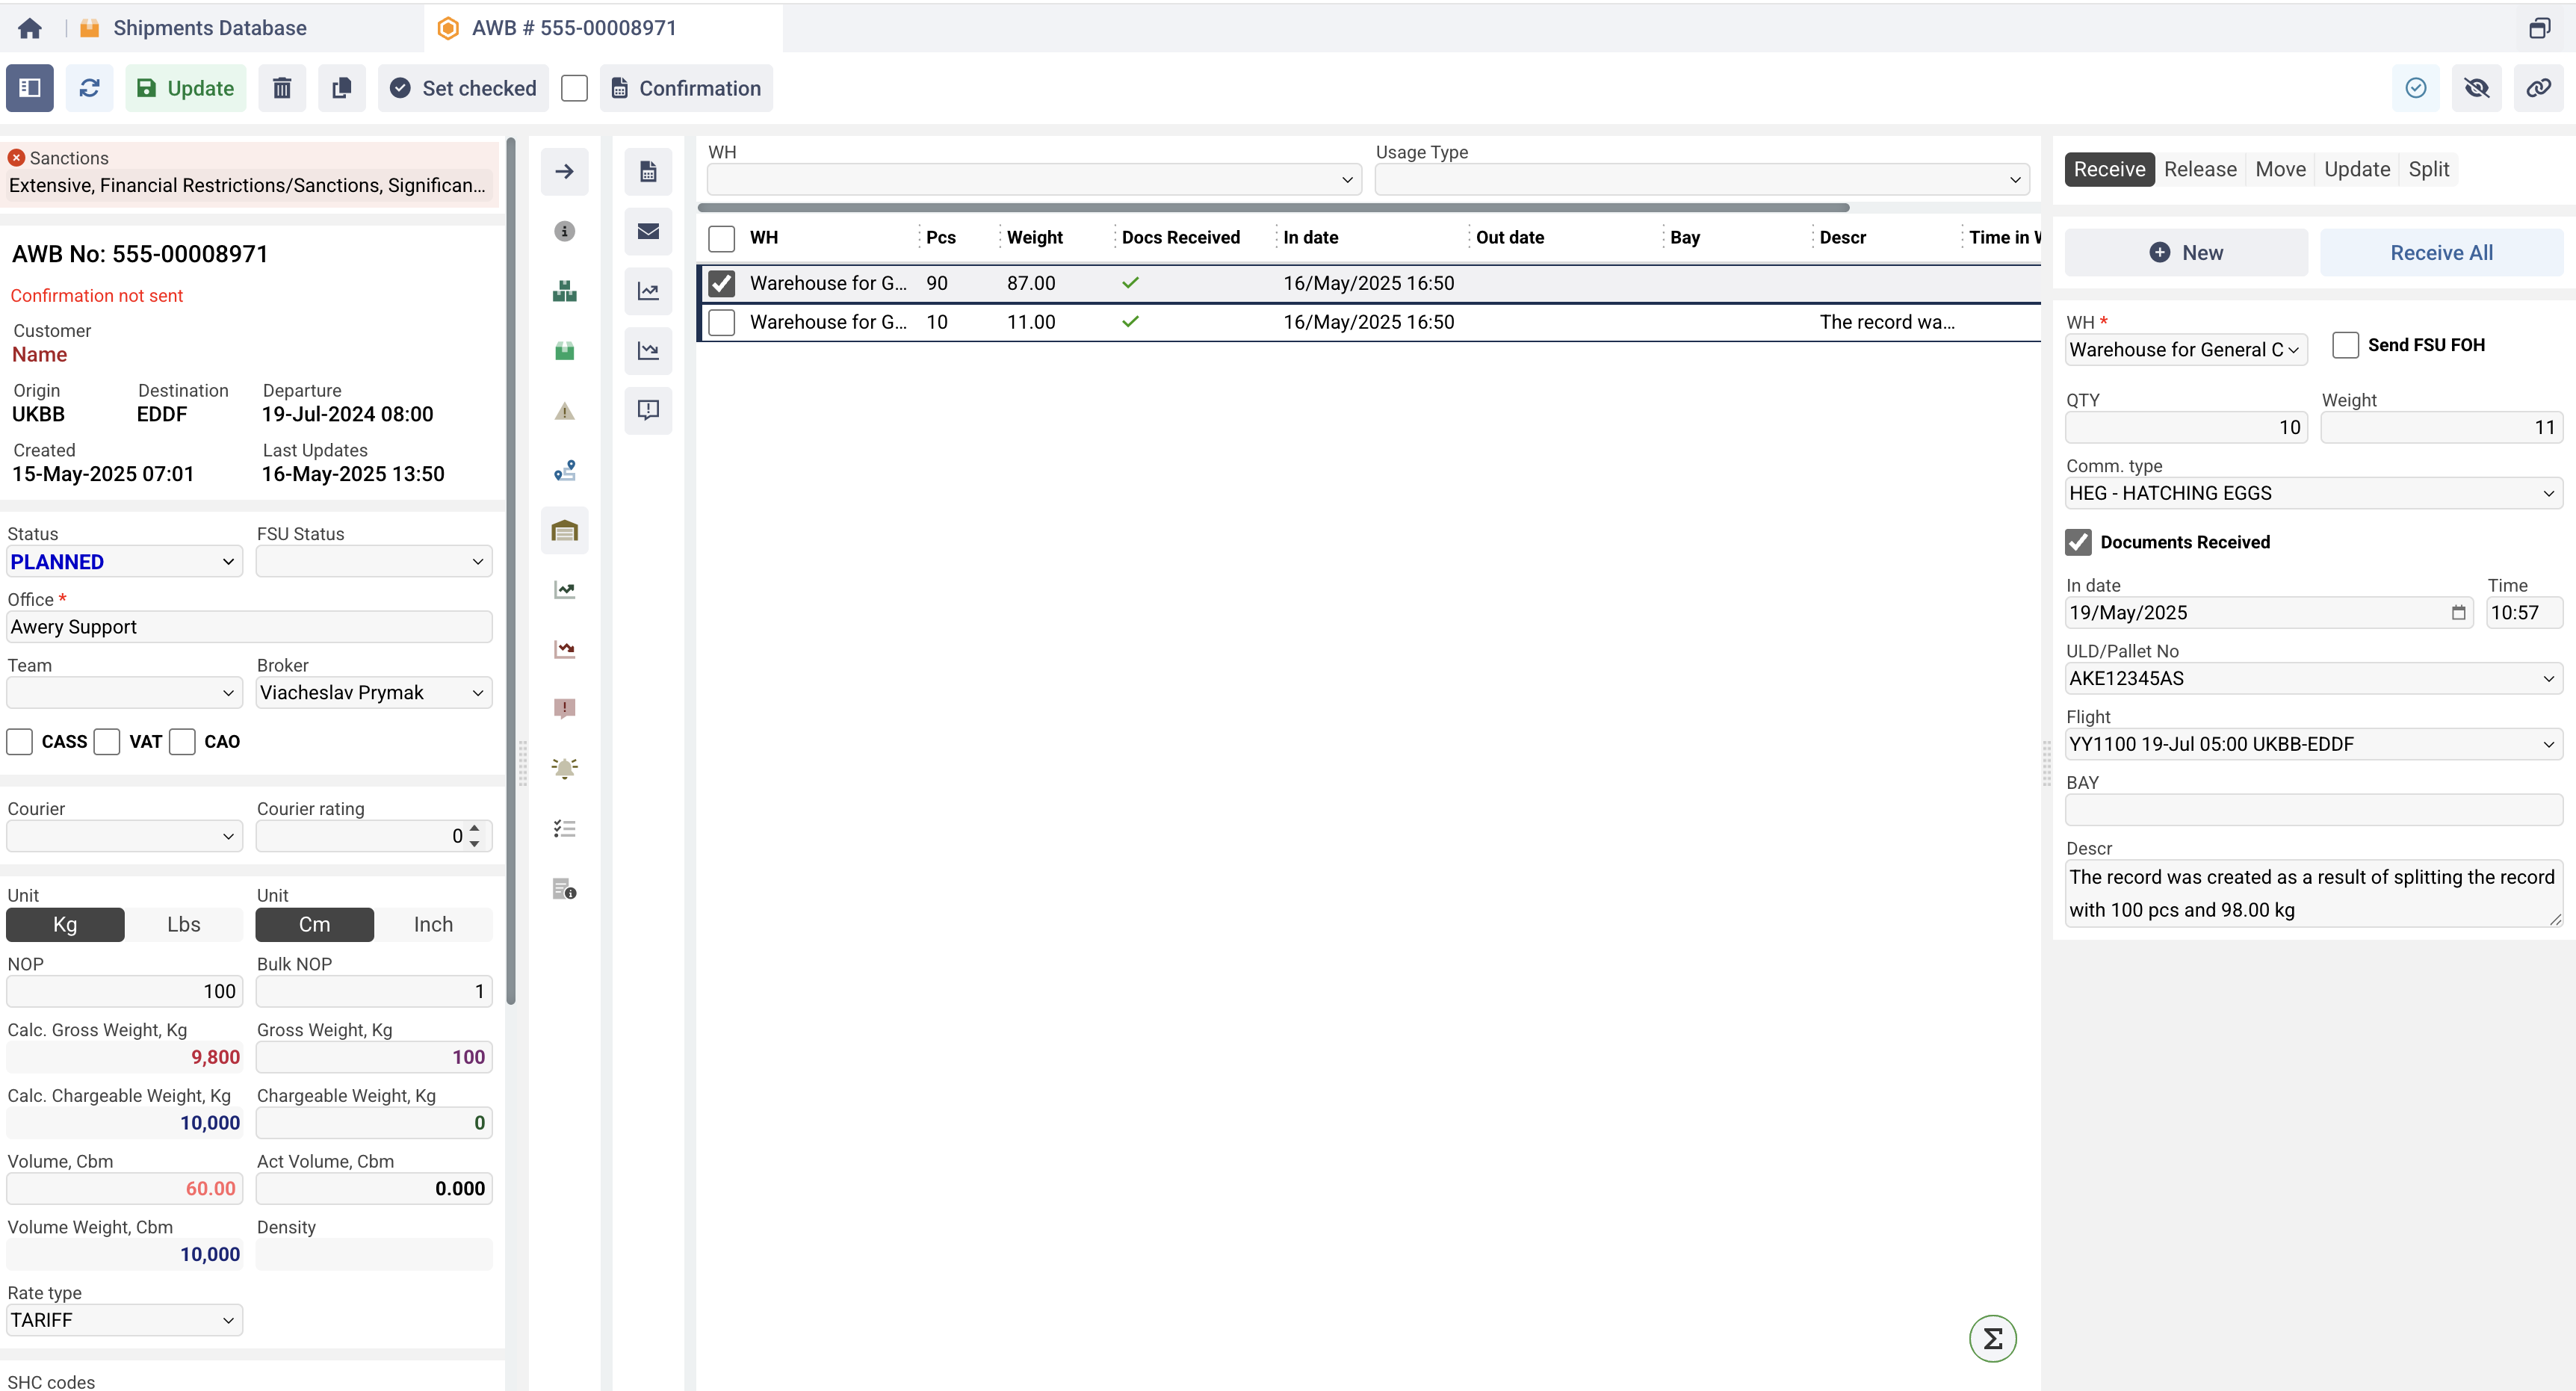
Warehouse Tab in AWB
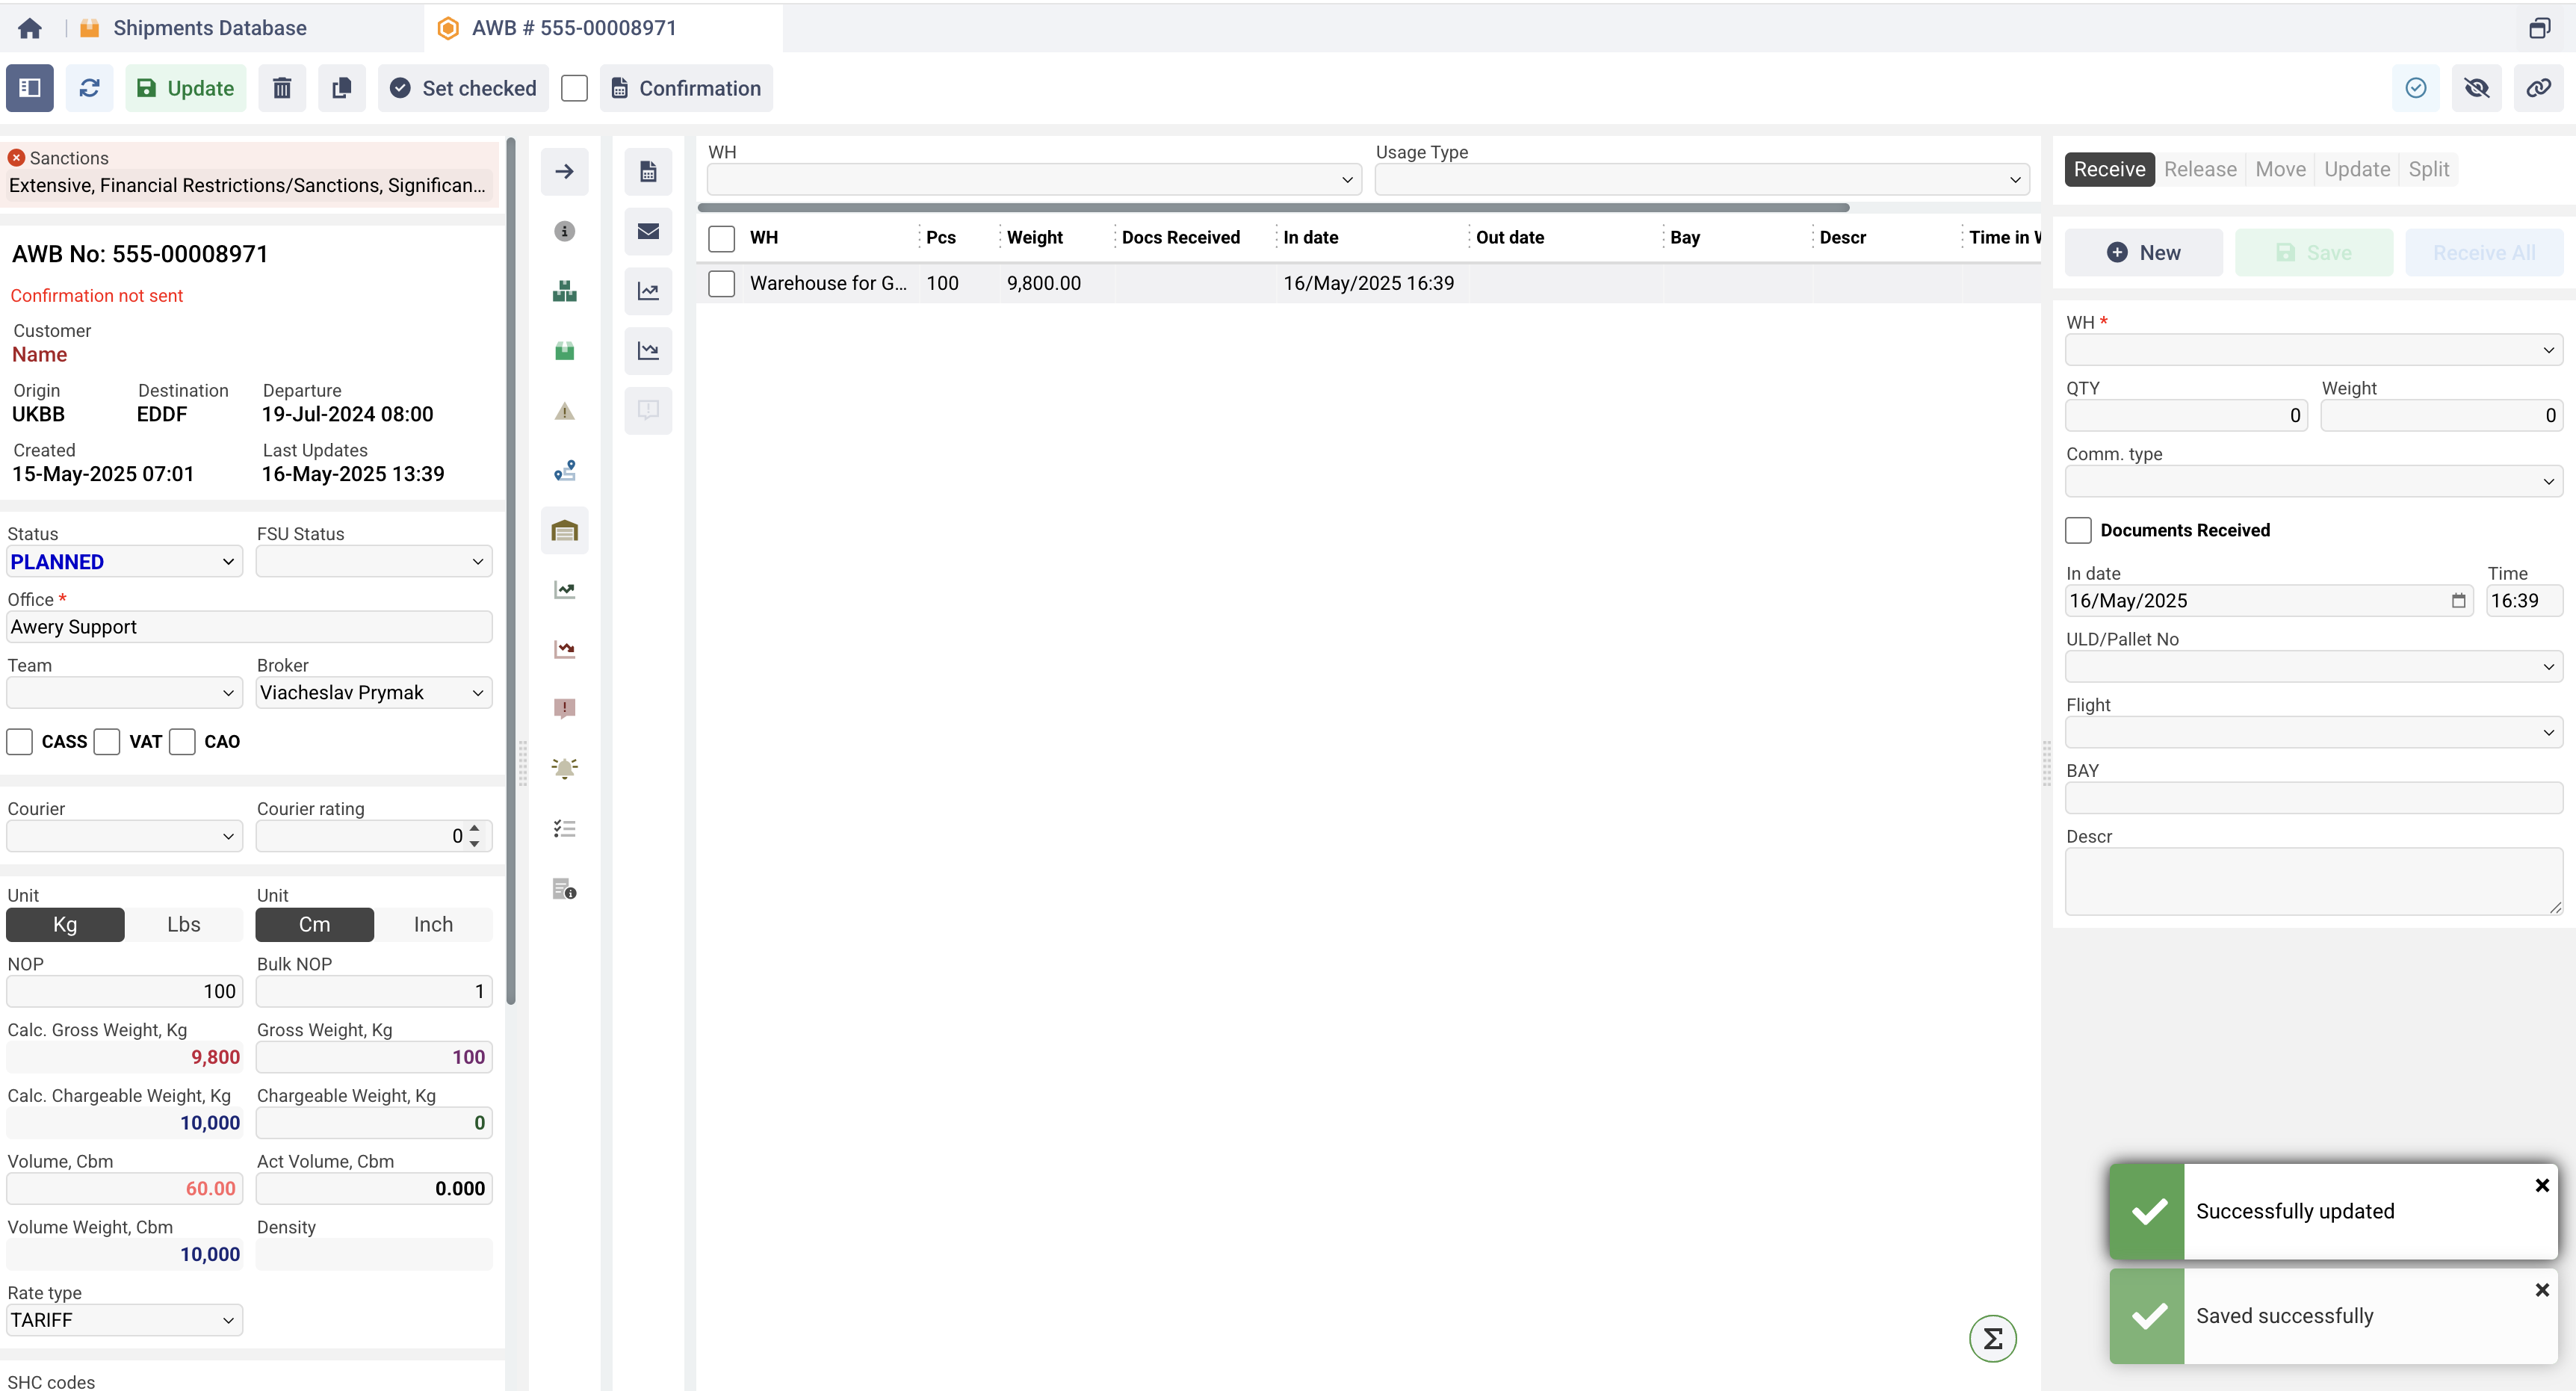
The Warehouse tab allows to manage(create/read/update/delete) entries related to the cargo movements in and out of the warehouse (further Warehouse Data entry). Tab can be hidden by permission.
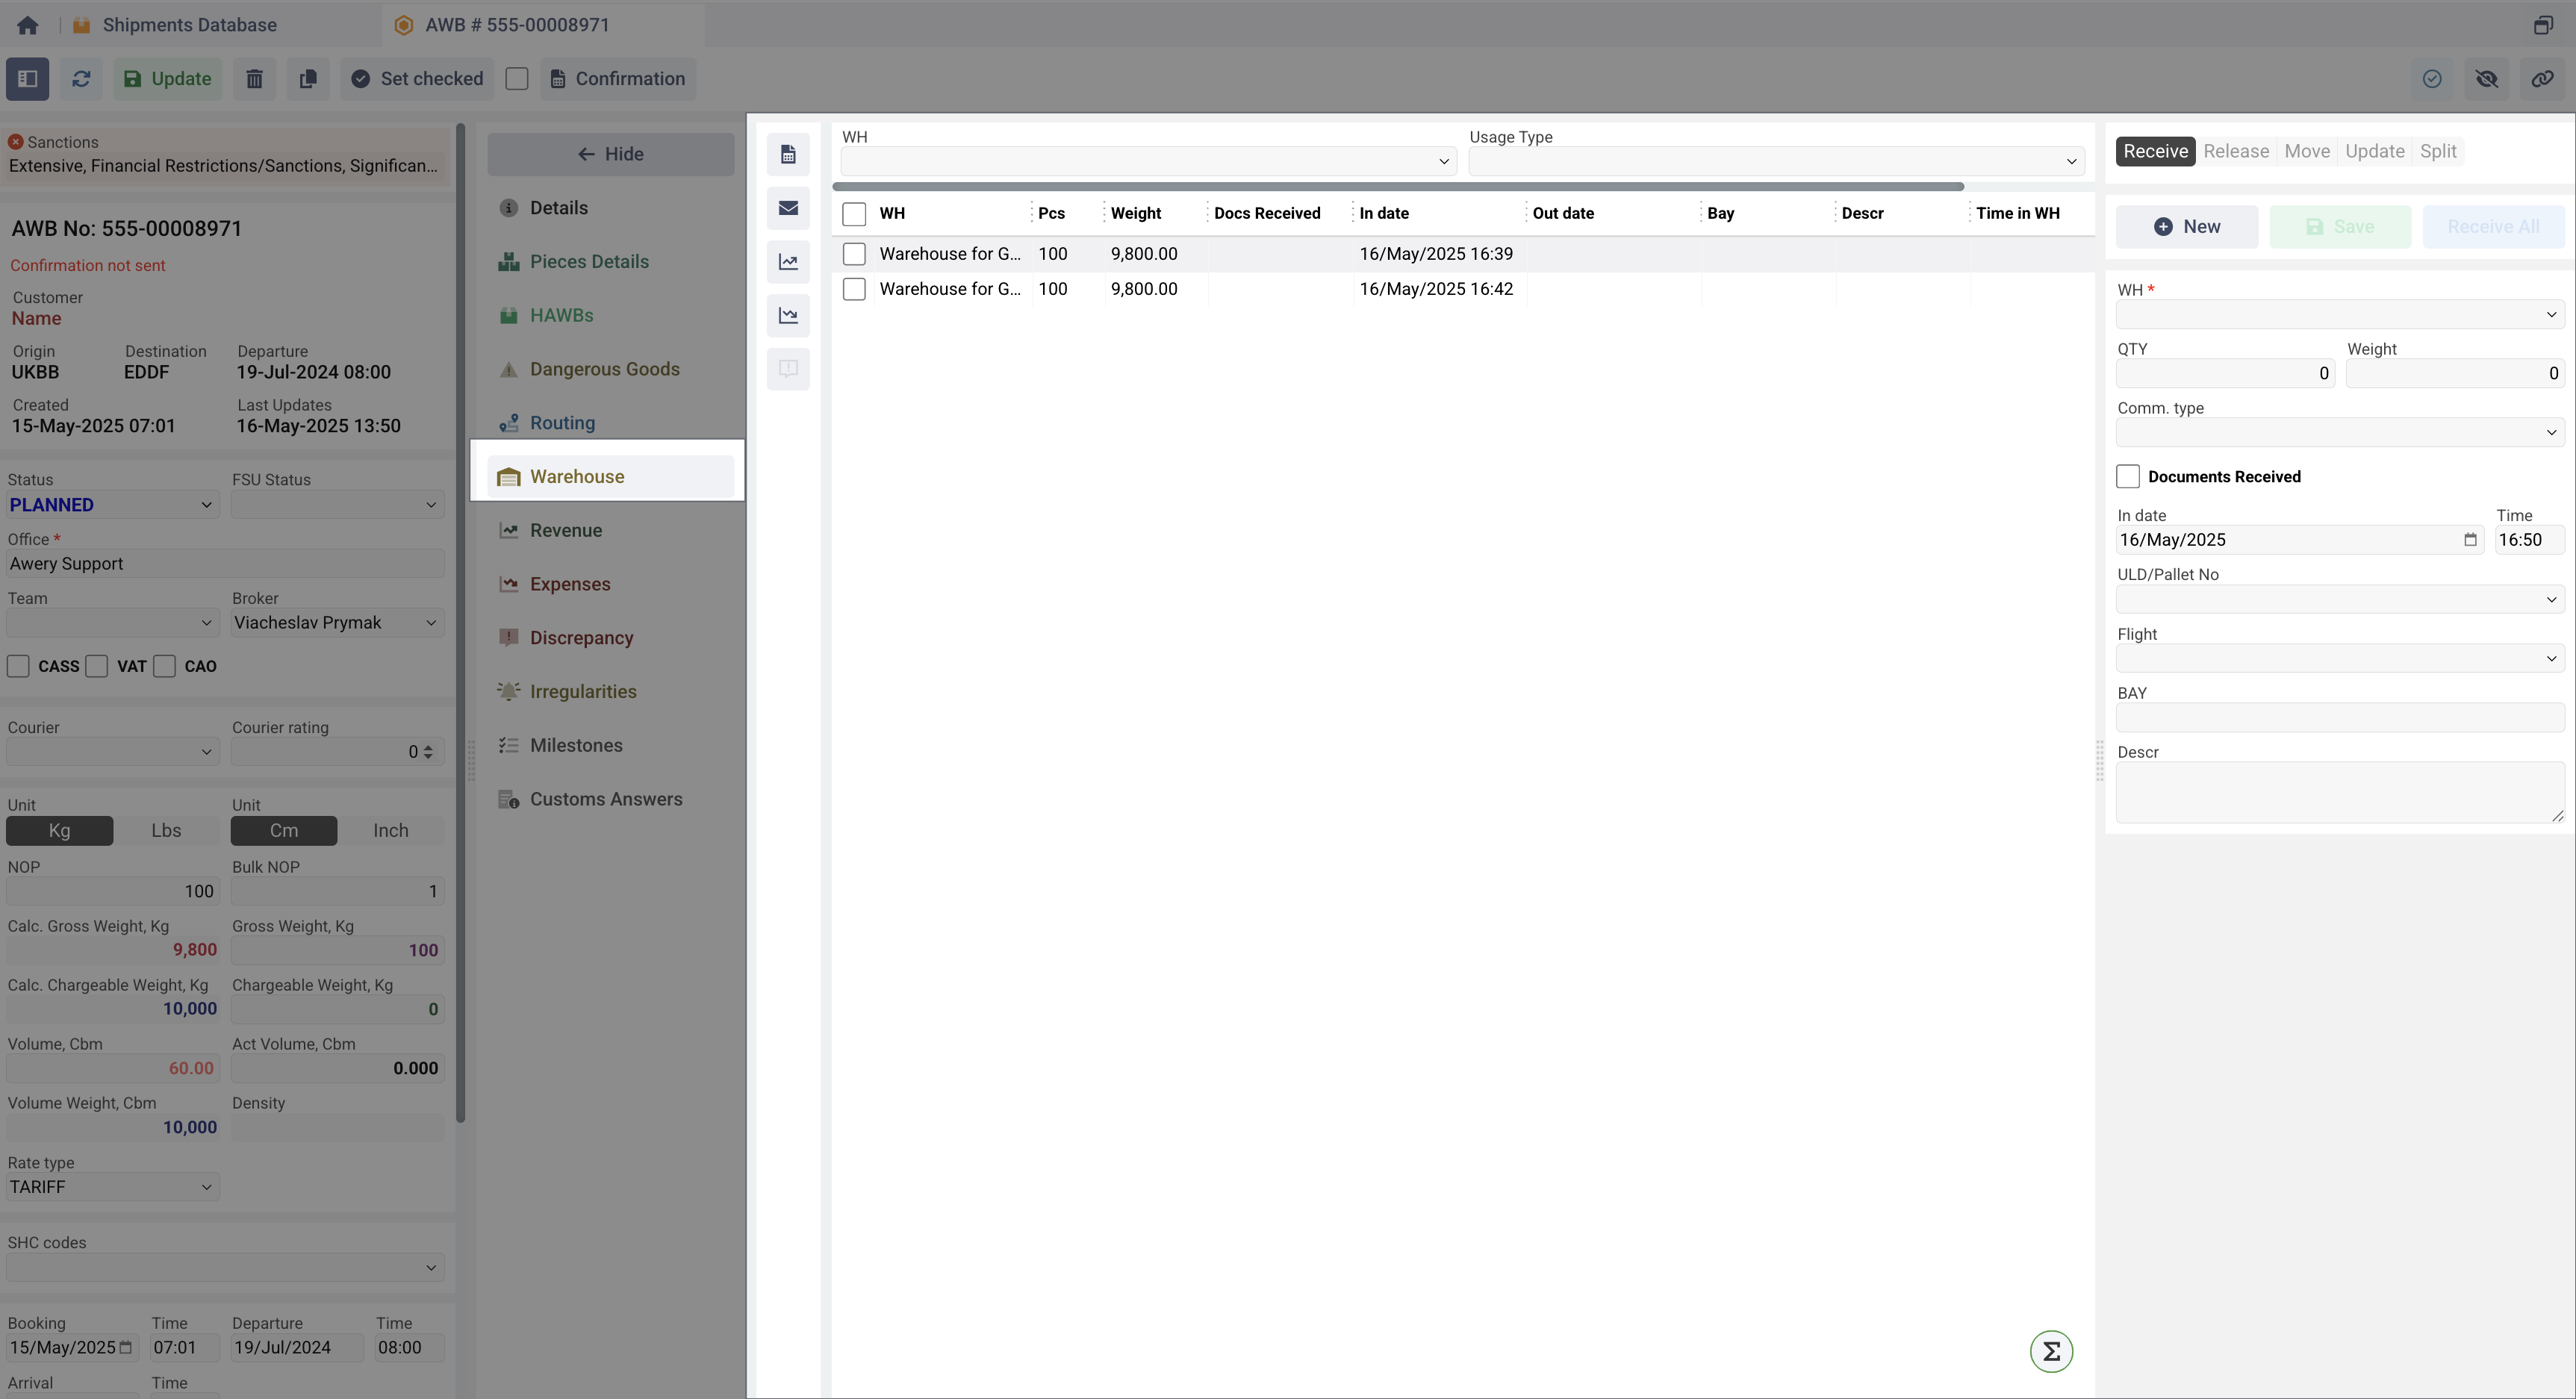
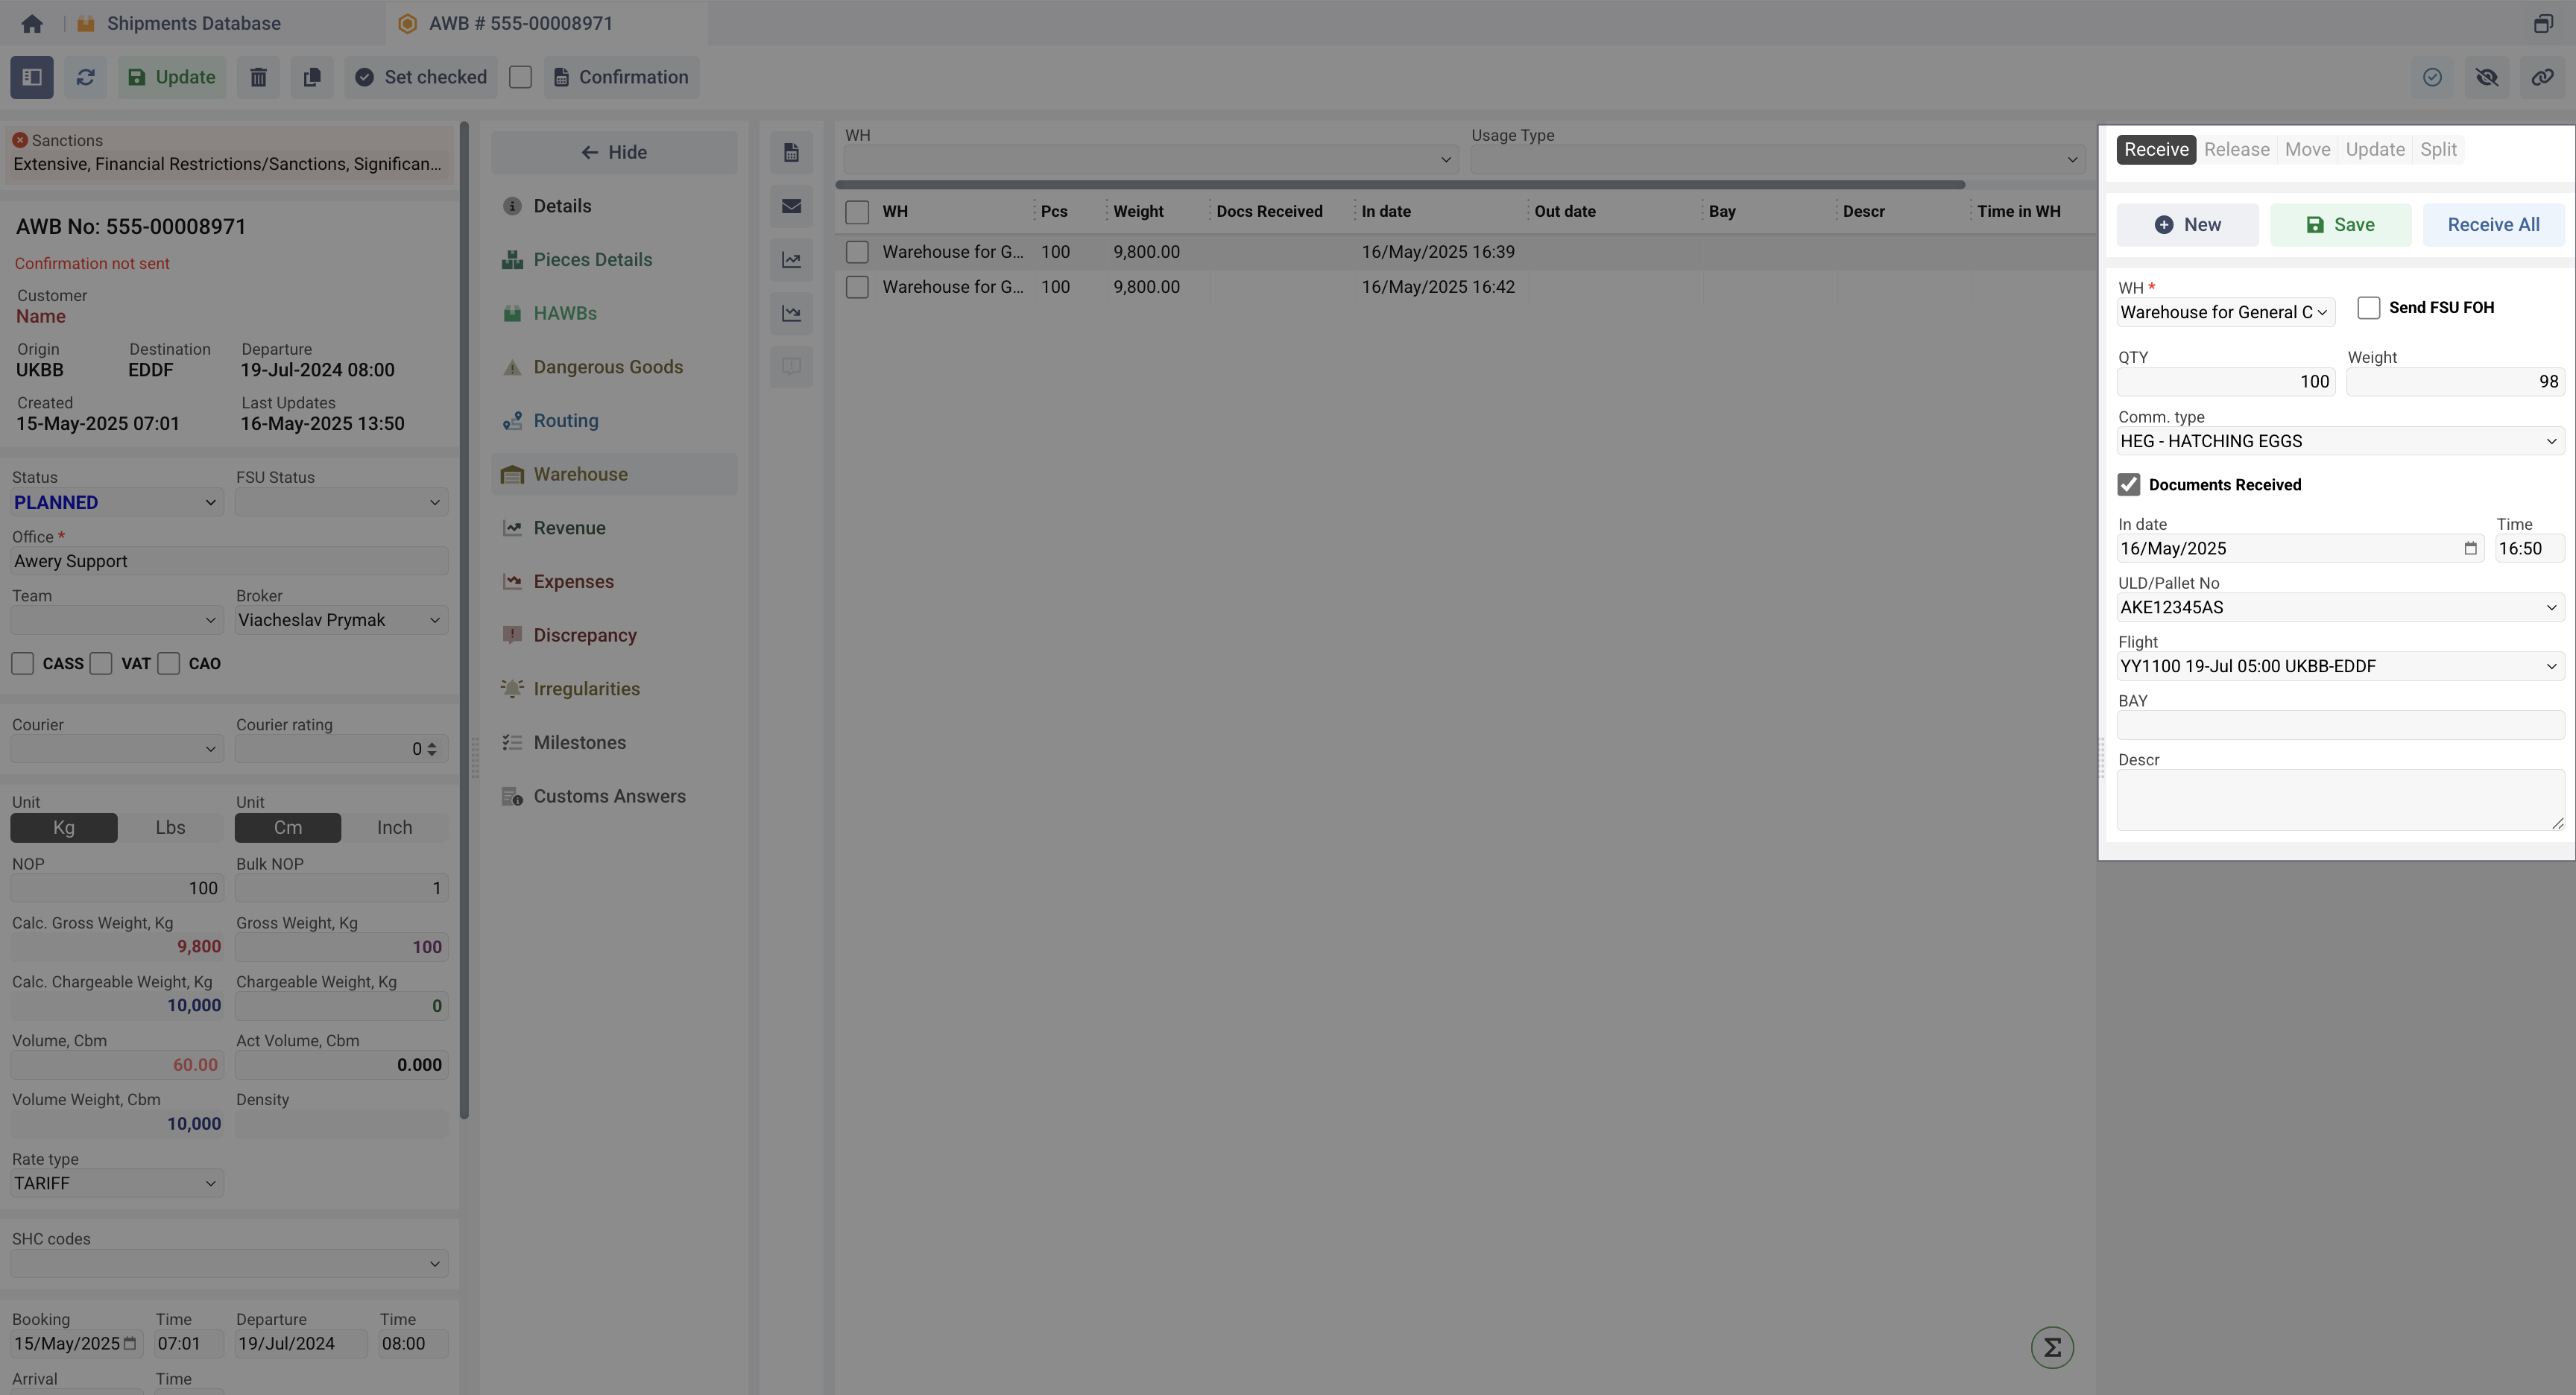
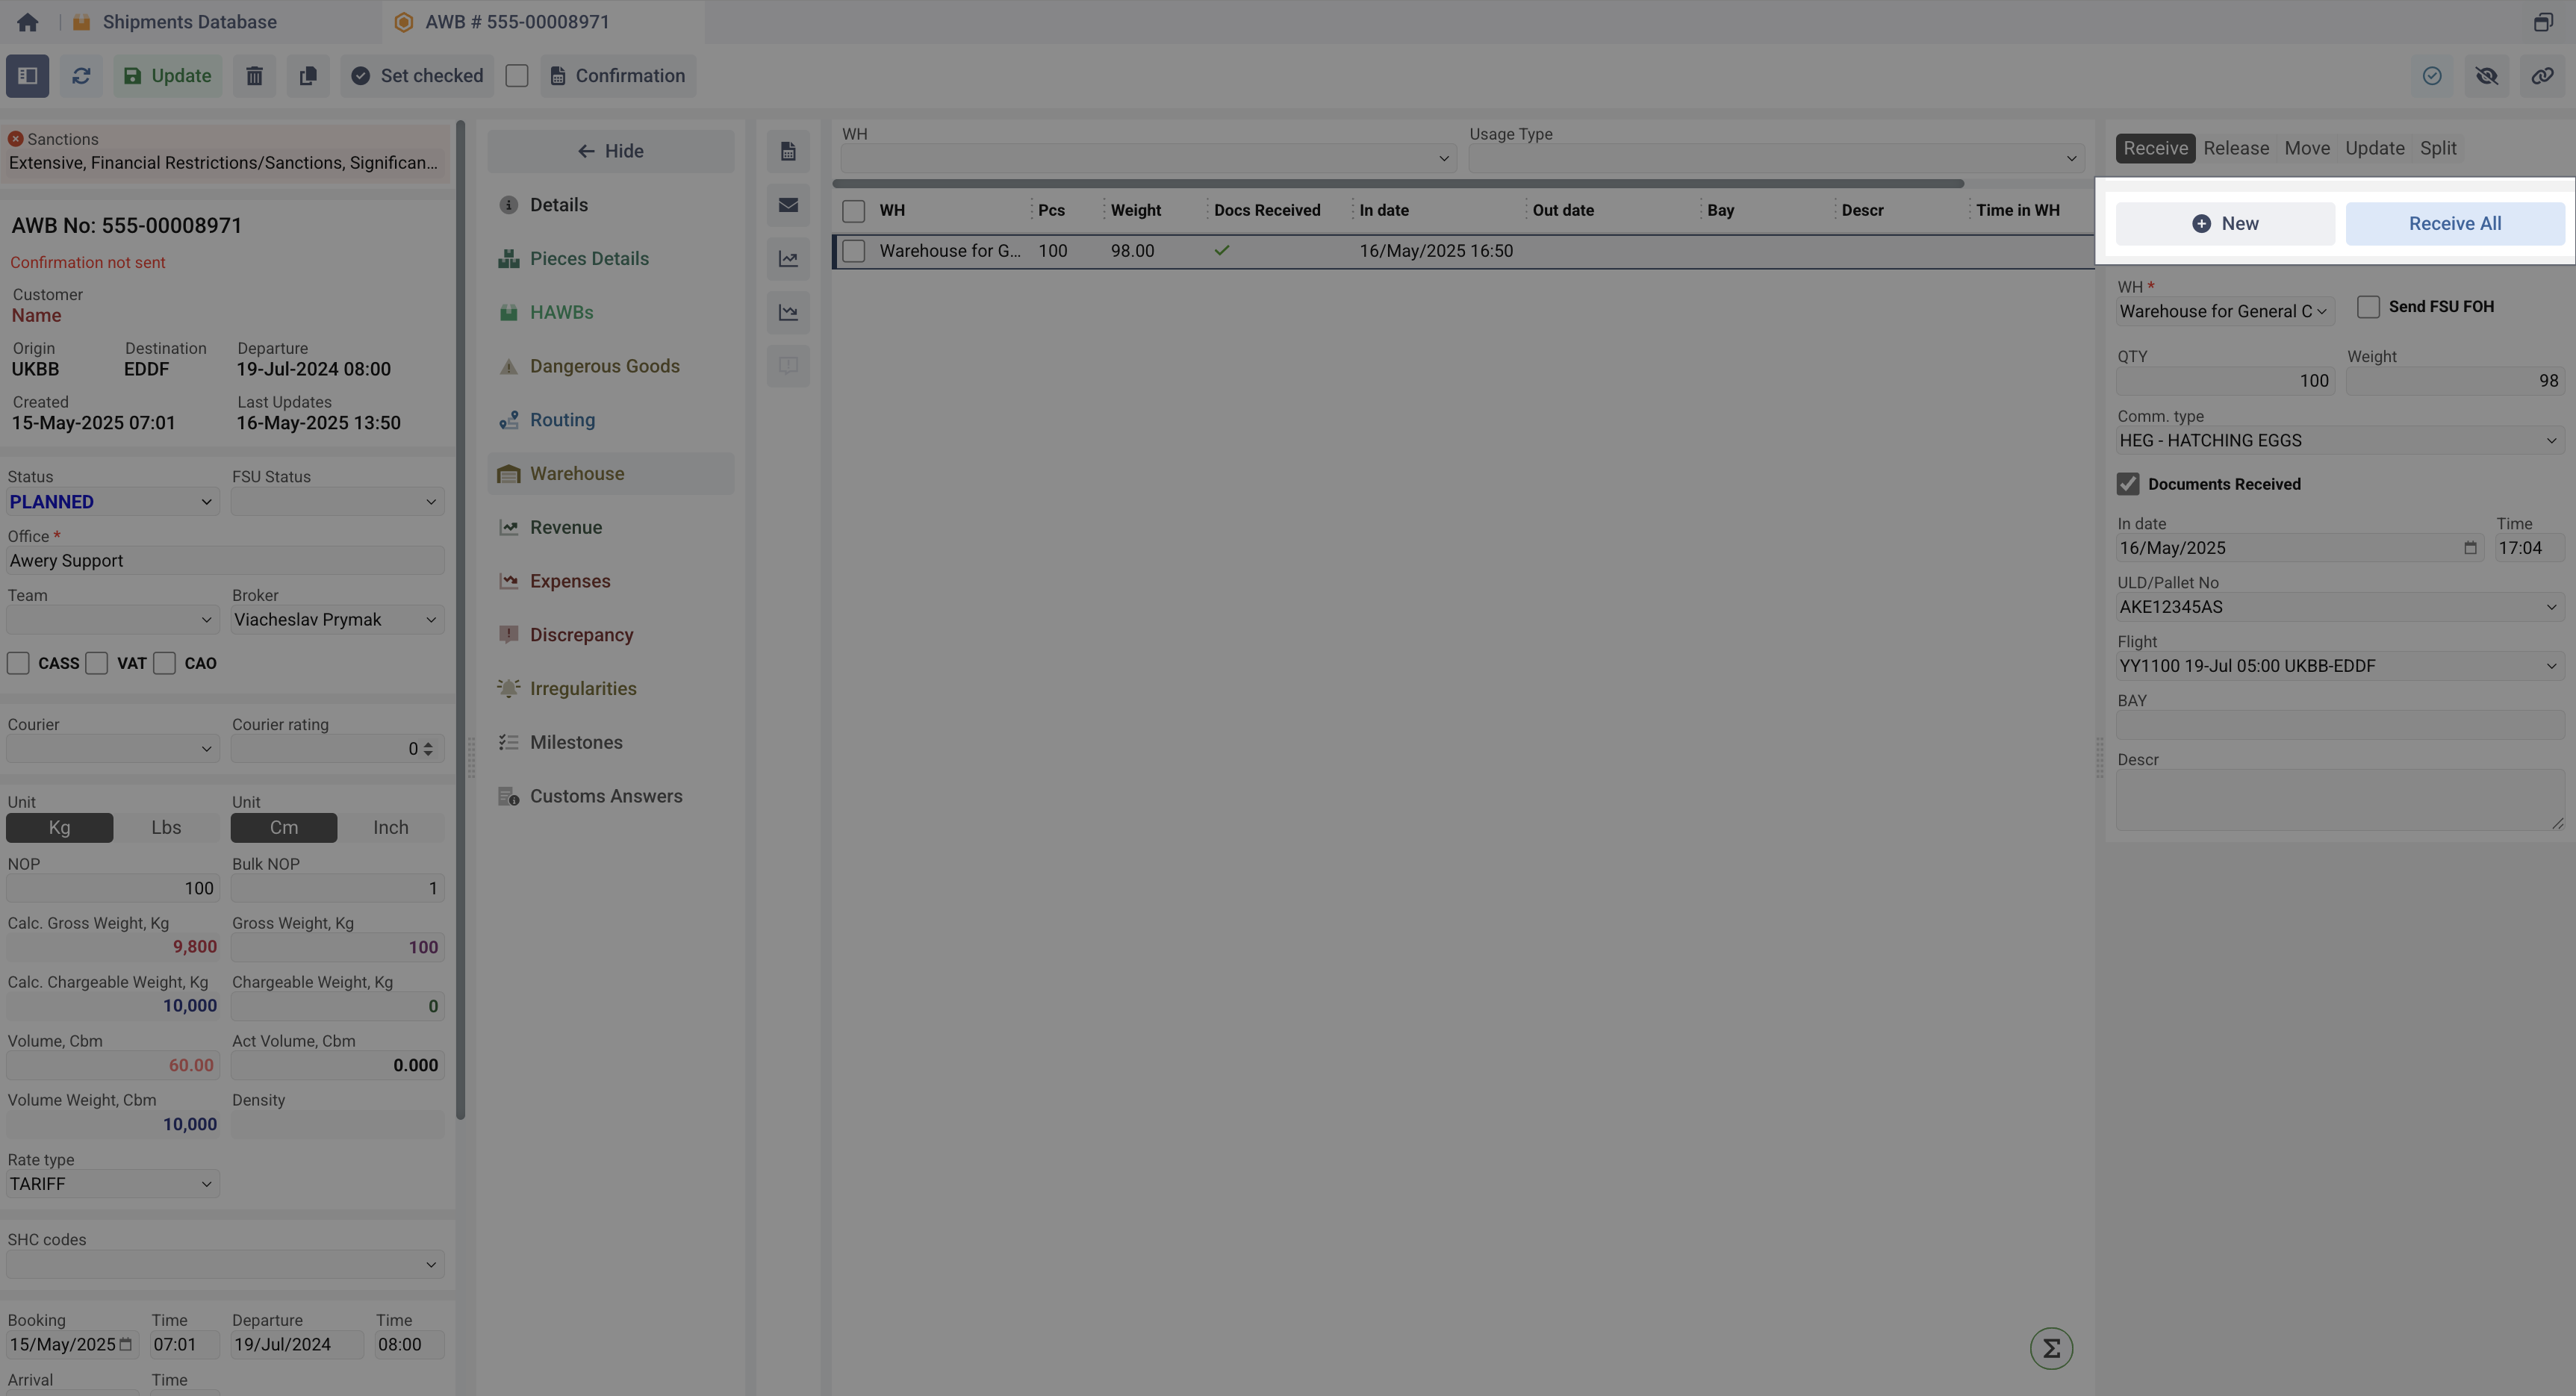
Receive operation
This tab is simpler than the Cargo Acceptance form and is designed to create various records about cargo arriving at the warehouse.
To create a record of incoming shipment:
-
Click New.
-
Select WH (Warehouse).
-
Enter QTY (Quantity).
-
Enter Weight.
-
Select Commodity Type from the list of available.
-
Check Documents Received if applicable.
-
Fill in In Date & Time.
-
Select Flight Number. The list of available flights will be displayed based on the flights on which AWB is currently planned on.
-
Specify BAY (Storage Location) if any.
-
Use Description for notes
-
Click Save.
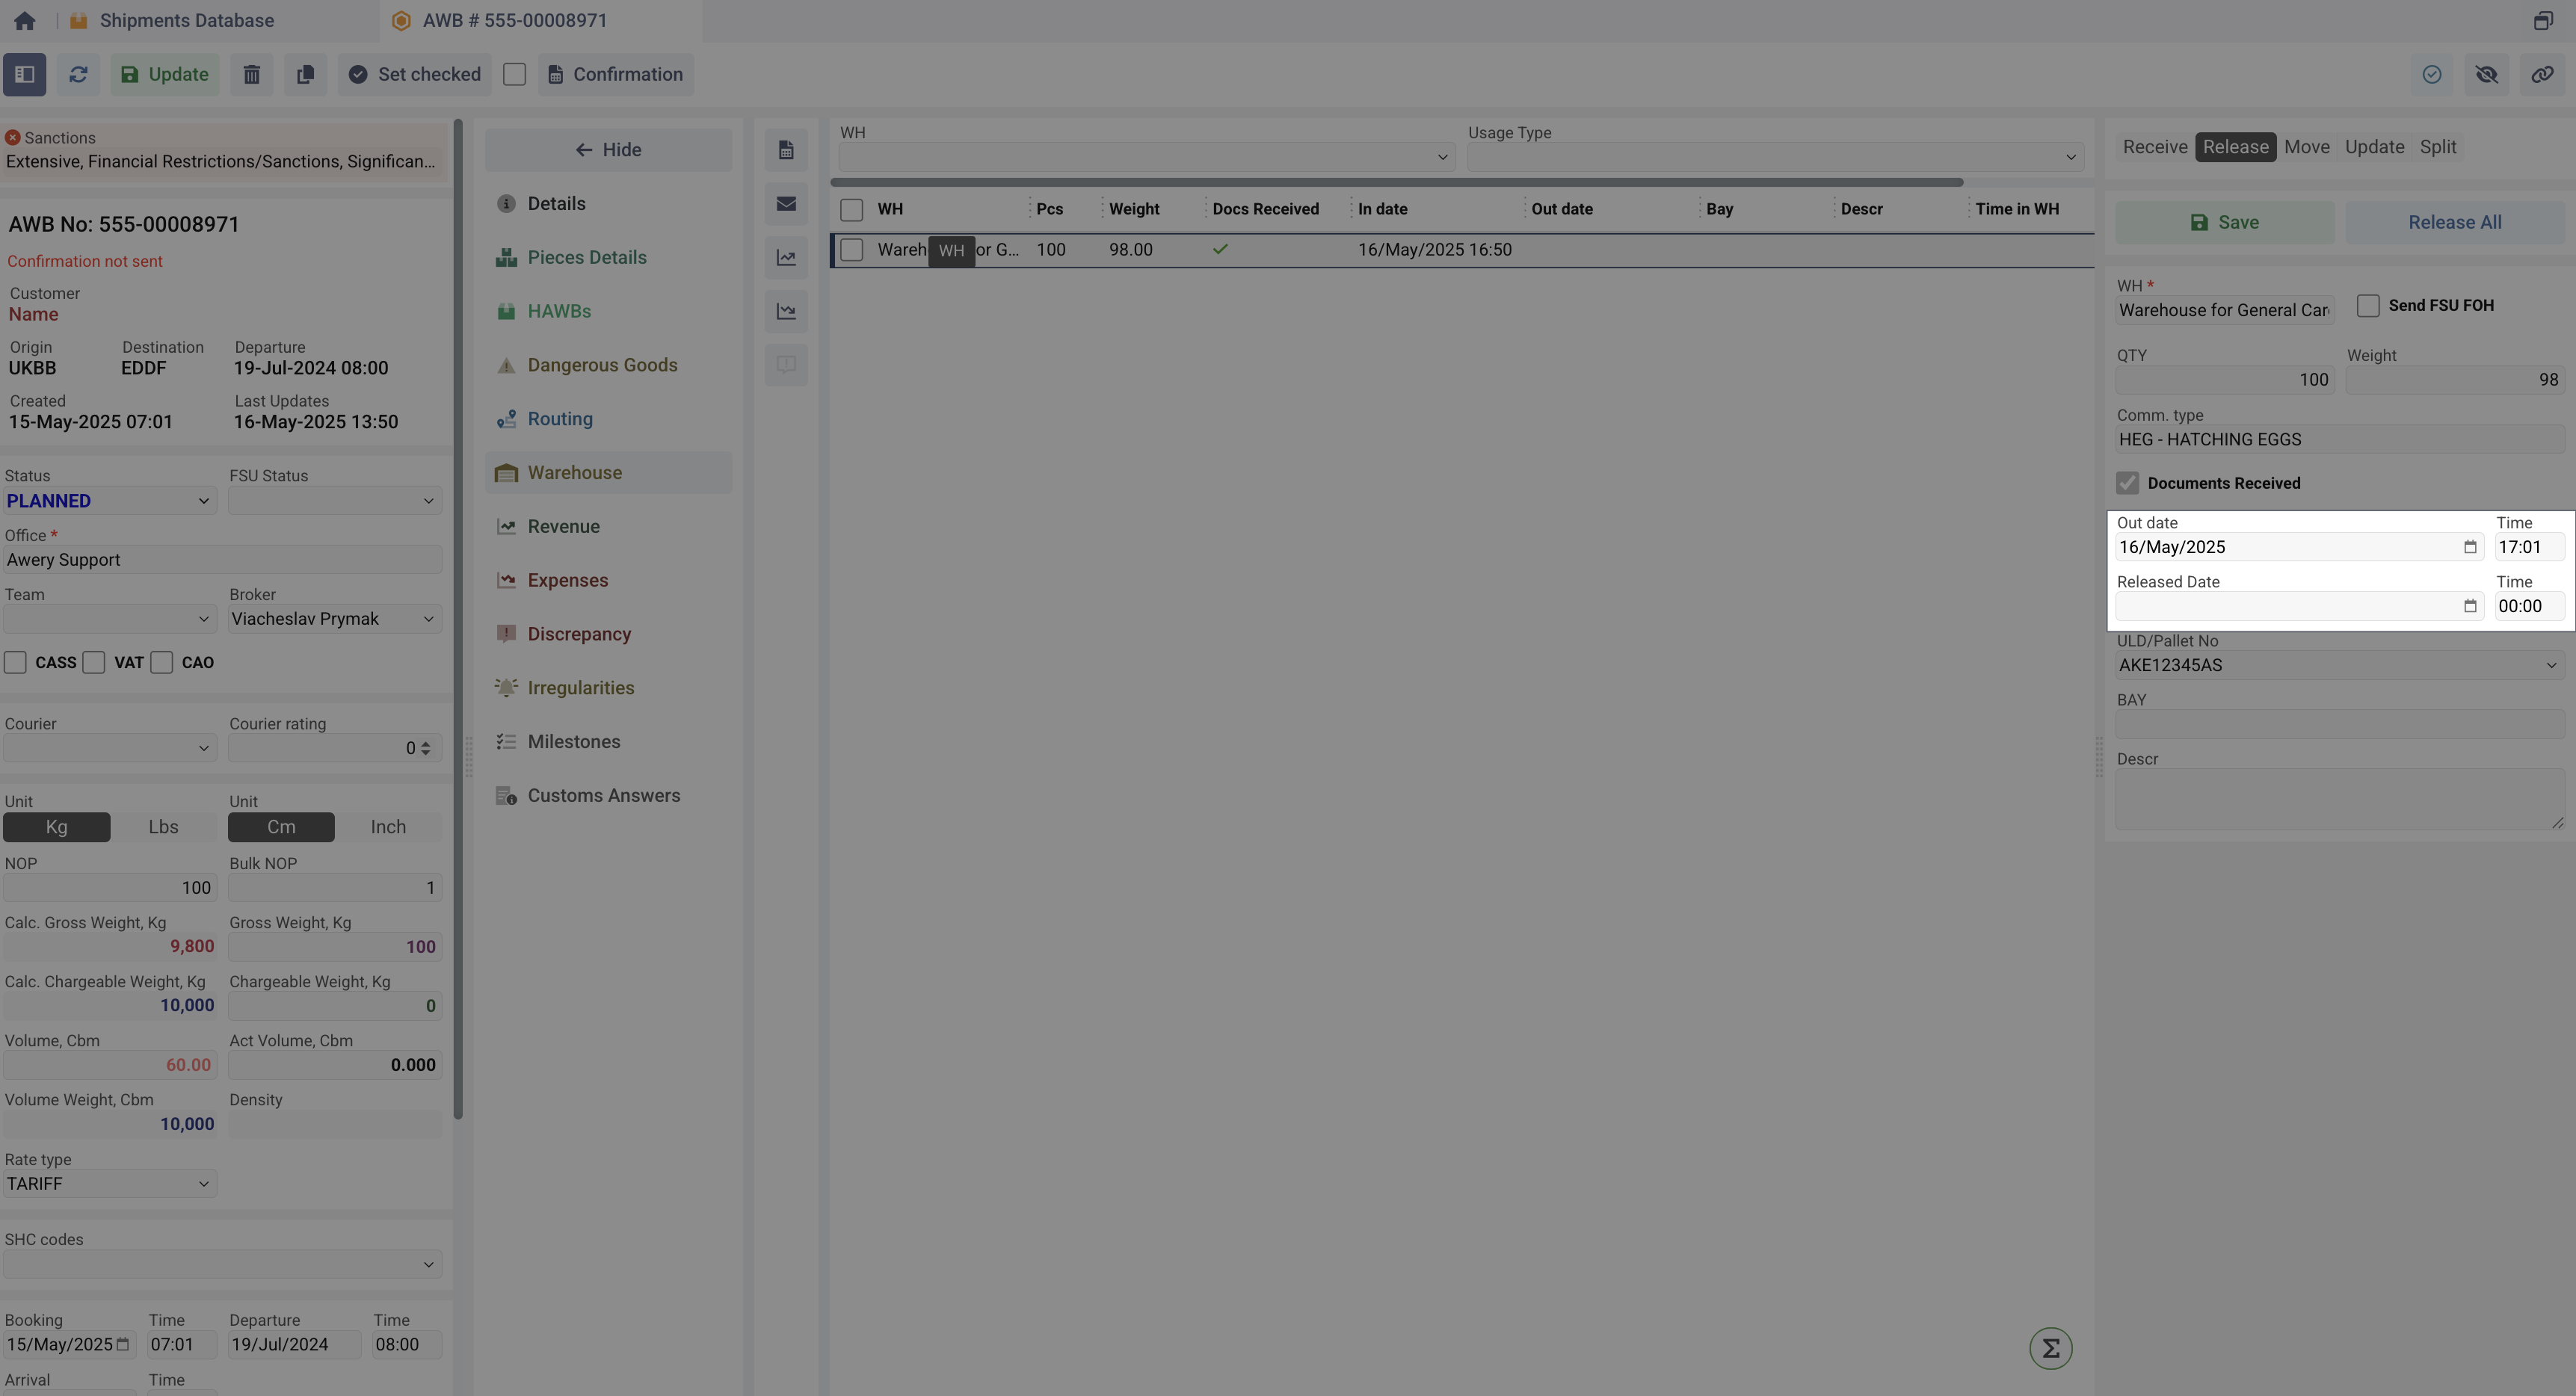
Release operation
To create a record of outgoing from the warehouse cargo:
-
Select the entry without 'Out Date' which means that cargo is still in WH. Other details cannot be changed at this stage.
-
Go to the Release tab.
-
Set the Out Date
-
Click Save.
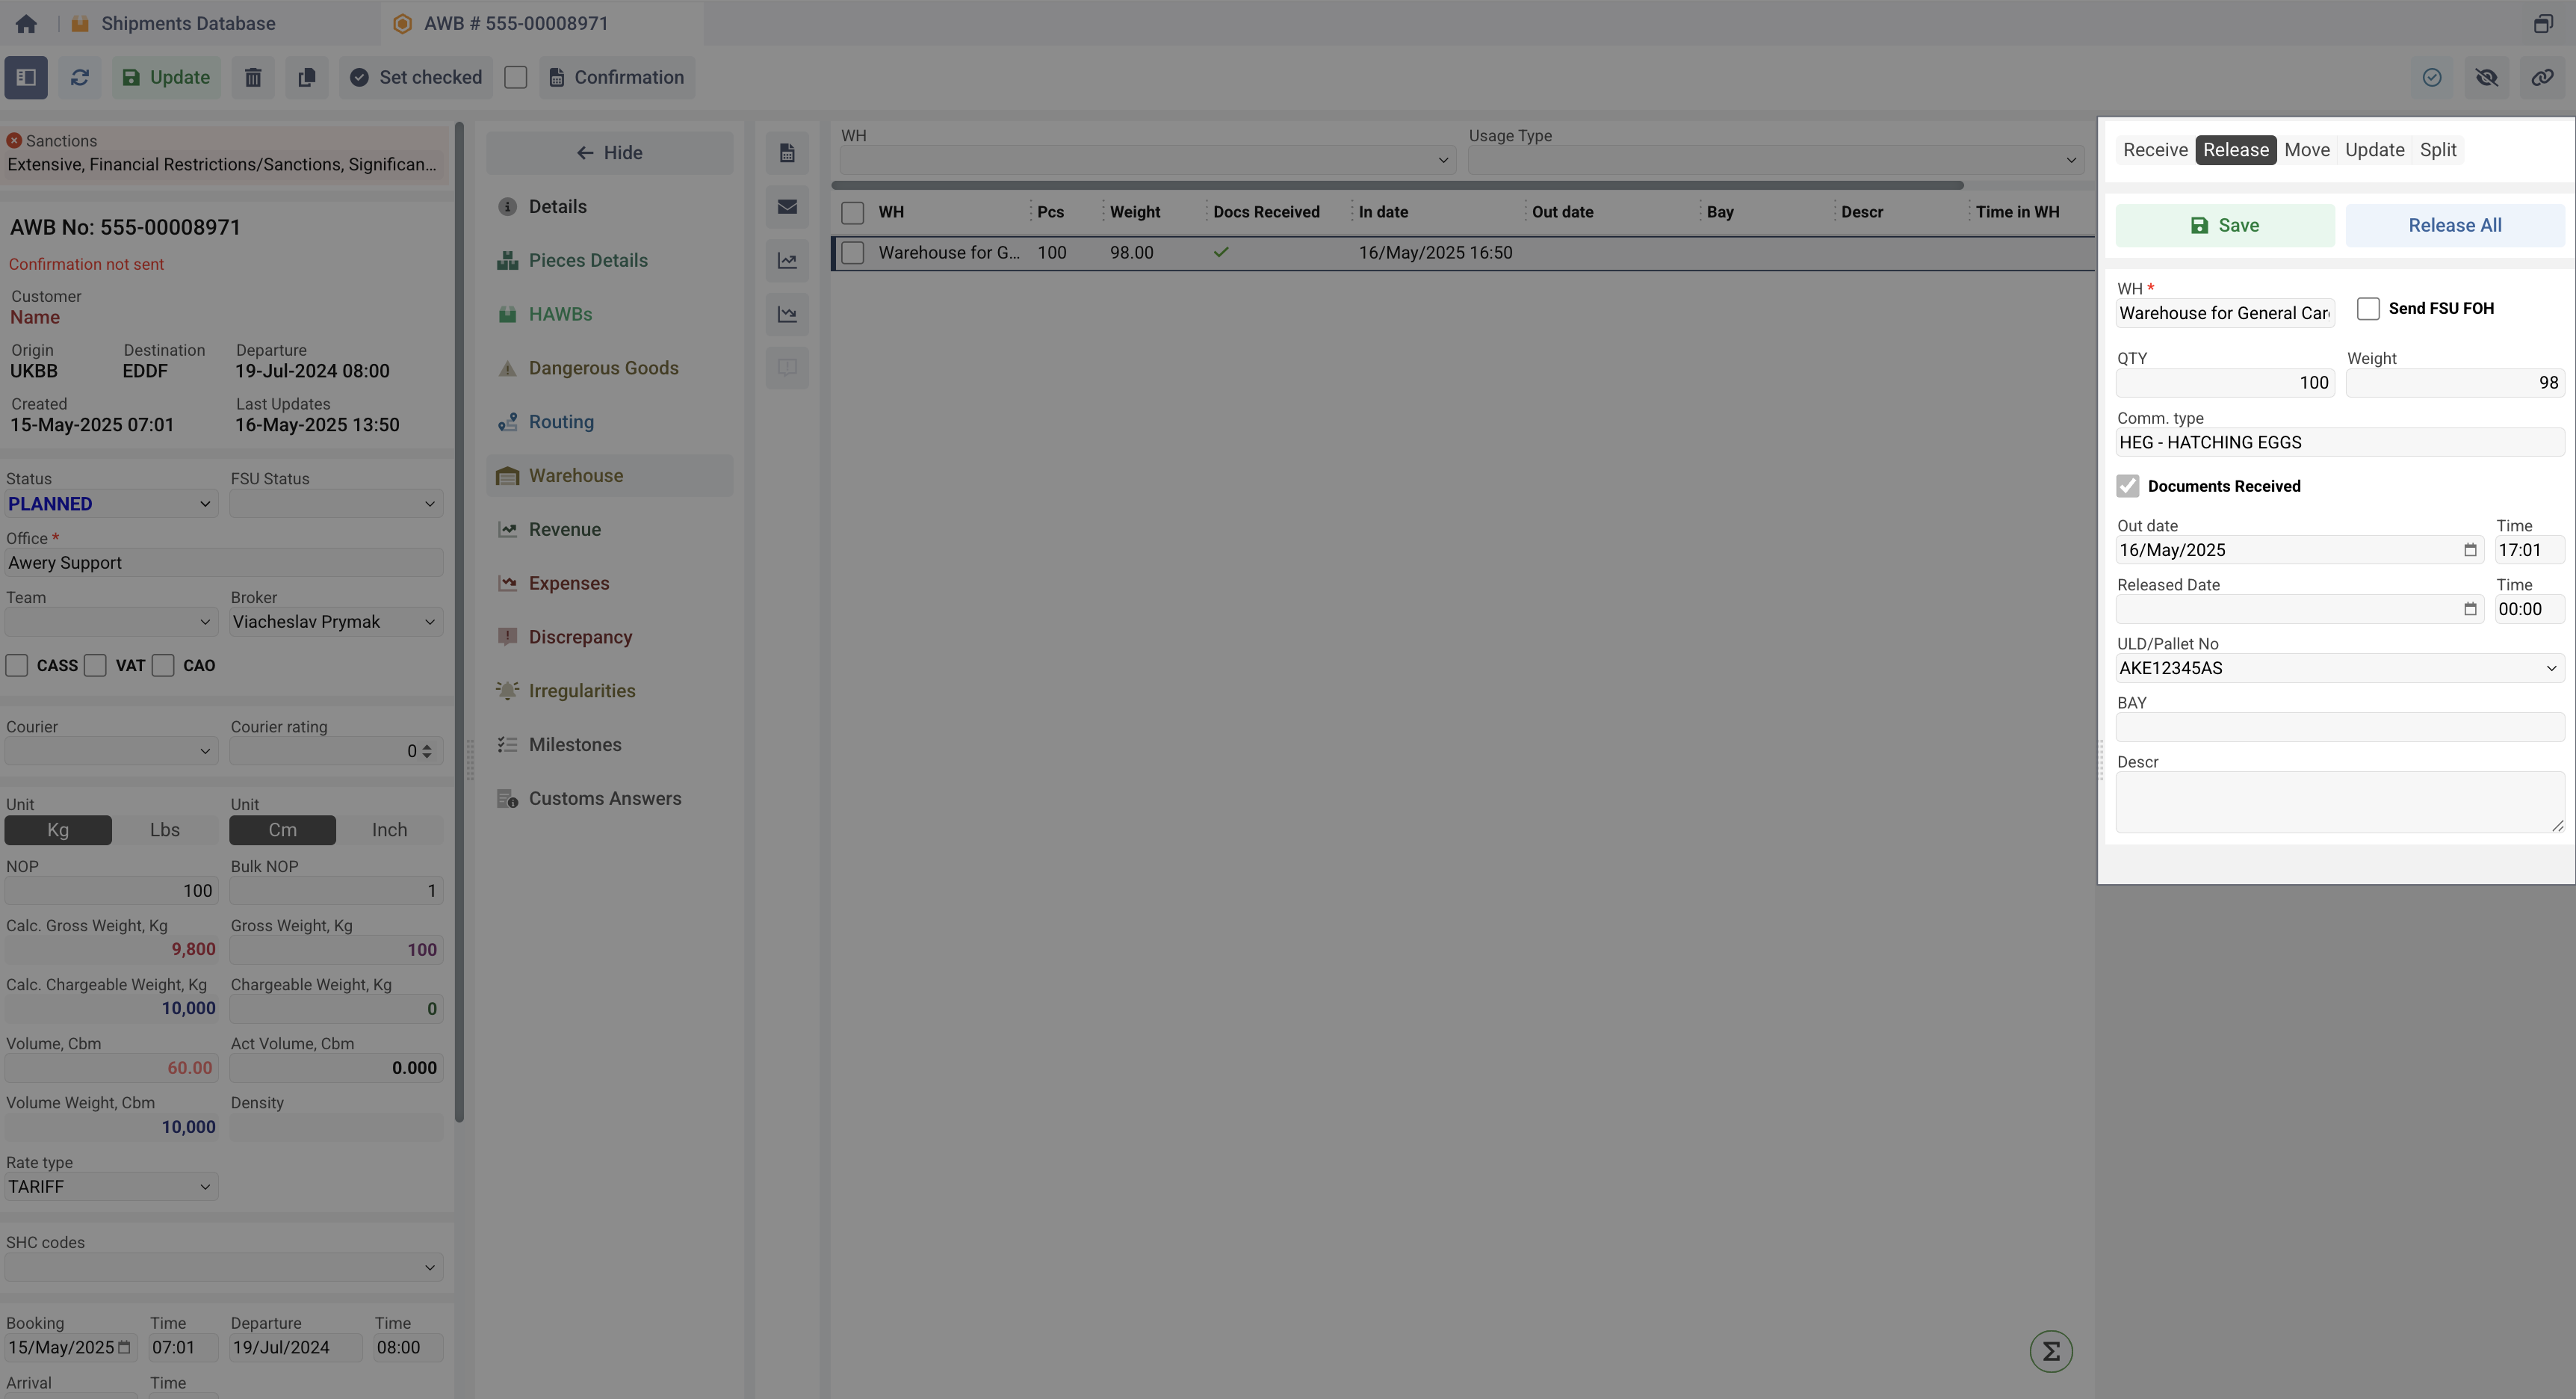
The system will log the release with the following timestamps:
-
Out Date – The documented departure date from the specifiс warehouse.
-
Release Date – The actual physical release date from the authority of Cargo Terminal or it’s territory.
Receive/Release All function
To receive the entire AWB shipment into the warehouse:
-
Select the Warehouse.
-
Click Receive All.
The system automatically creates a record in which the pieces, weight, and commodity type are added based on the basic data of the air waybill.
To release all previously received cargo from the warehouses:
-
Select the Cargo.
-
Click Release All.

Move Function
The system allows you to quickly move cargo from one location/warehouse to another. To do this, select a Warehouse Data record from the table where there is no Out Date yet and go to the Move tab. In this tab, as a main step, you need to specify a new warehouse, the amount of weight and quantity and pieces that will be moved there.
You can also change other data, including the date of Receiving to the new warehouse and the date of Release from the current warehouse.
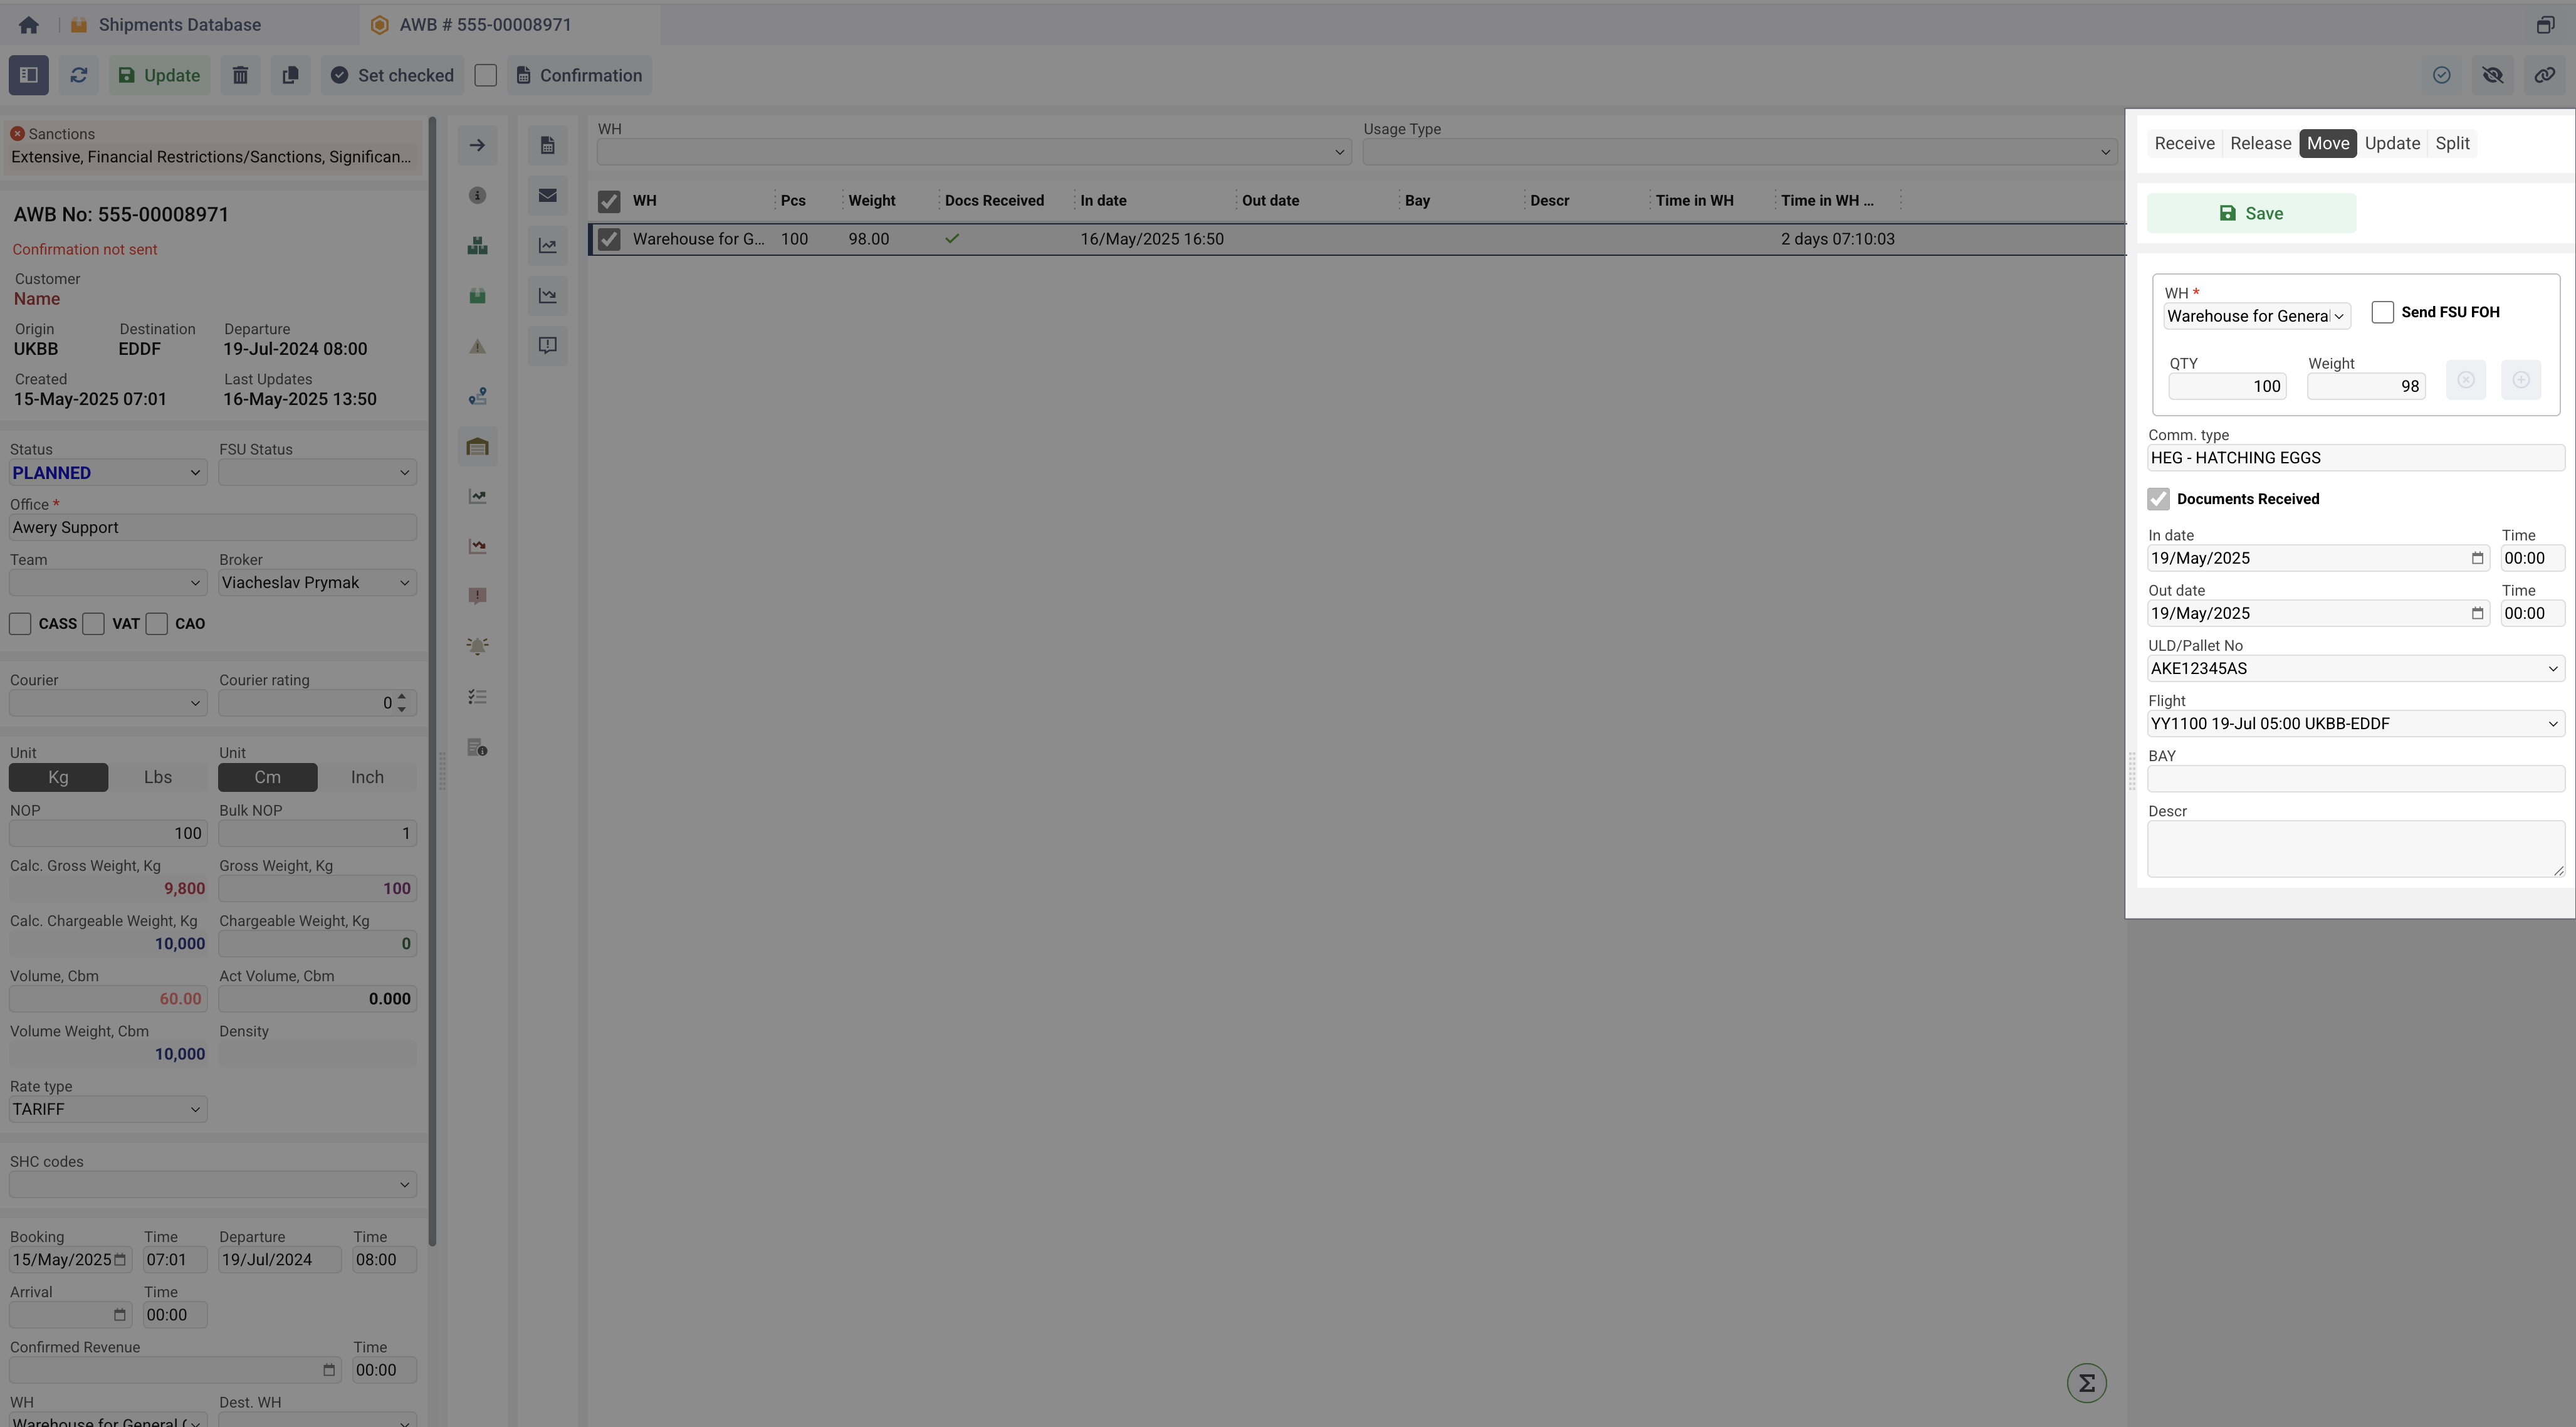
If you specify the maximum number of pieces but not the weight, the system will not allow you to do this. The same works if you specify the entire weight but not the pieces. In case of inconsistency of information, you need to update the initial warehouse data using the Update tab.
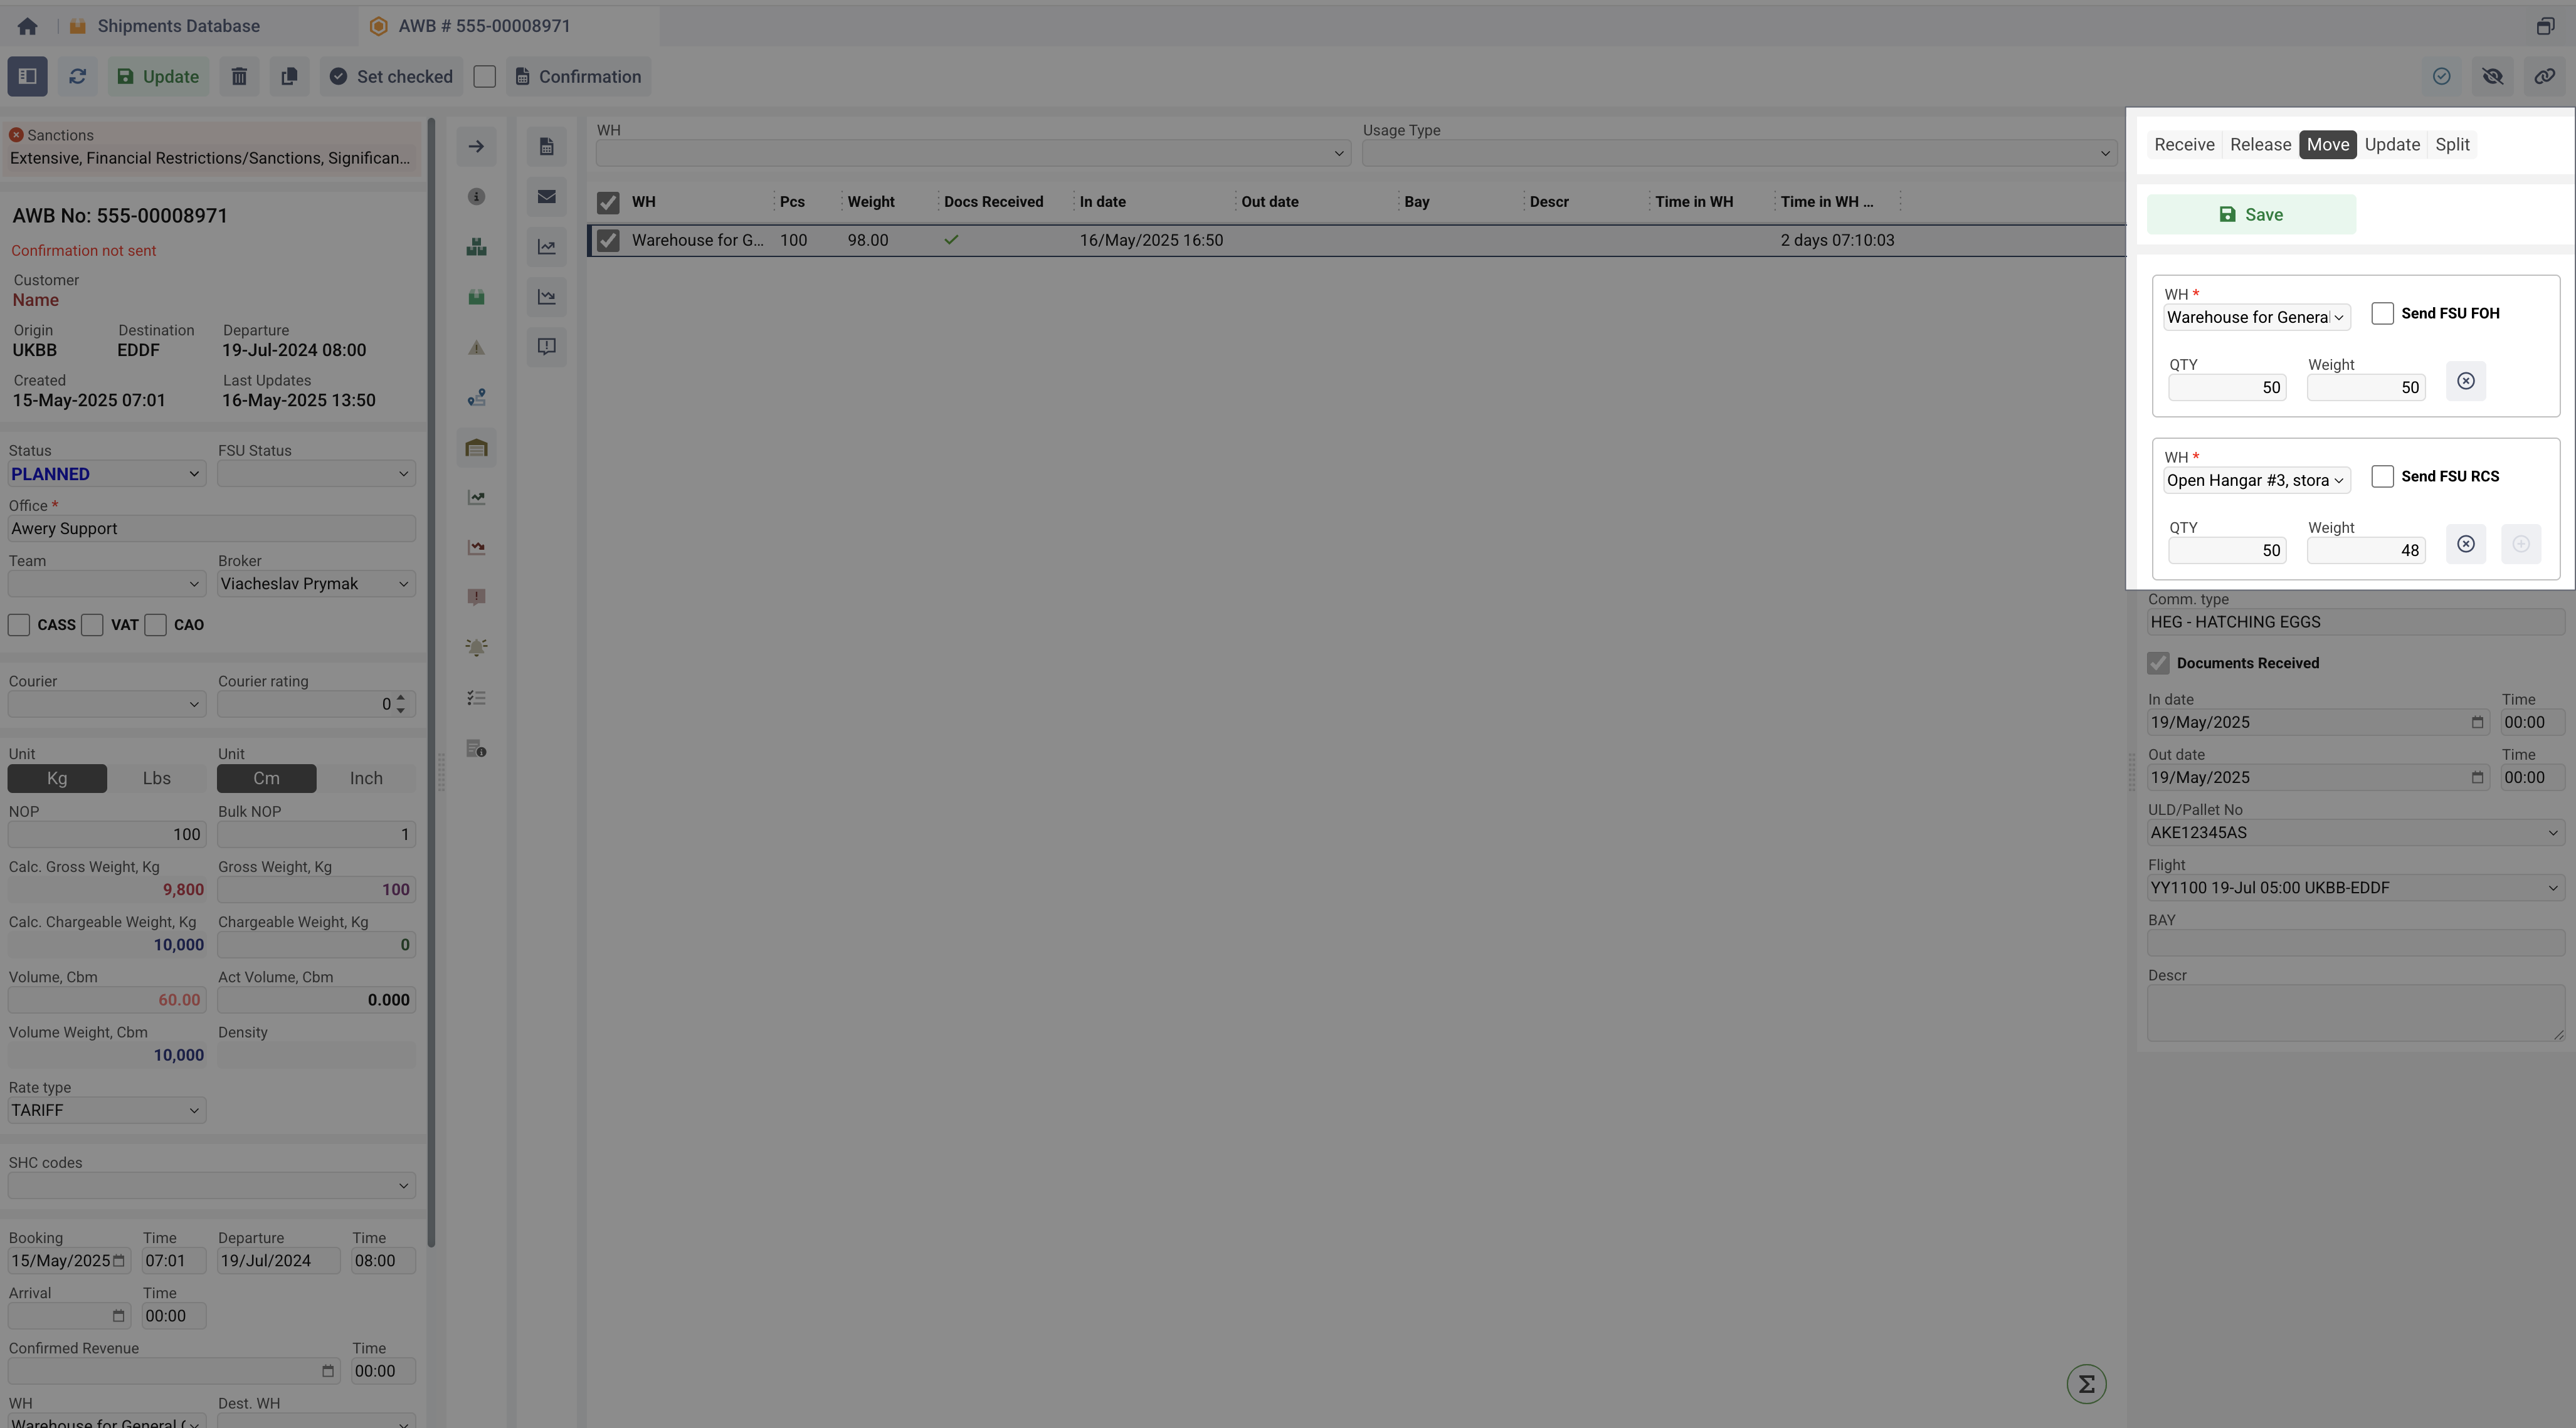
At the same time, the system allows you to create several records of movement between warehouses at once, provided that the cargo is moved in parts. To do this, enter not the maximum values of weight AND pieces, and click the Add Warehouse to split cargo button, which will add a new component to create another record, as shown in the screenshot below. The system will automatically calculate the difference between the entered values in the previous section and the maximum values in the first selected warehouse data.
In this case, the system will put the date of release from the warehouse on the initially selected record, and will create as many new ones as you have filled. In Date&time will be the same for each new record.
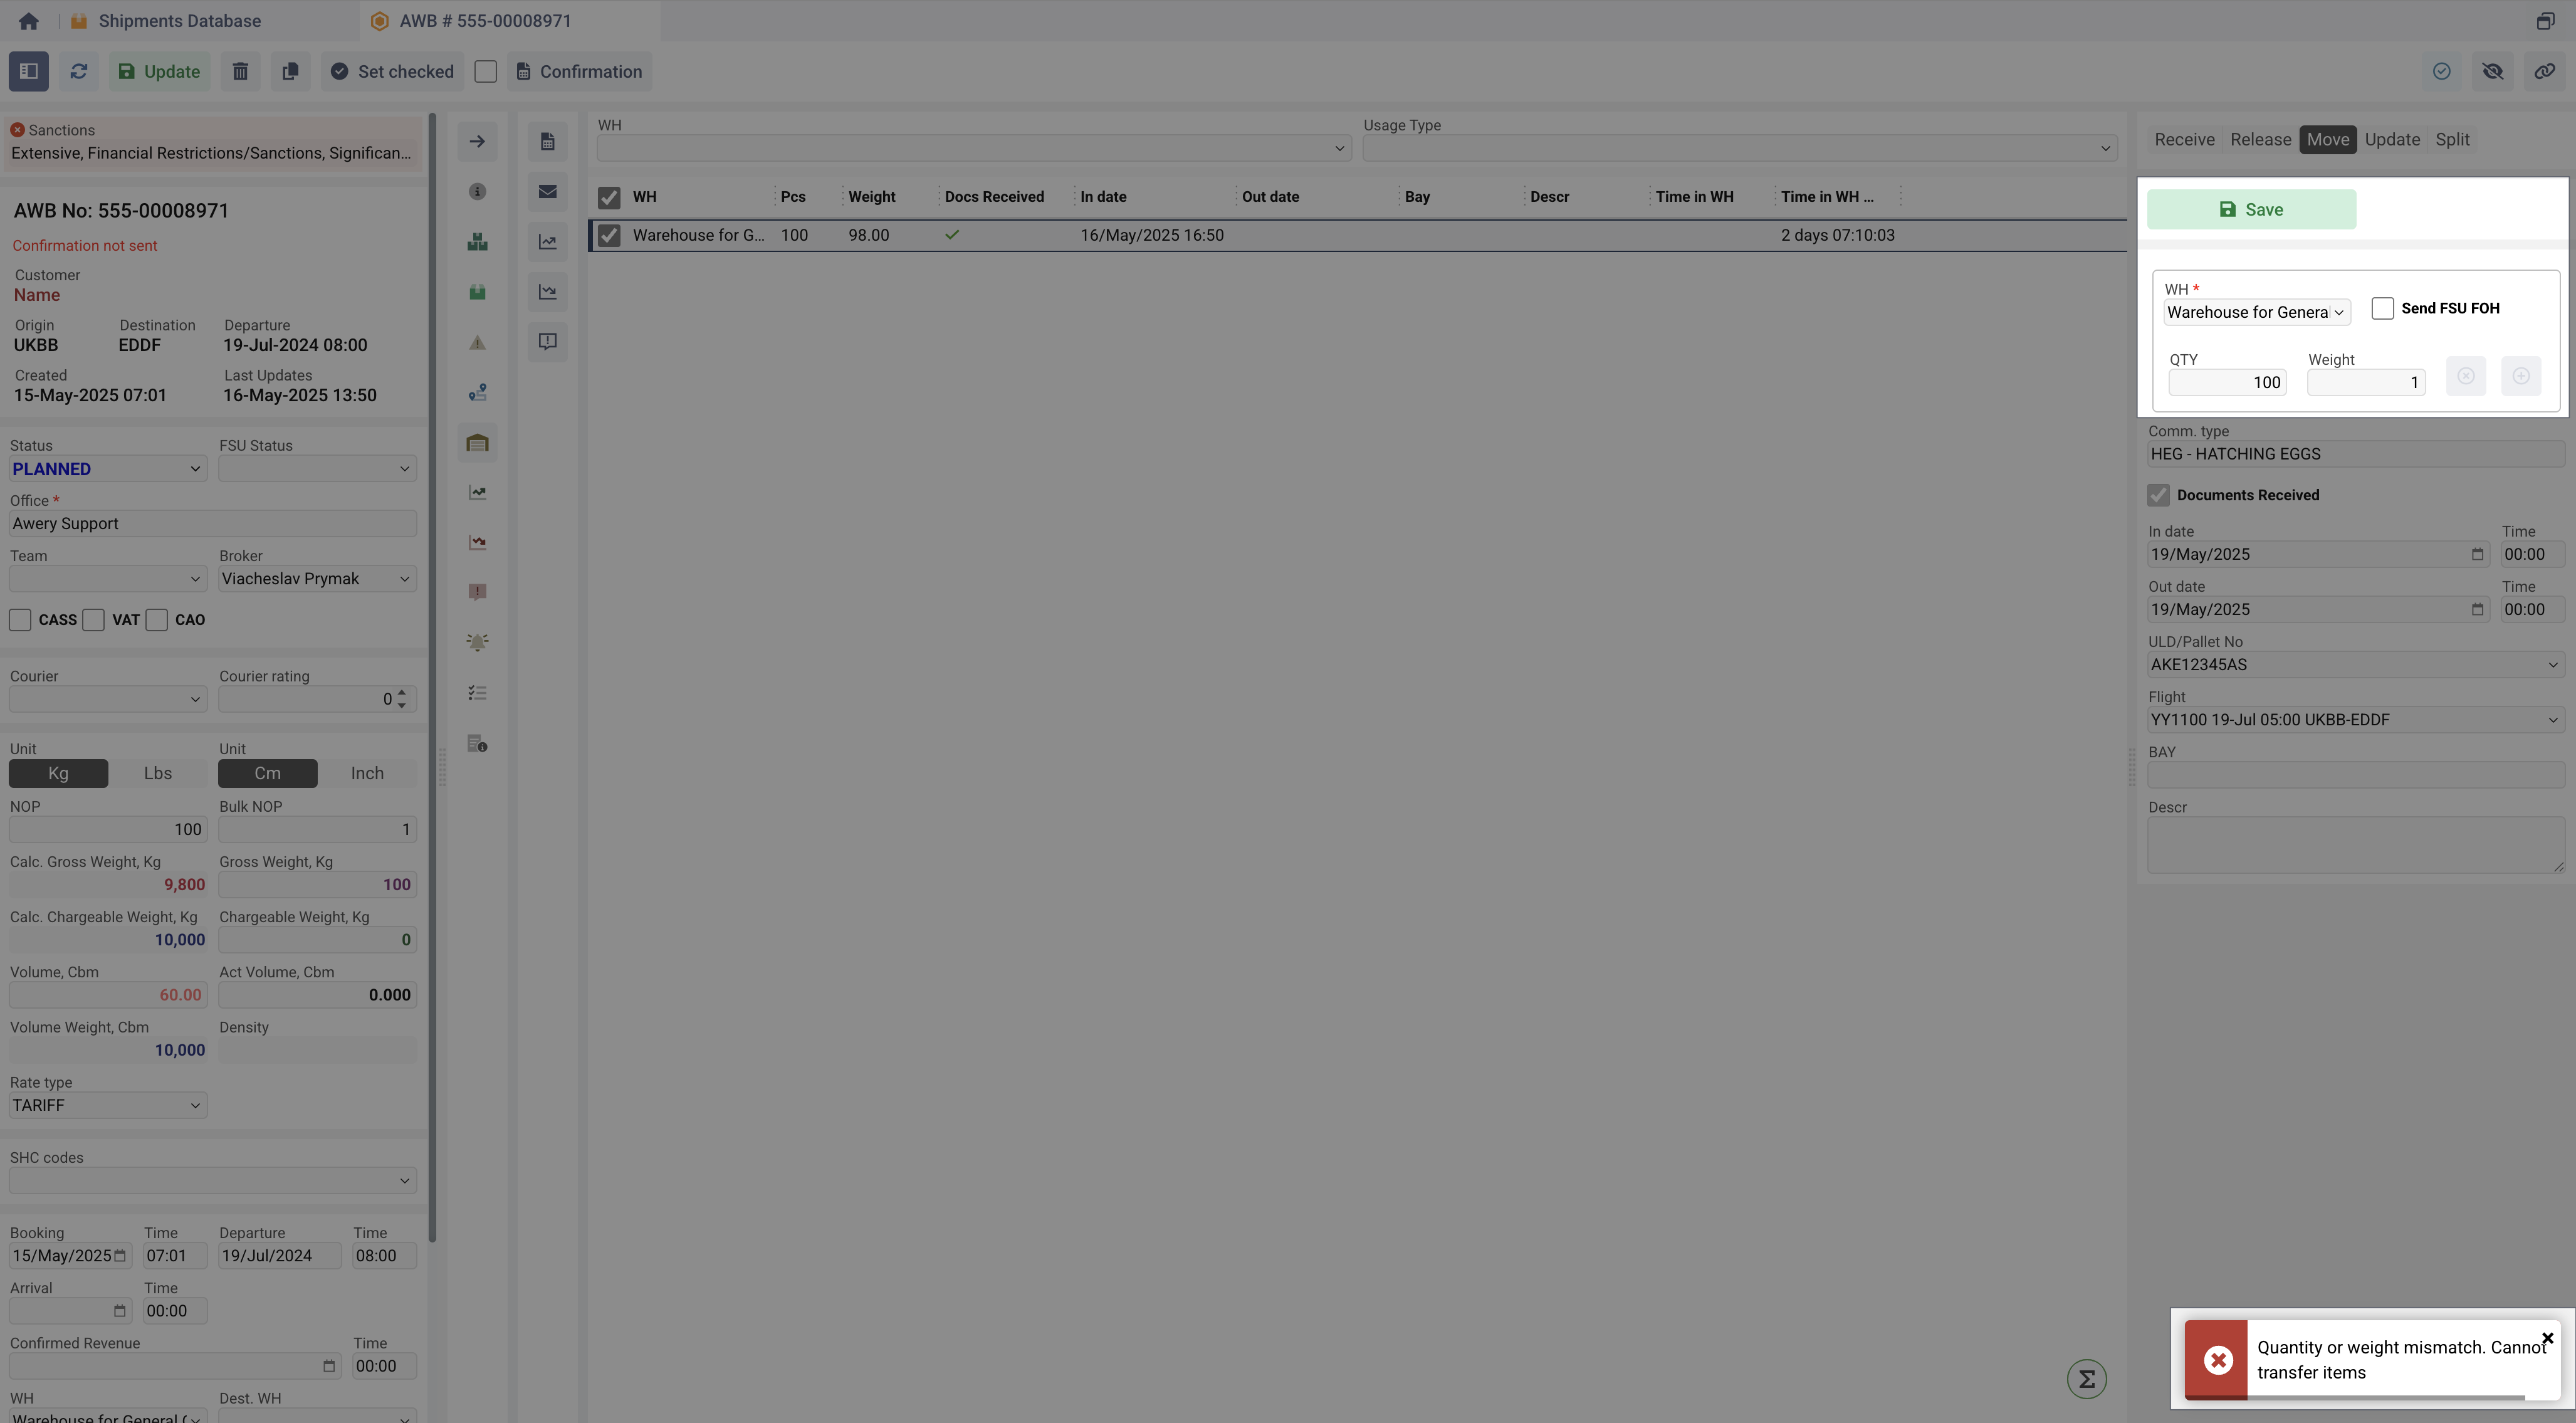
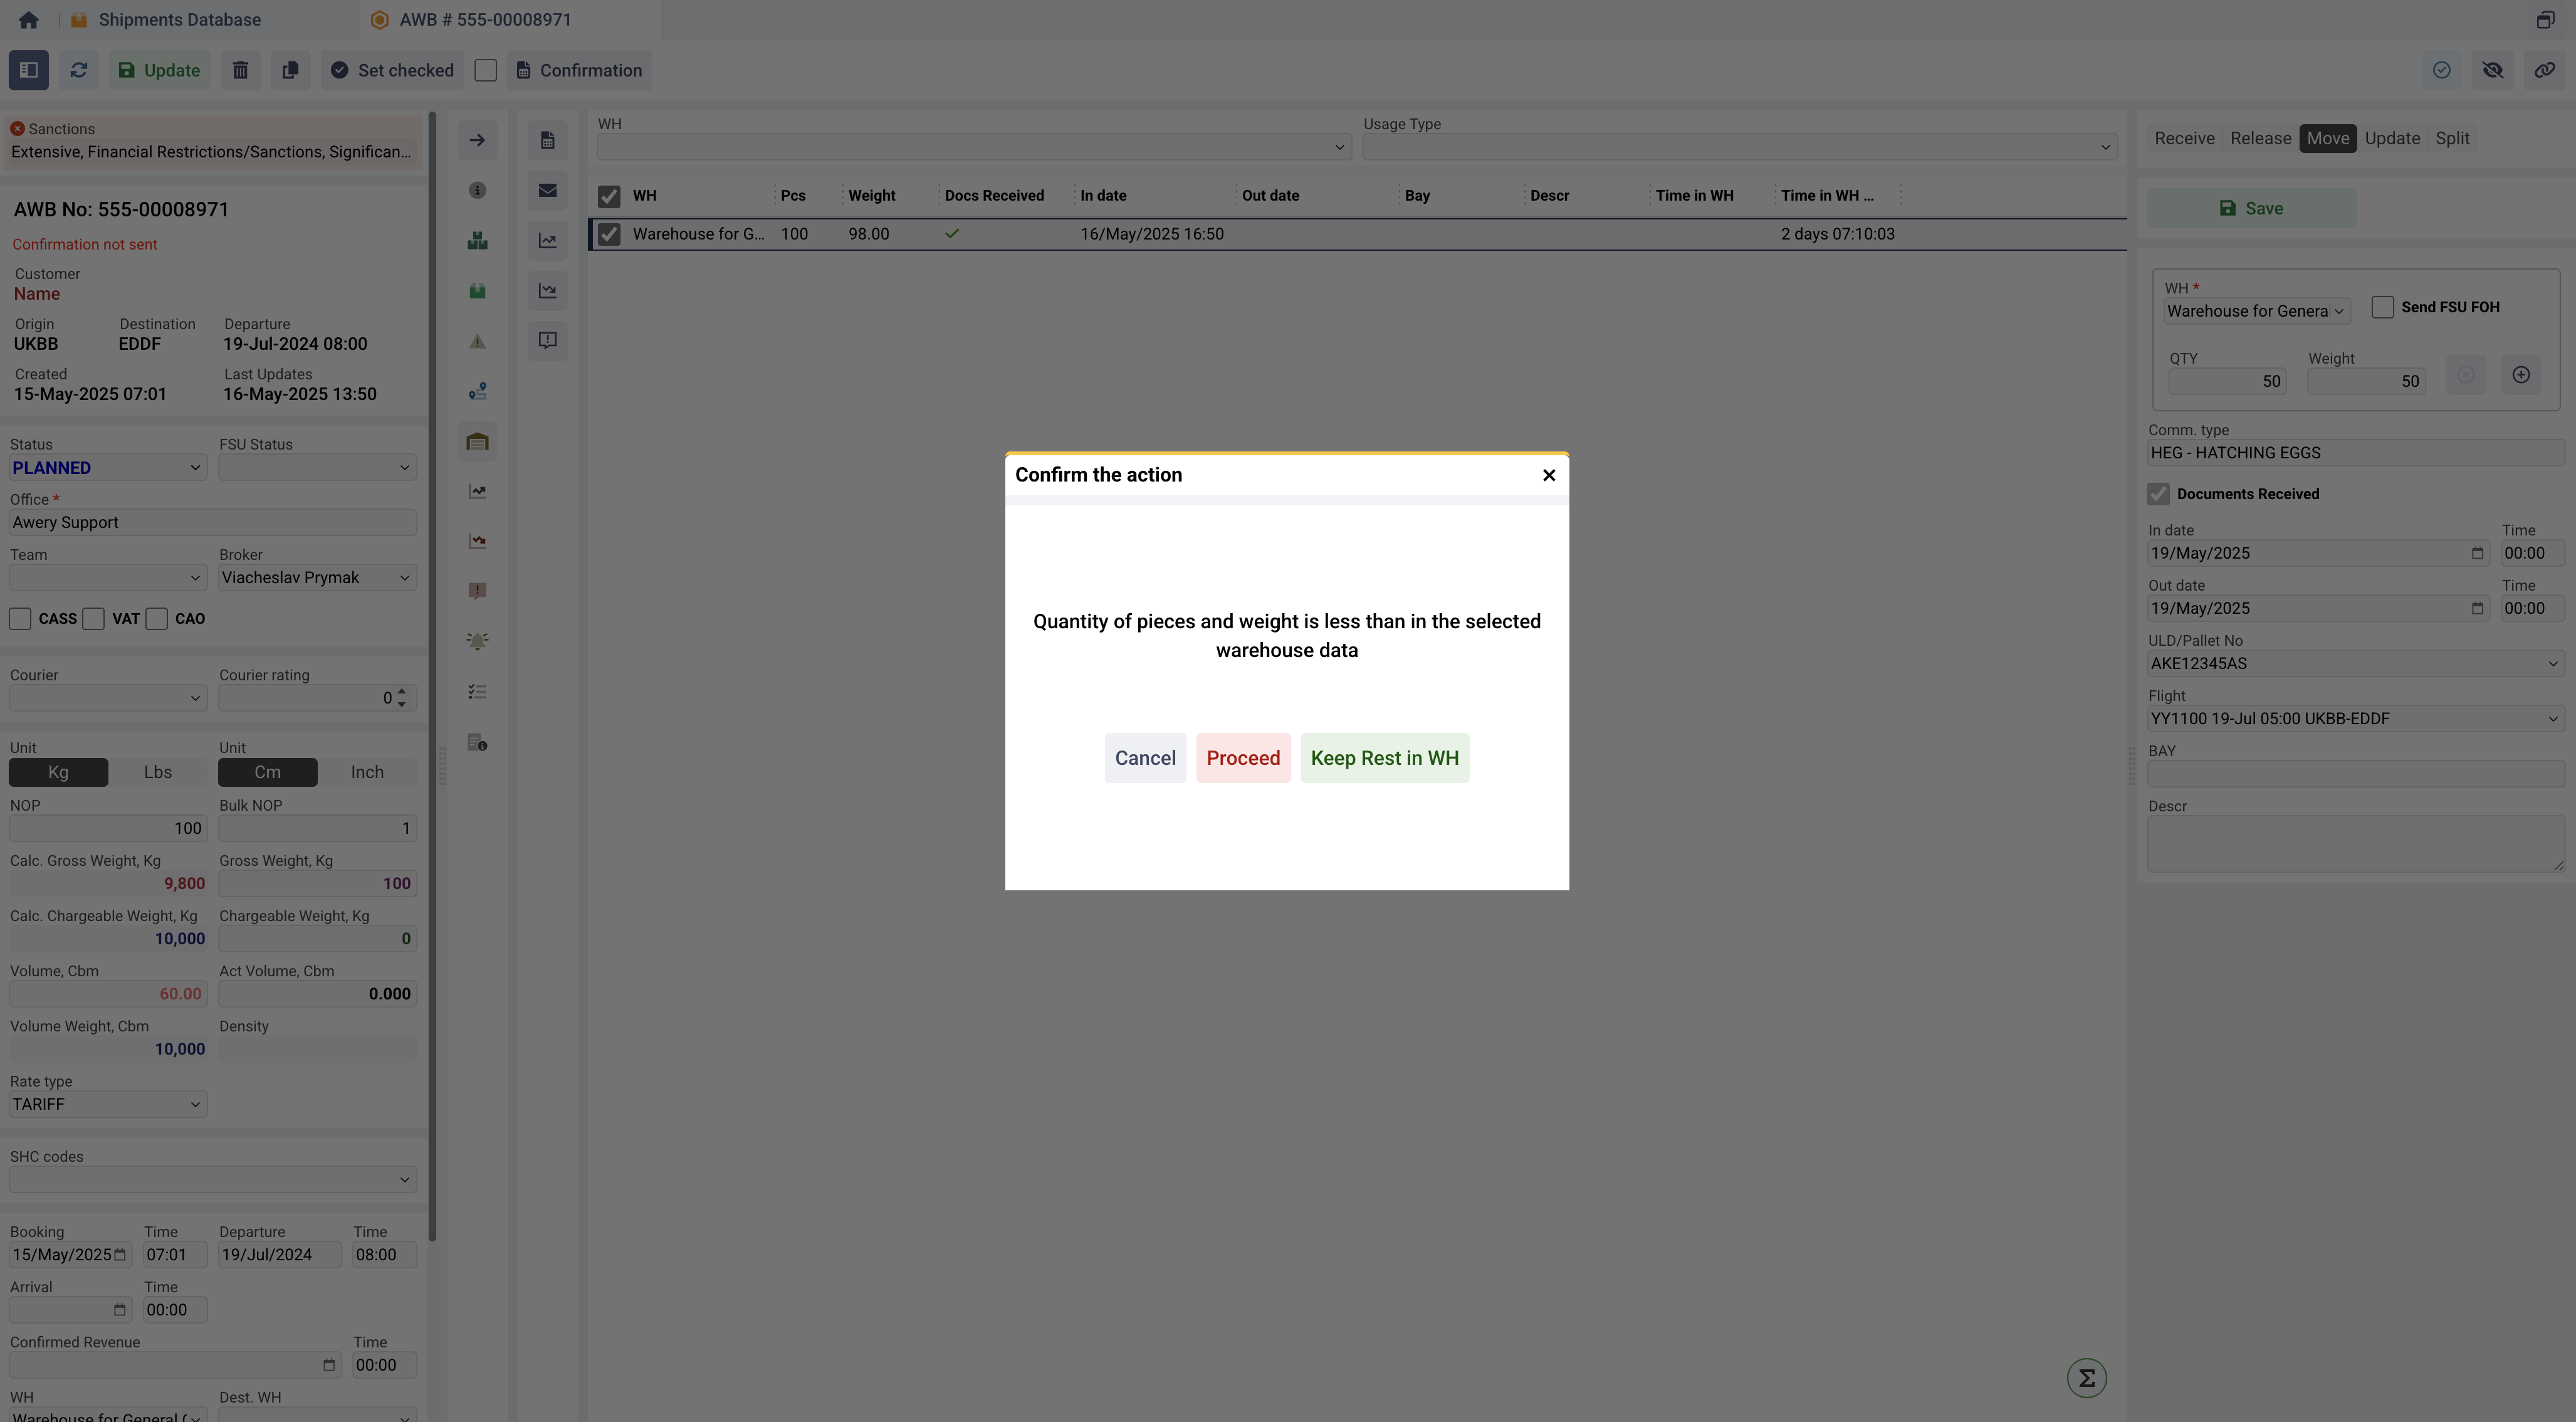
It does not matter whether you want to create one or more movement records, if you want to save records where the sum of the Weight and the number of pieces does not match the values from the initially selected Warehouse Data, the system will open a modal window where you need to confirm this action.
If you click:
-
Cancel
-
The system will close the window and will not perform any actions, allowing you to check the entered data.
-
-
Continue
-
The system will save the data exactly as you entered it without validating it.
-
-
Keep rest in WH
-
The system will split the initial record in such a way as to separate the rest, leave it in the warehouse, and move only the specified part of the shipment.
-
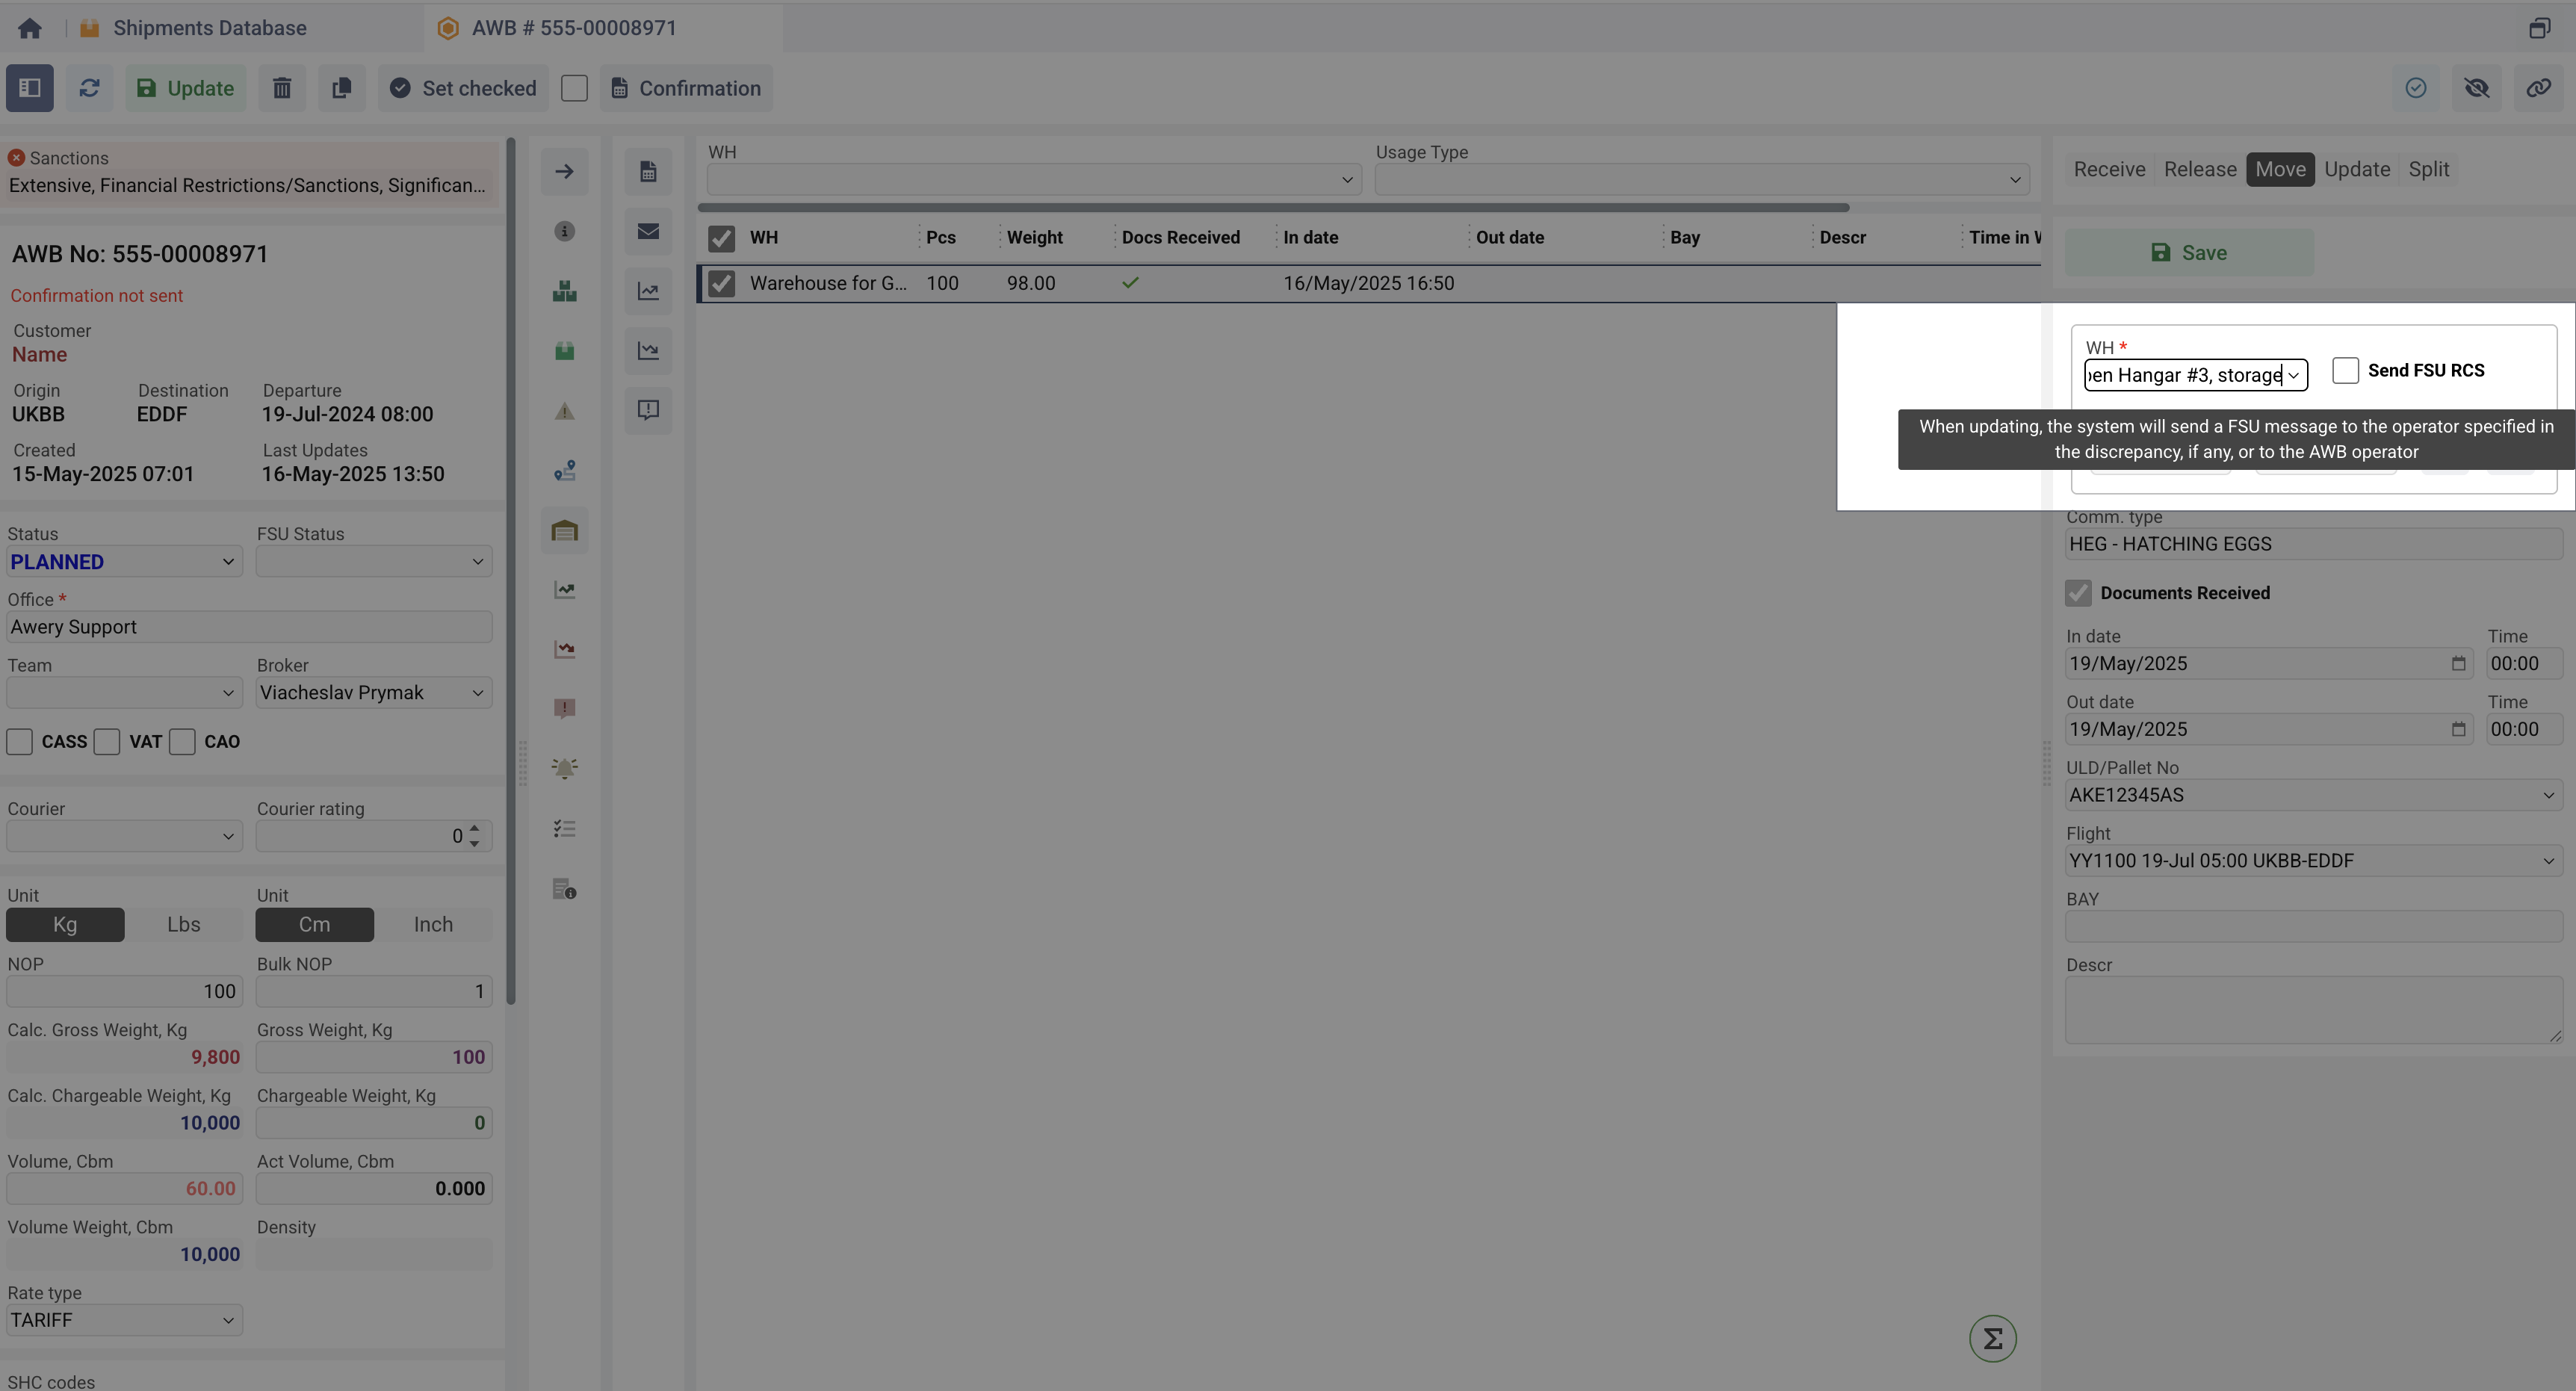
Since a move record is literally creating a new WH data record (and updating the old one), as mentioned earlier, the system will offer to send various FSU notifications at the time of the move. The type of notification at this point will depend on the Usage Type specified in the warehouse setup.
Thus, if the Warehouse with:
-
Storage - FSU RCS will be suggested.
-
Build Up Area - FSU PRE will be suggested.
-
Dispatch Zone - FSU RCF will be suggested.
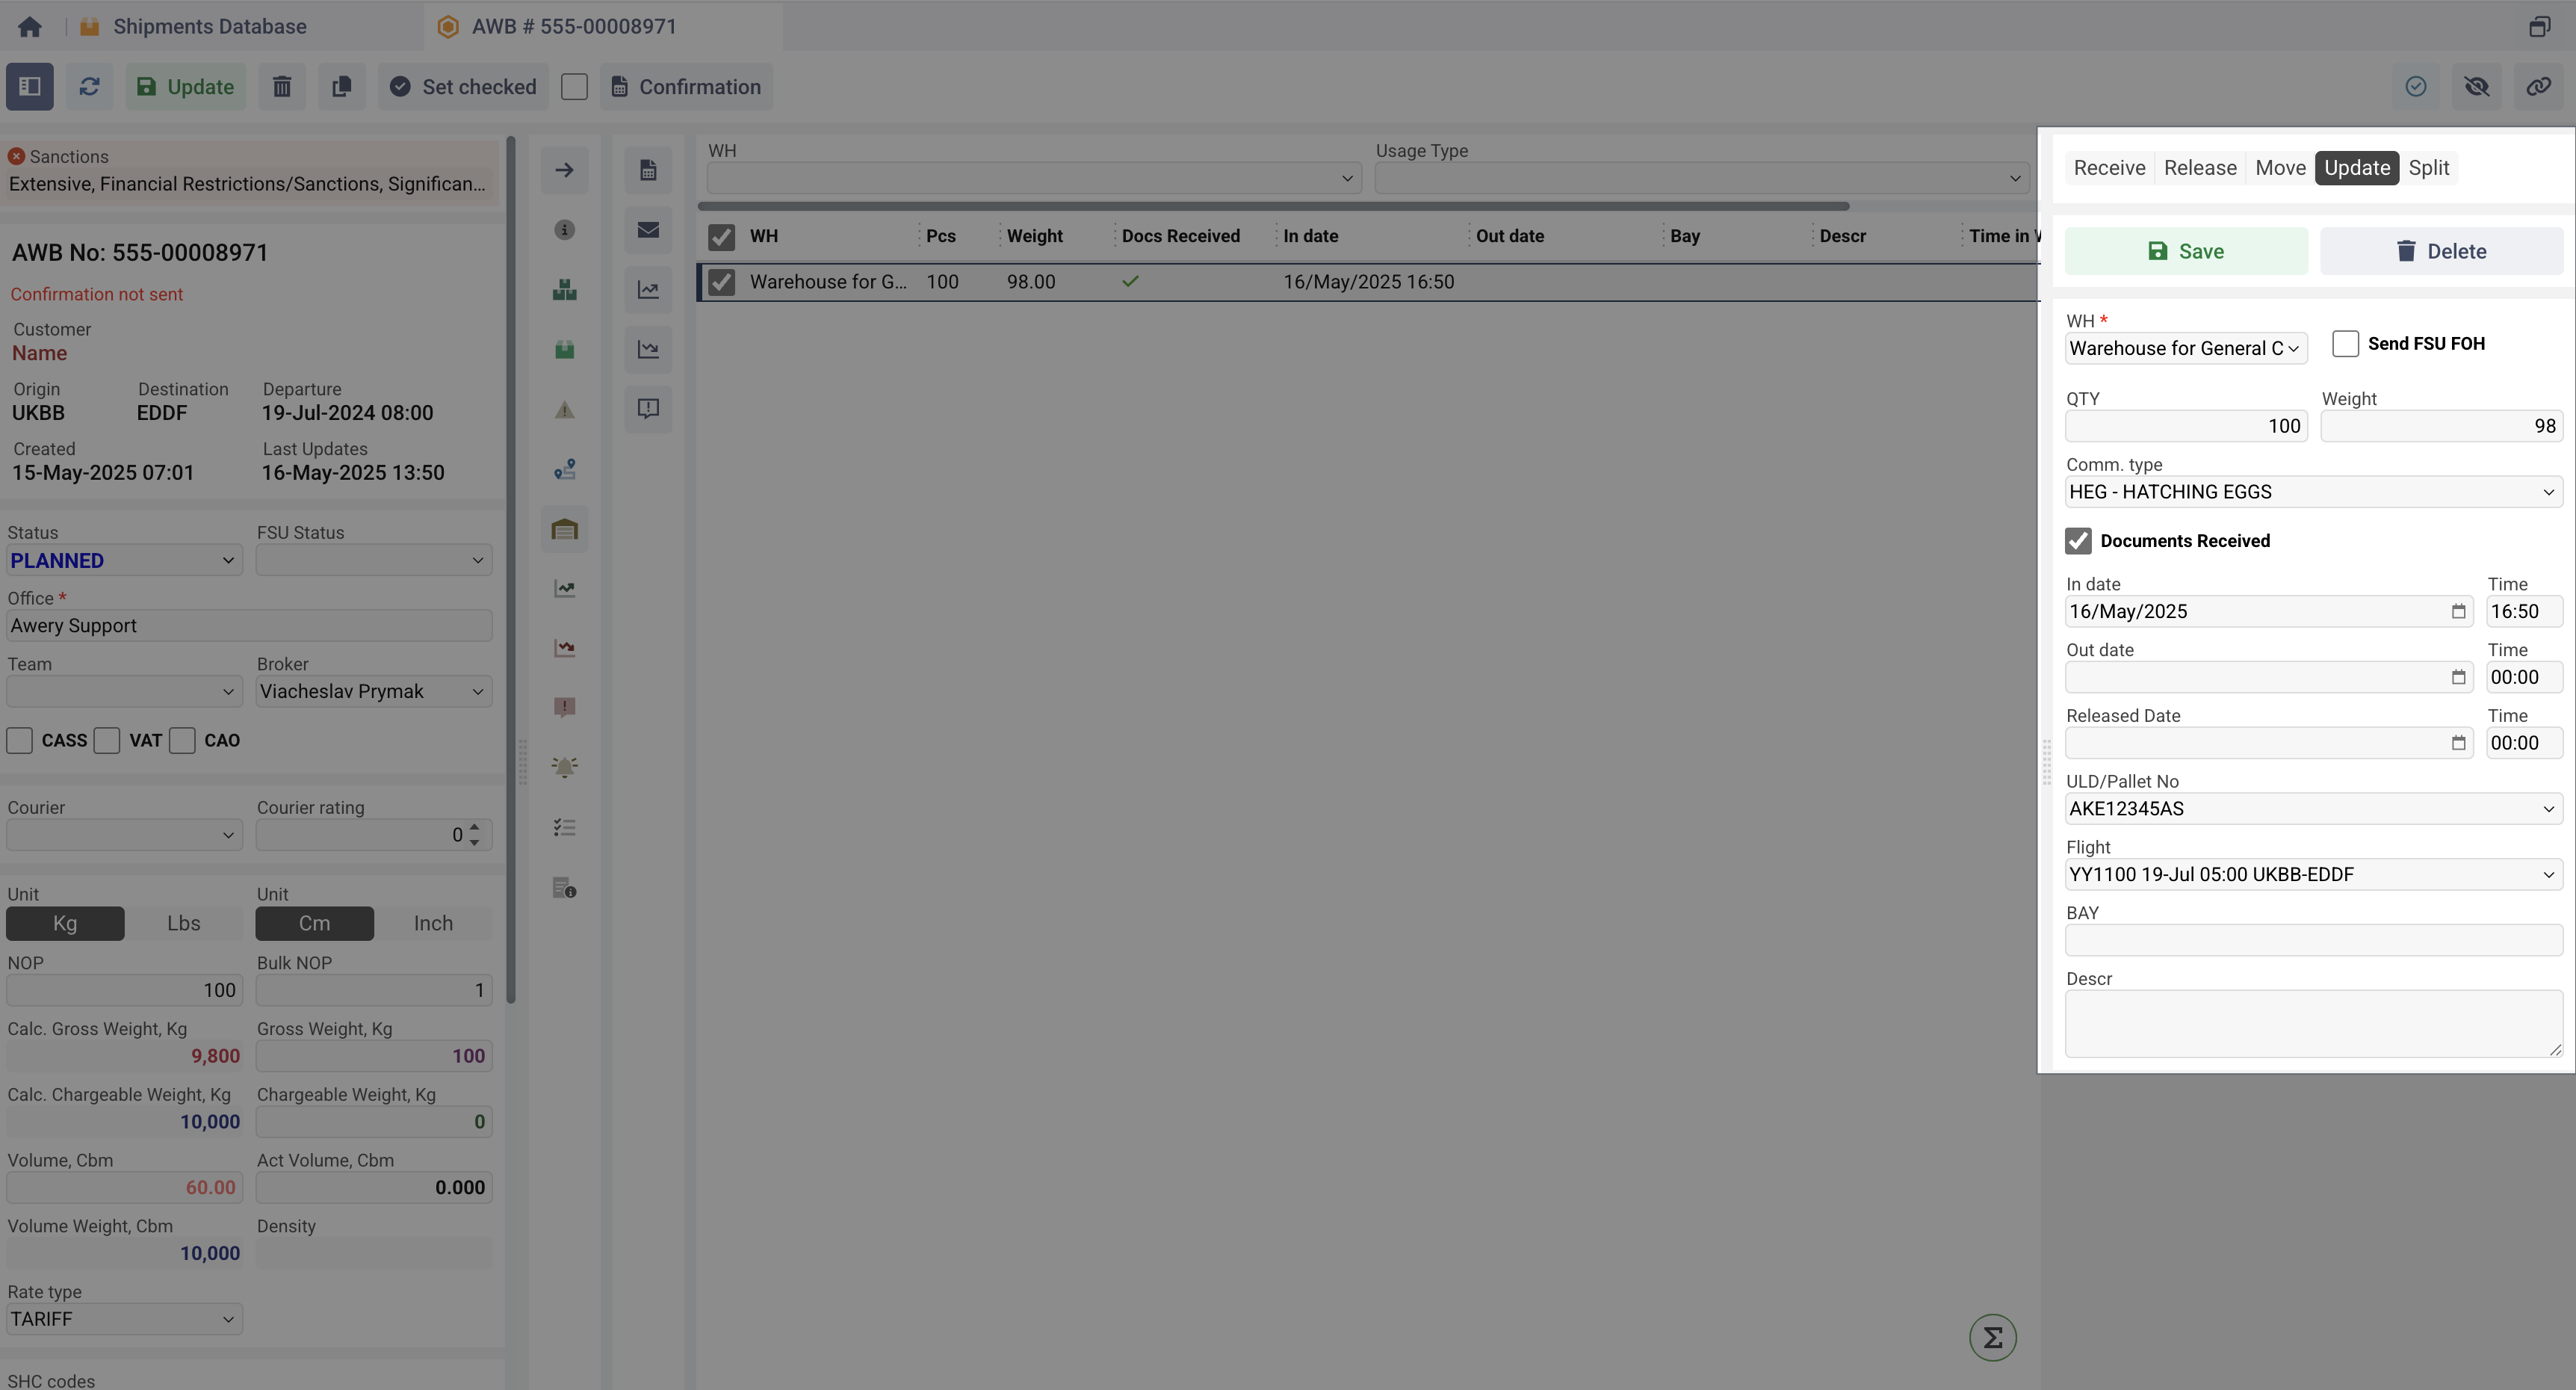
Update Function
The Update function is for administrators to modify any information within the record. Tab can be blocked by a permission.
Split Function
You can split Warehouse Data on the several part:
-
Go to the Split section at the navigation bbar.
-
In the Split window, specify:
-
Count of Pieces – Quantity to separate.
-
Count of Weight – Weight to separate.
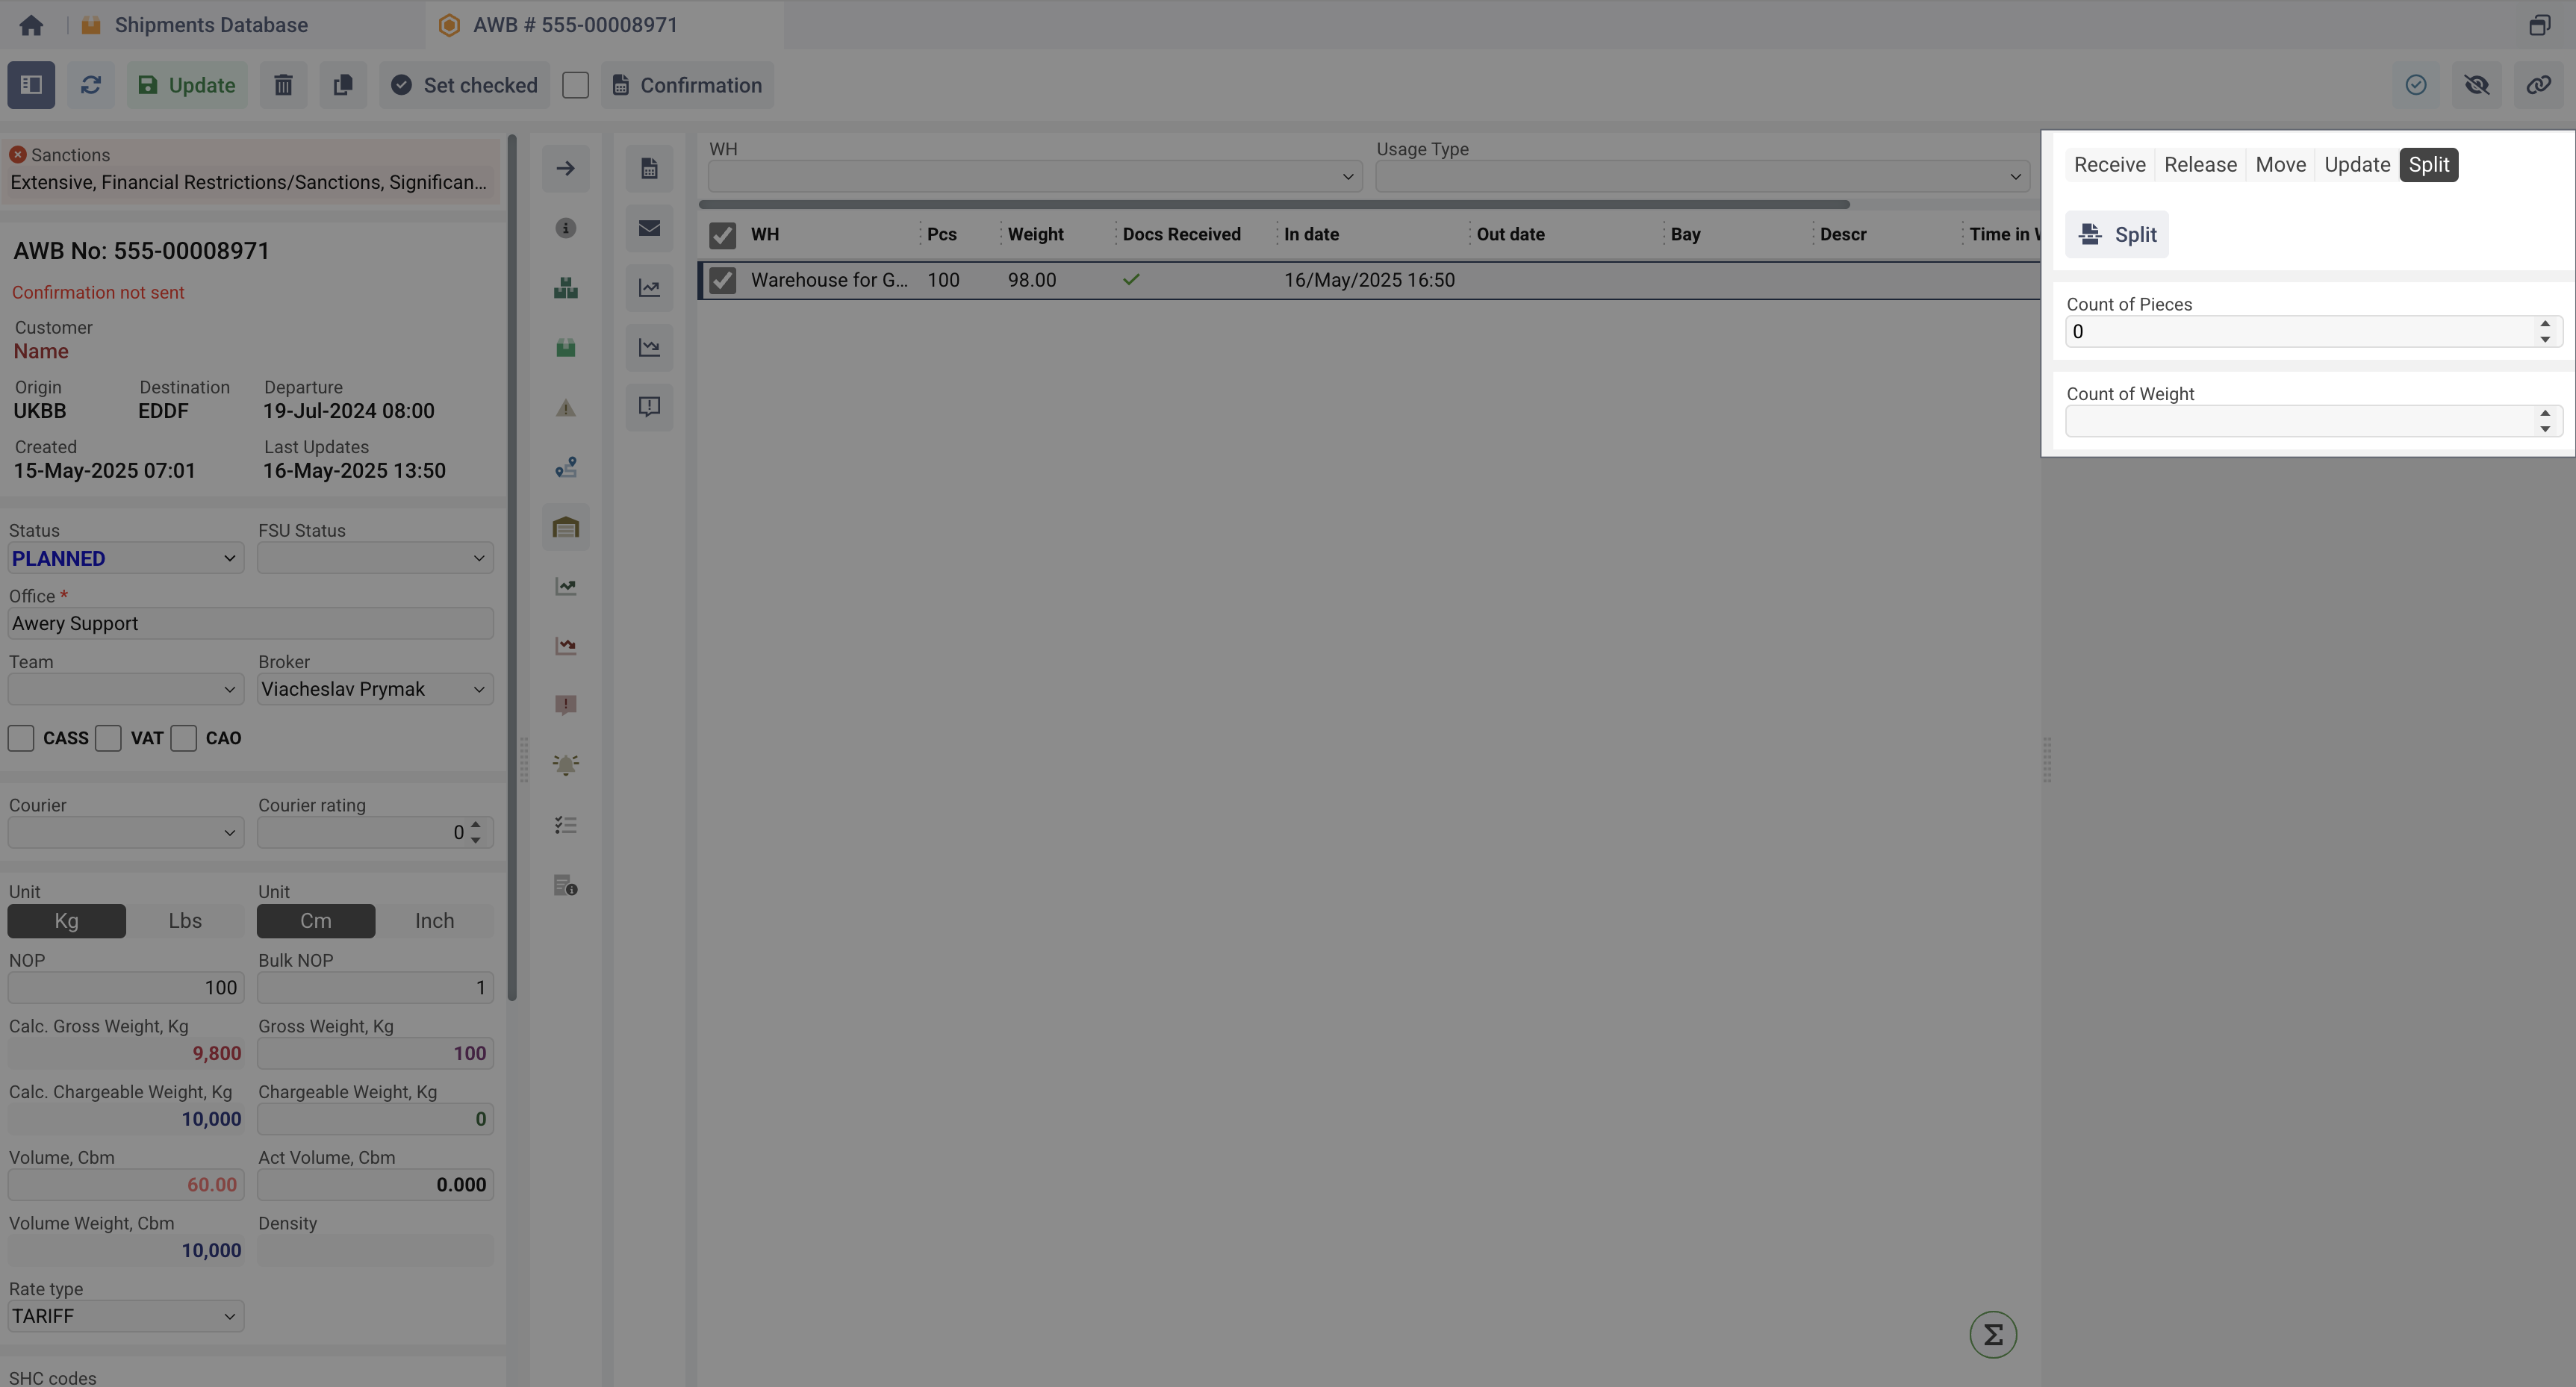
-
Click Split.
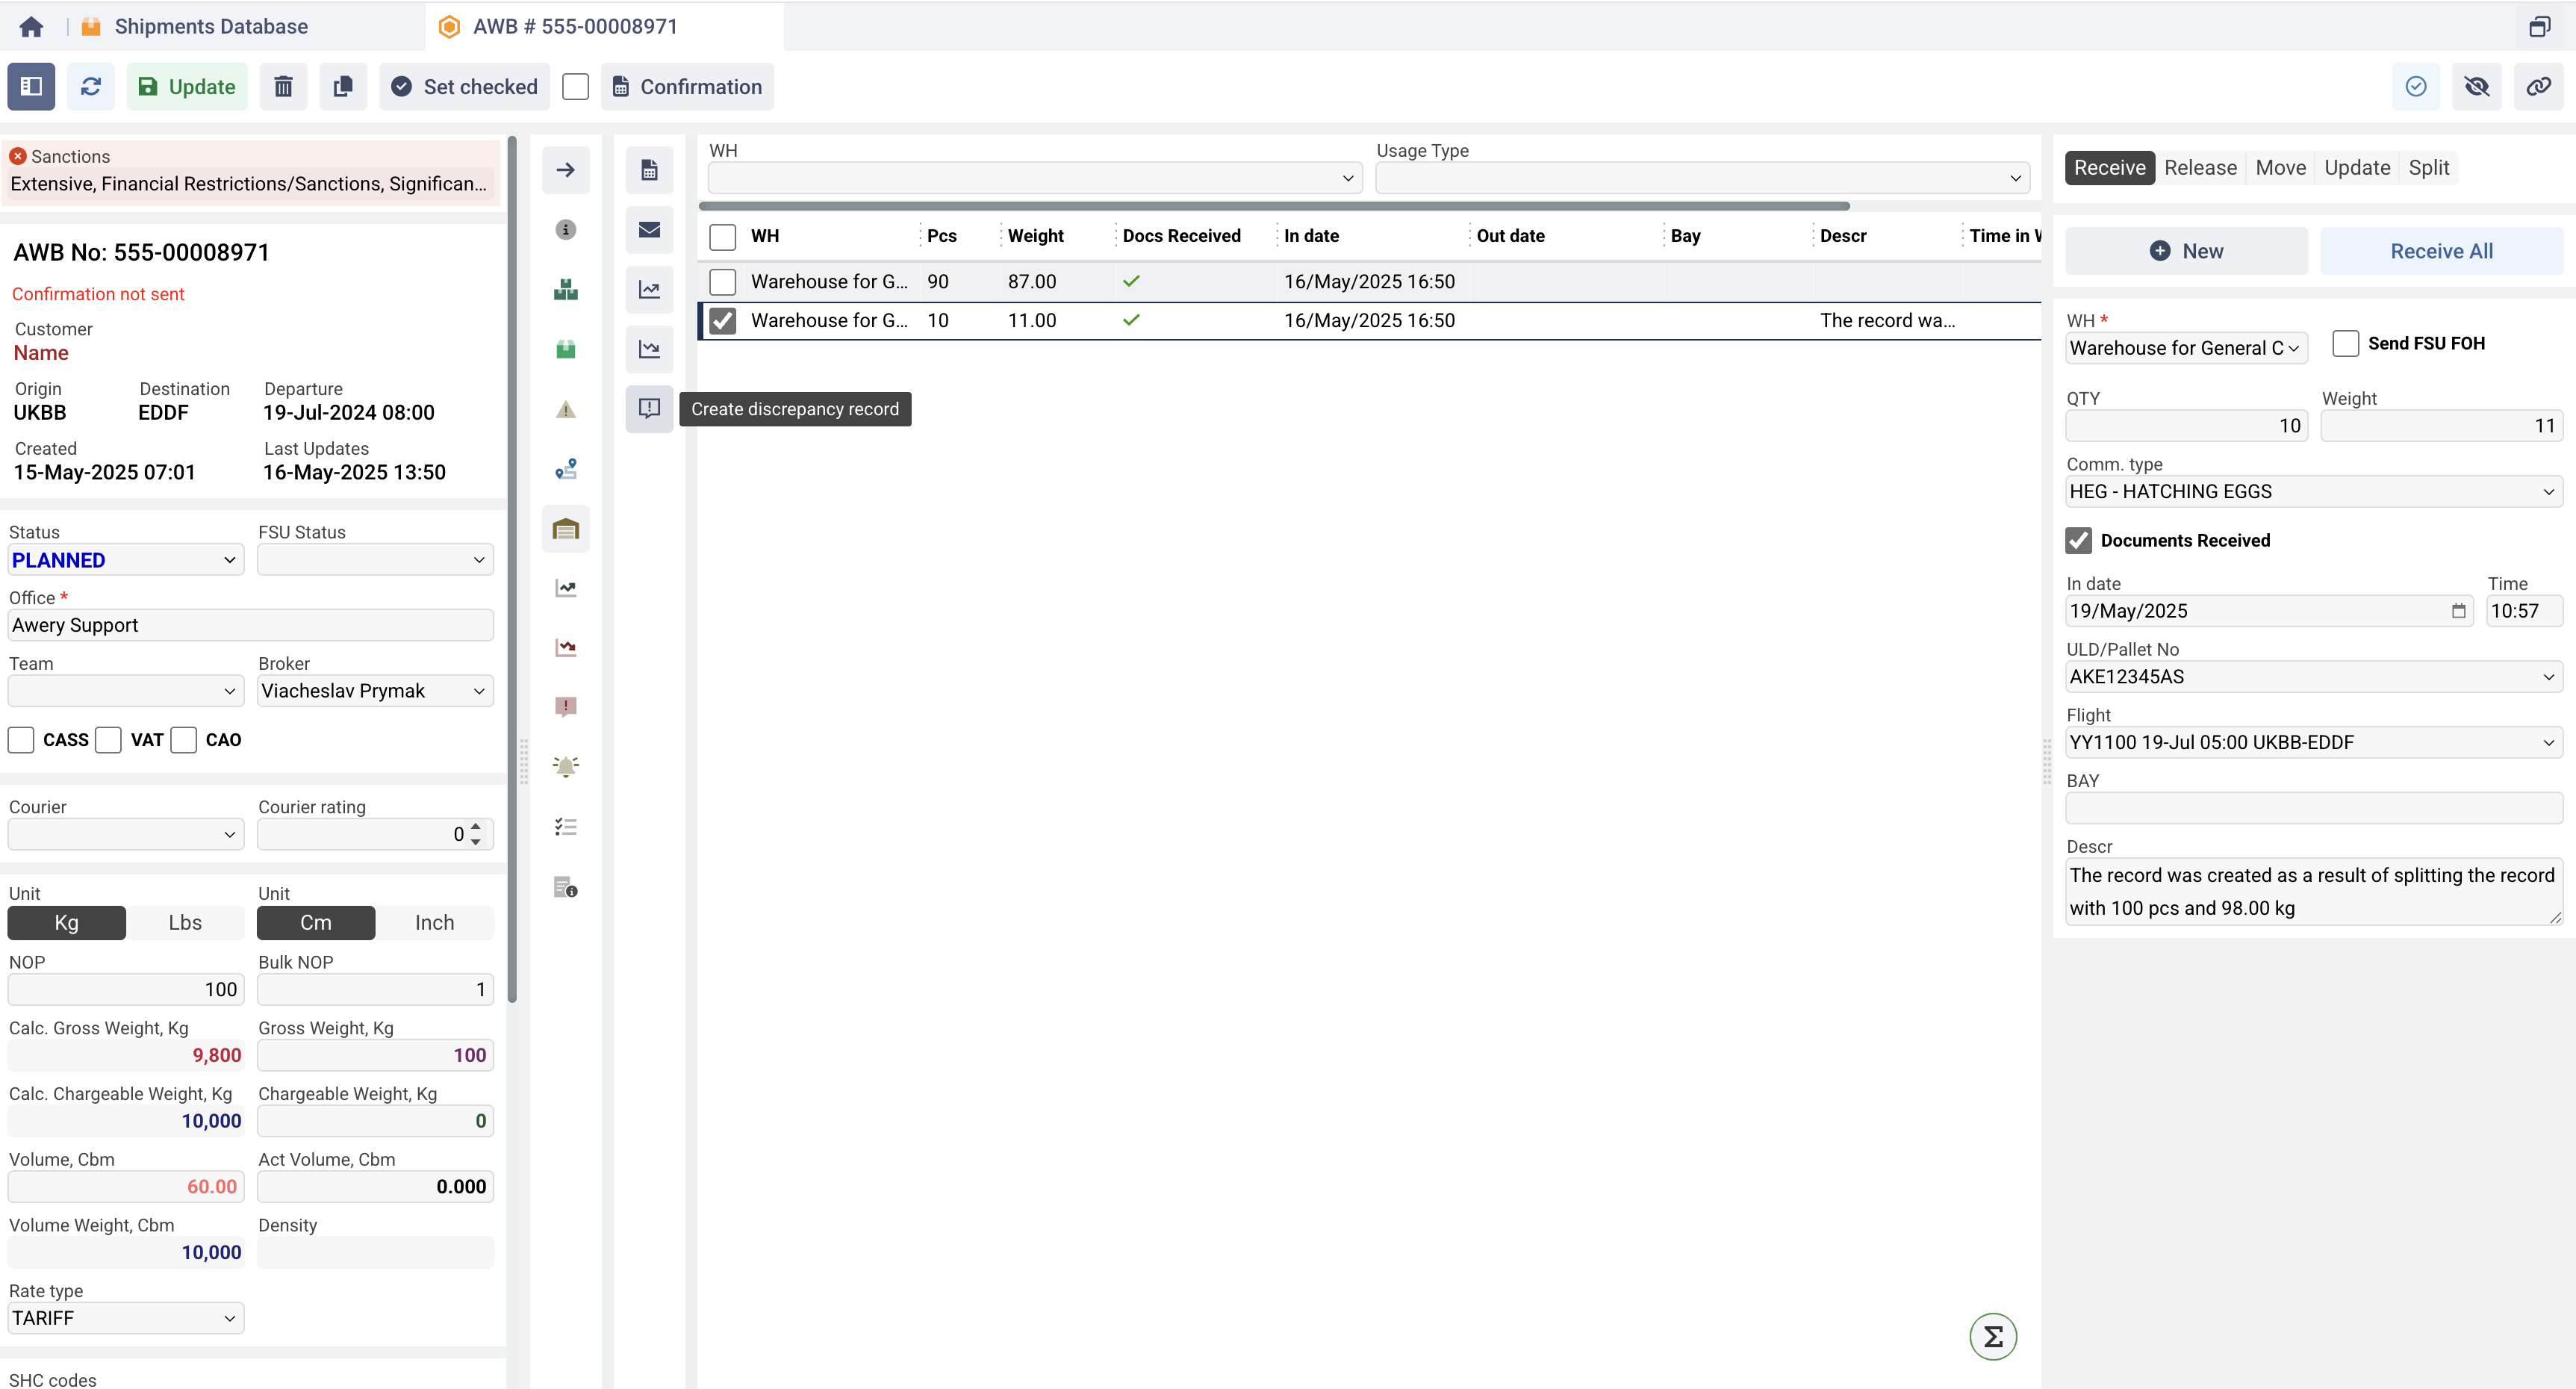
-
The system will create a new record for the separated cargo based on the previous inputs.
-
Description will show details of the split.

Discrepancy Management
As mentioned earlier, upon receive of the shipment, you can immediately create a discrepancy record if something is wrong with the shipment, however, there may be cases when you need to create a record post-facto based on any selected warehouse date. For it:
-
Select entry in the tabular part.
-
Click Create Discrepancy Record.
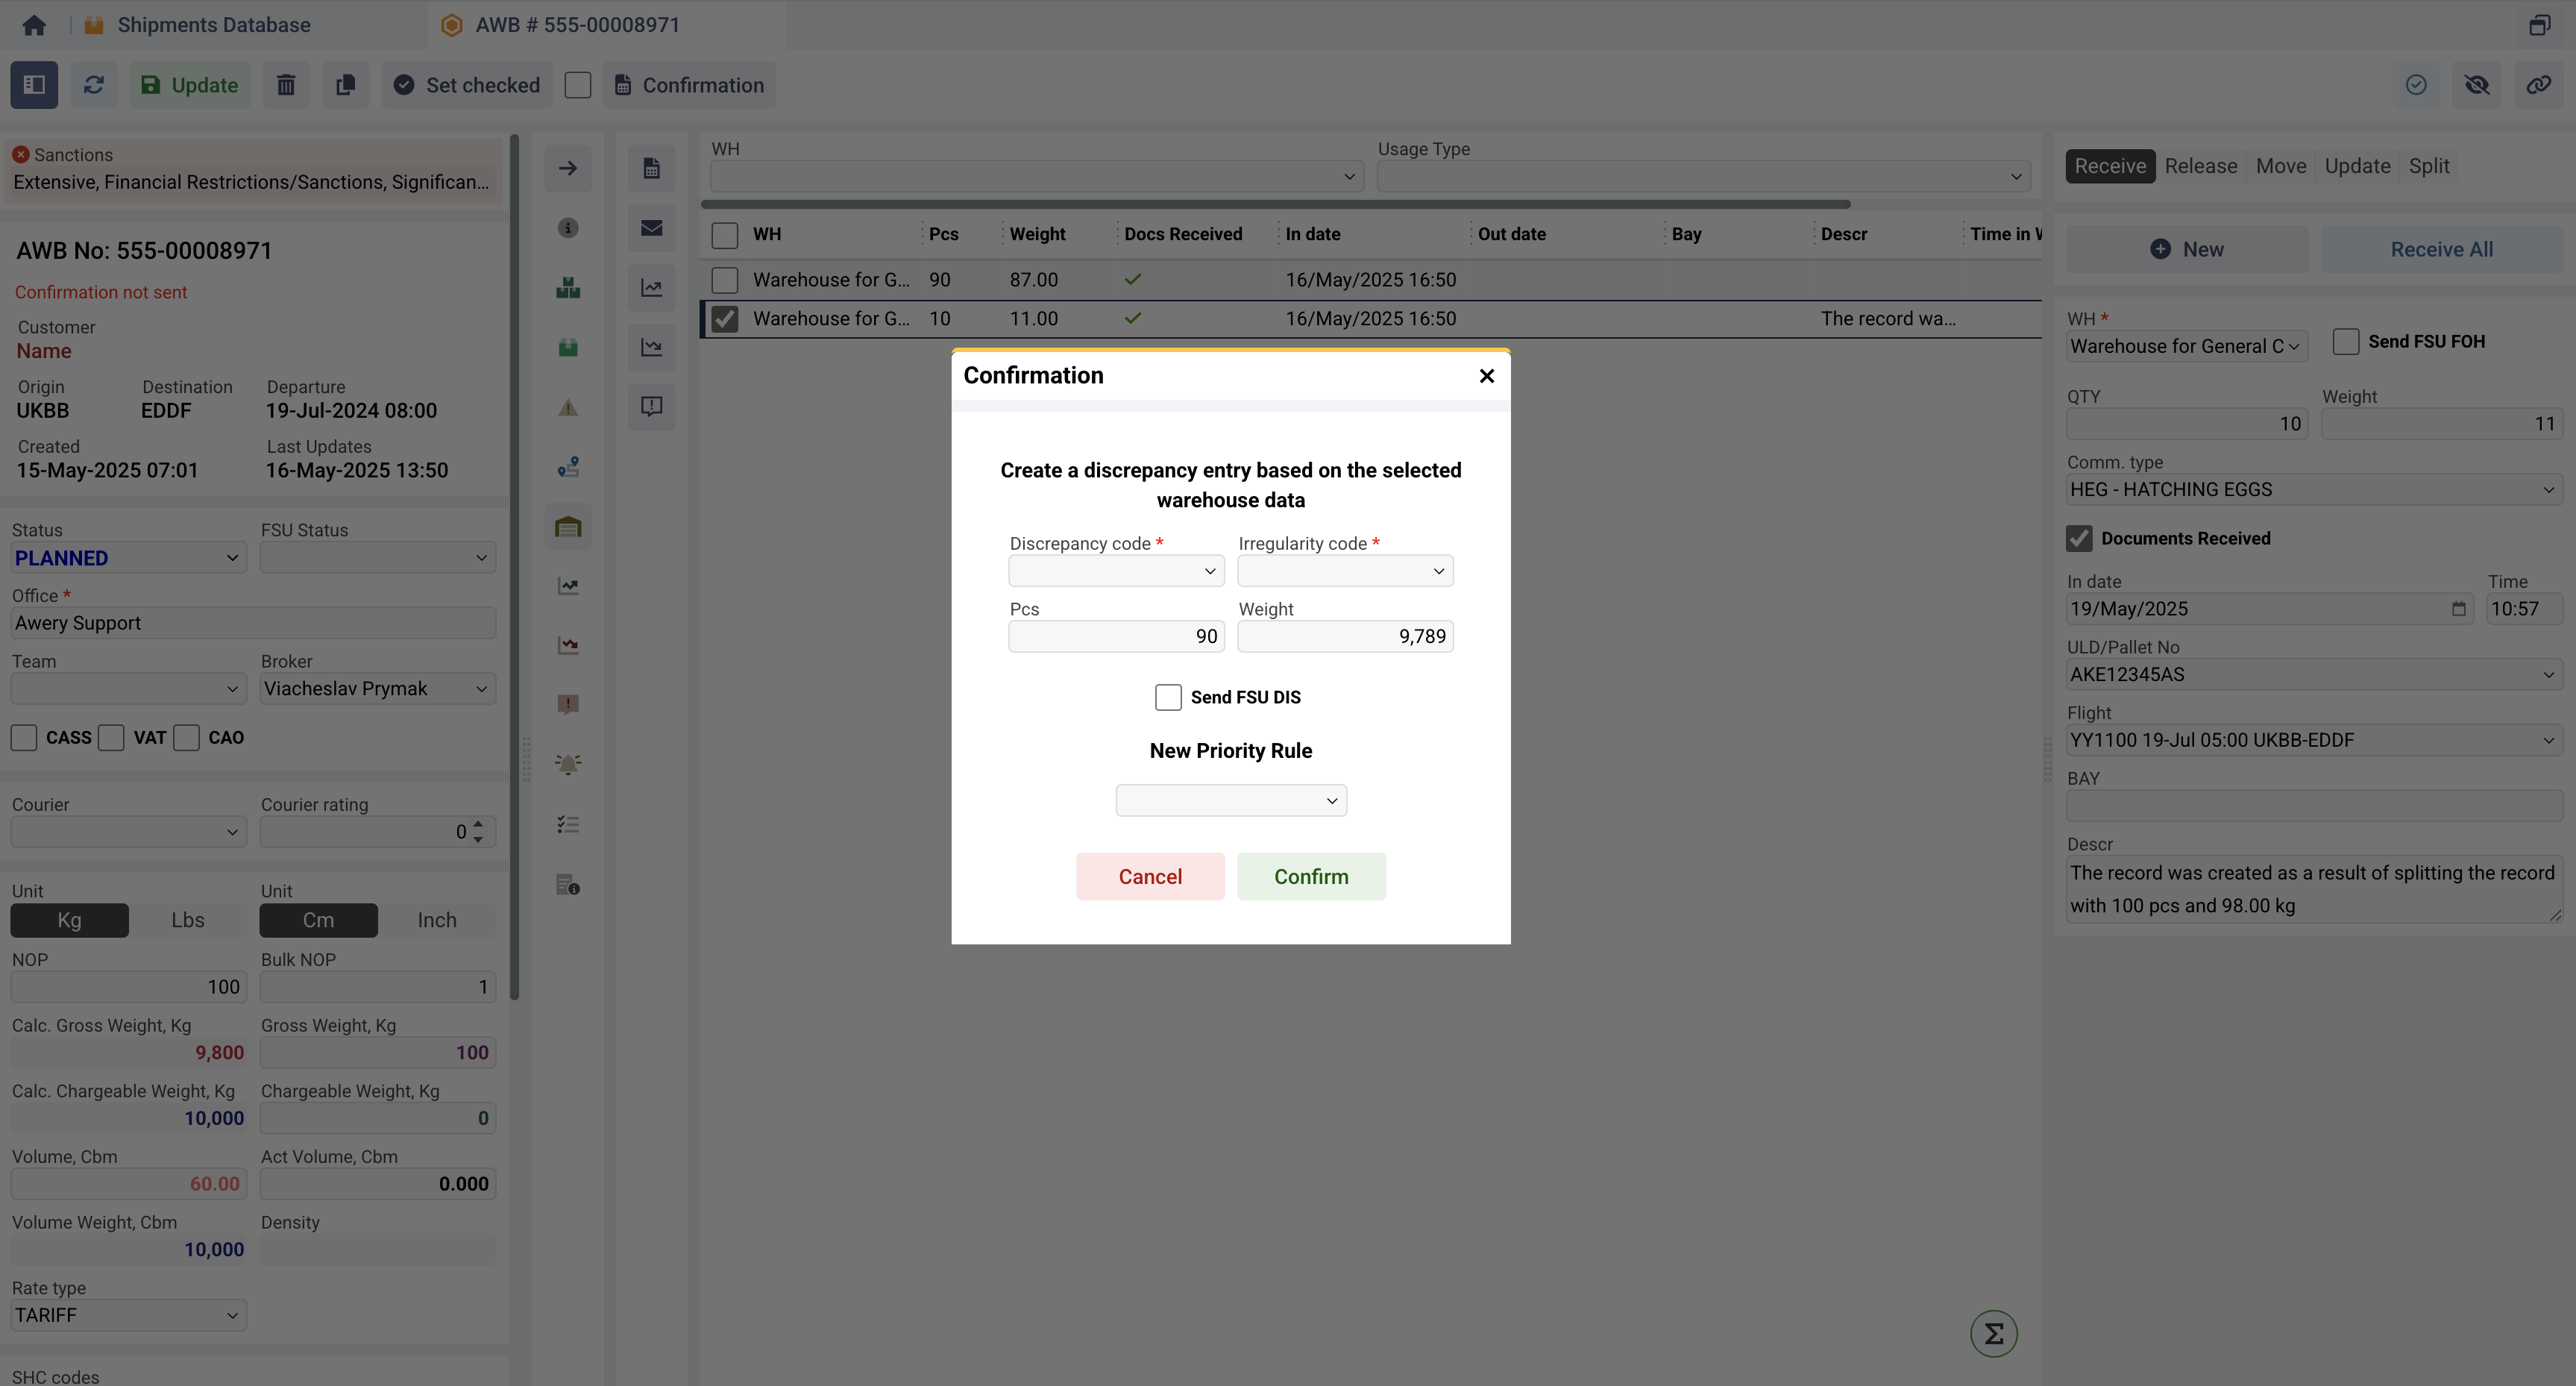
-
In the notification window, fill in:
-
Discrepancy Code & Irregularity Code.
-
Pcs (Pieces). It will be initially filled based on the selected Warehouse Data.
-
Weight. It will be initially filled based on the selected Warehouse Data.
-
Click Confirm.
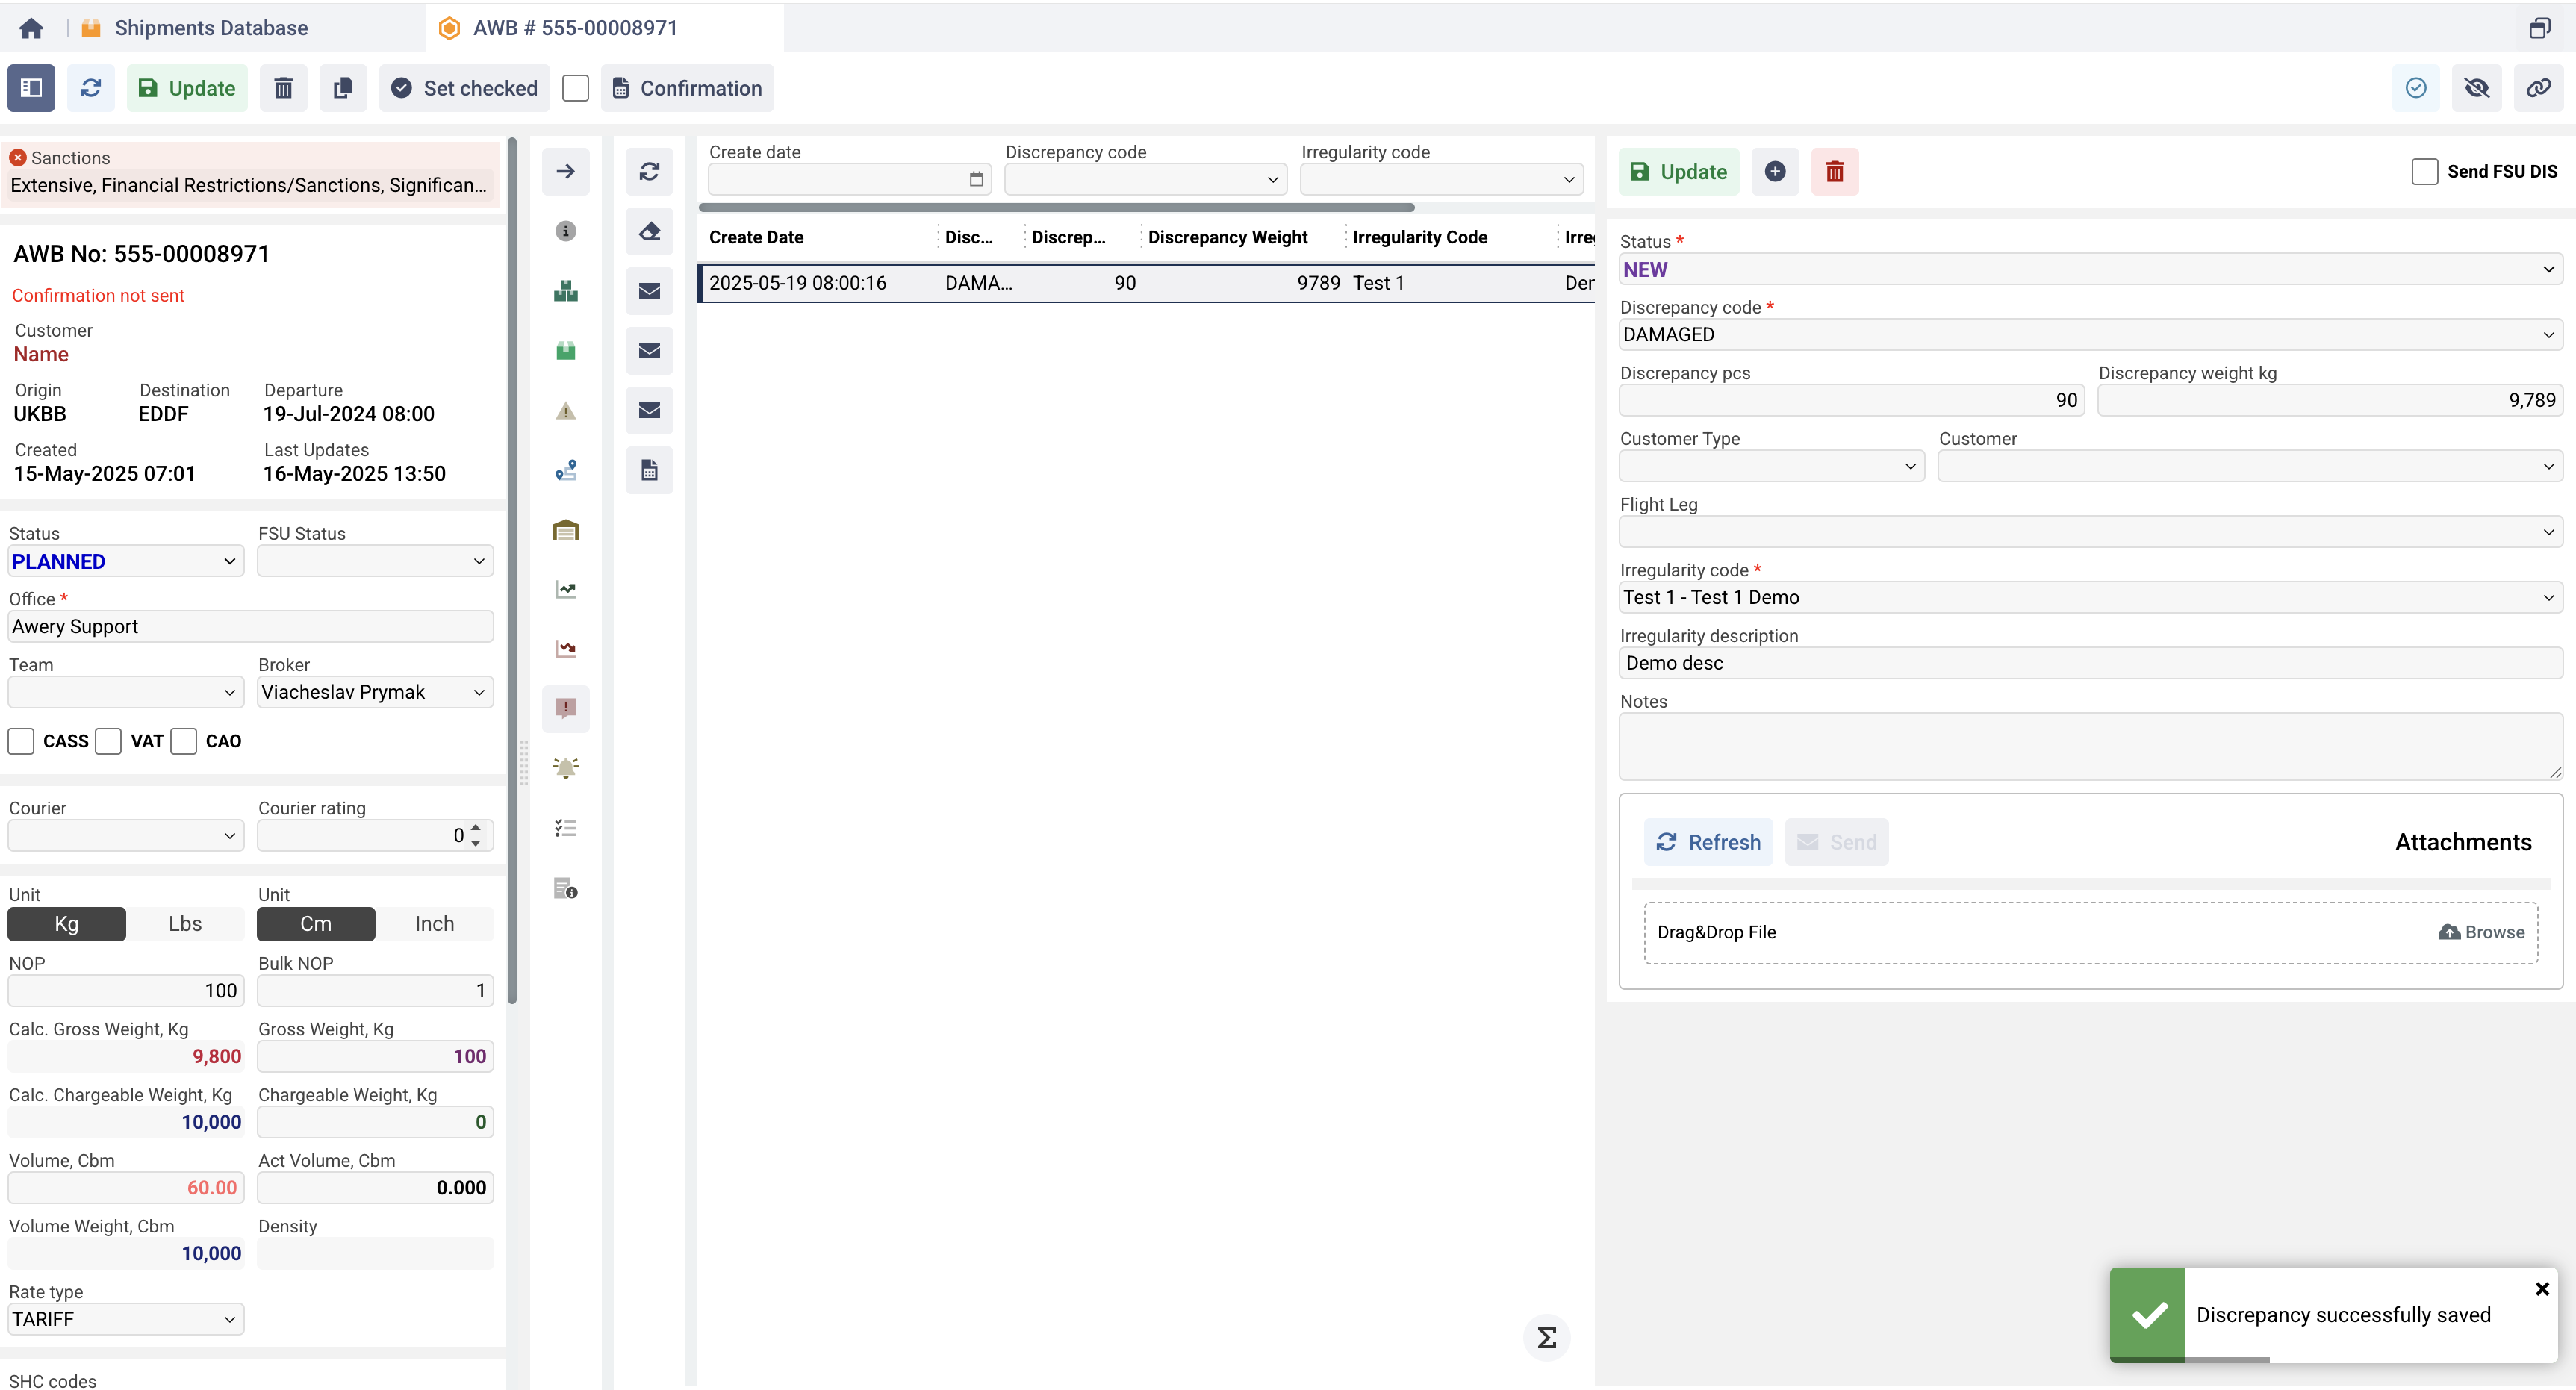
-
The record appears in the Discrepancy tab.
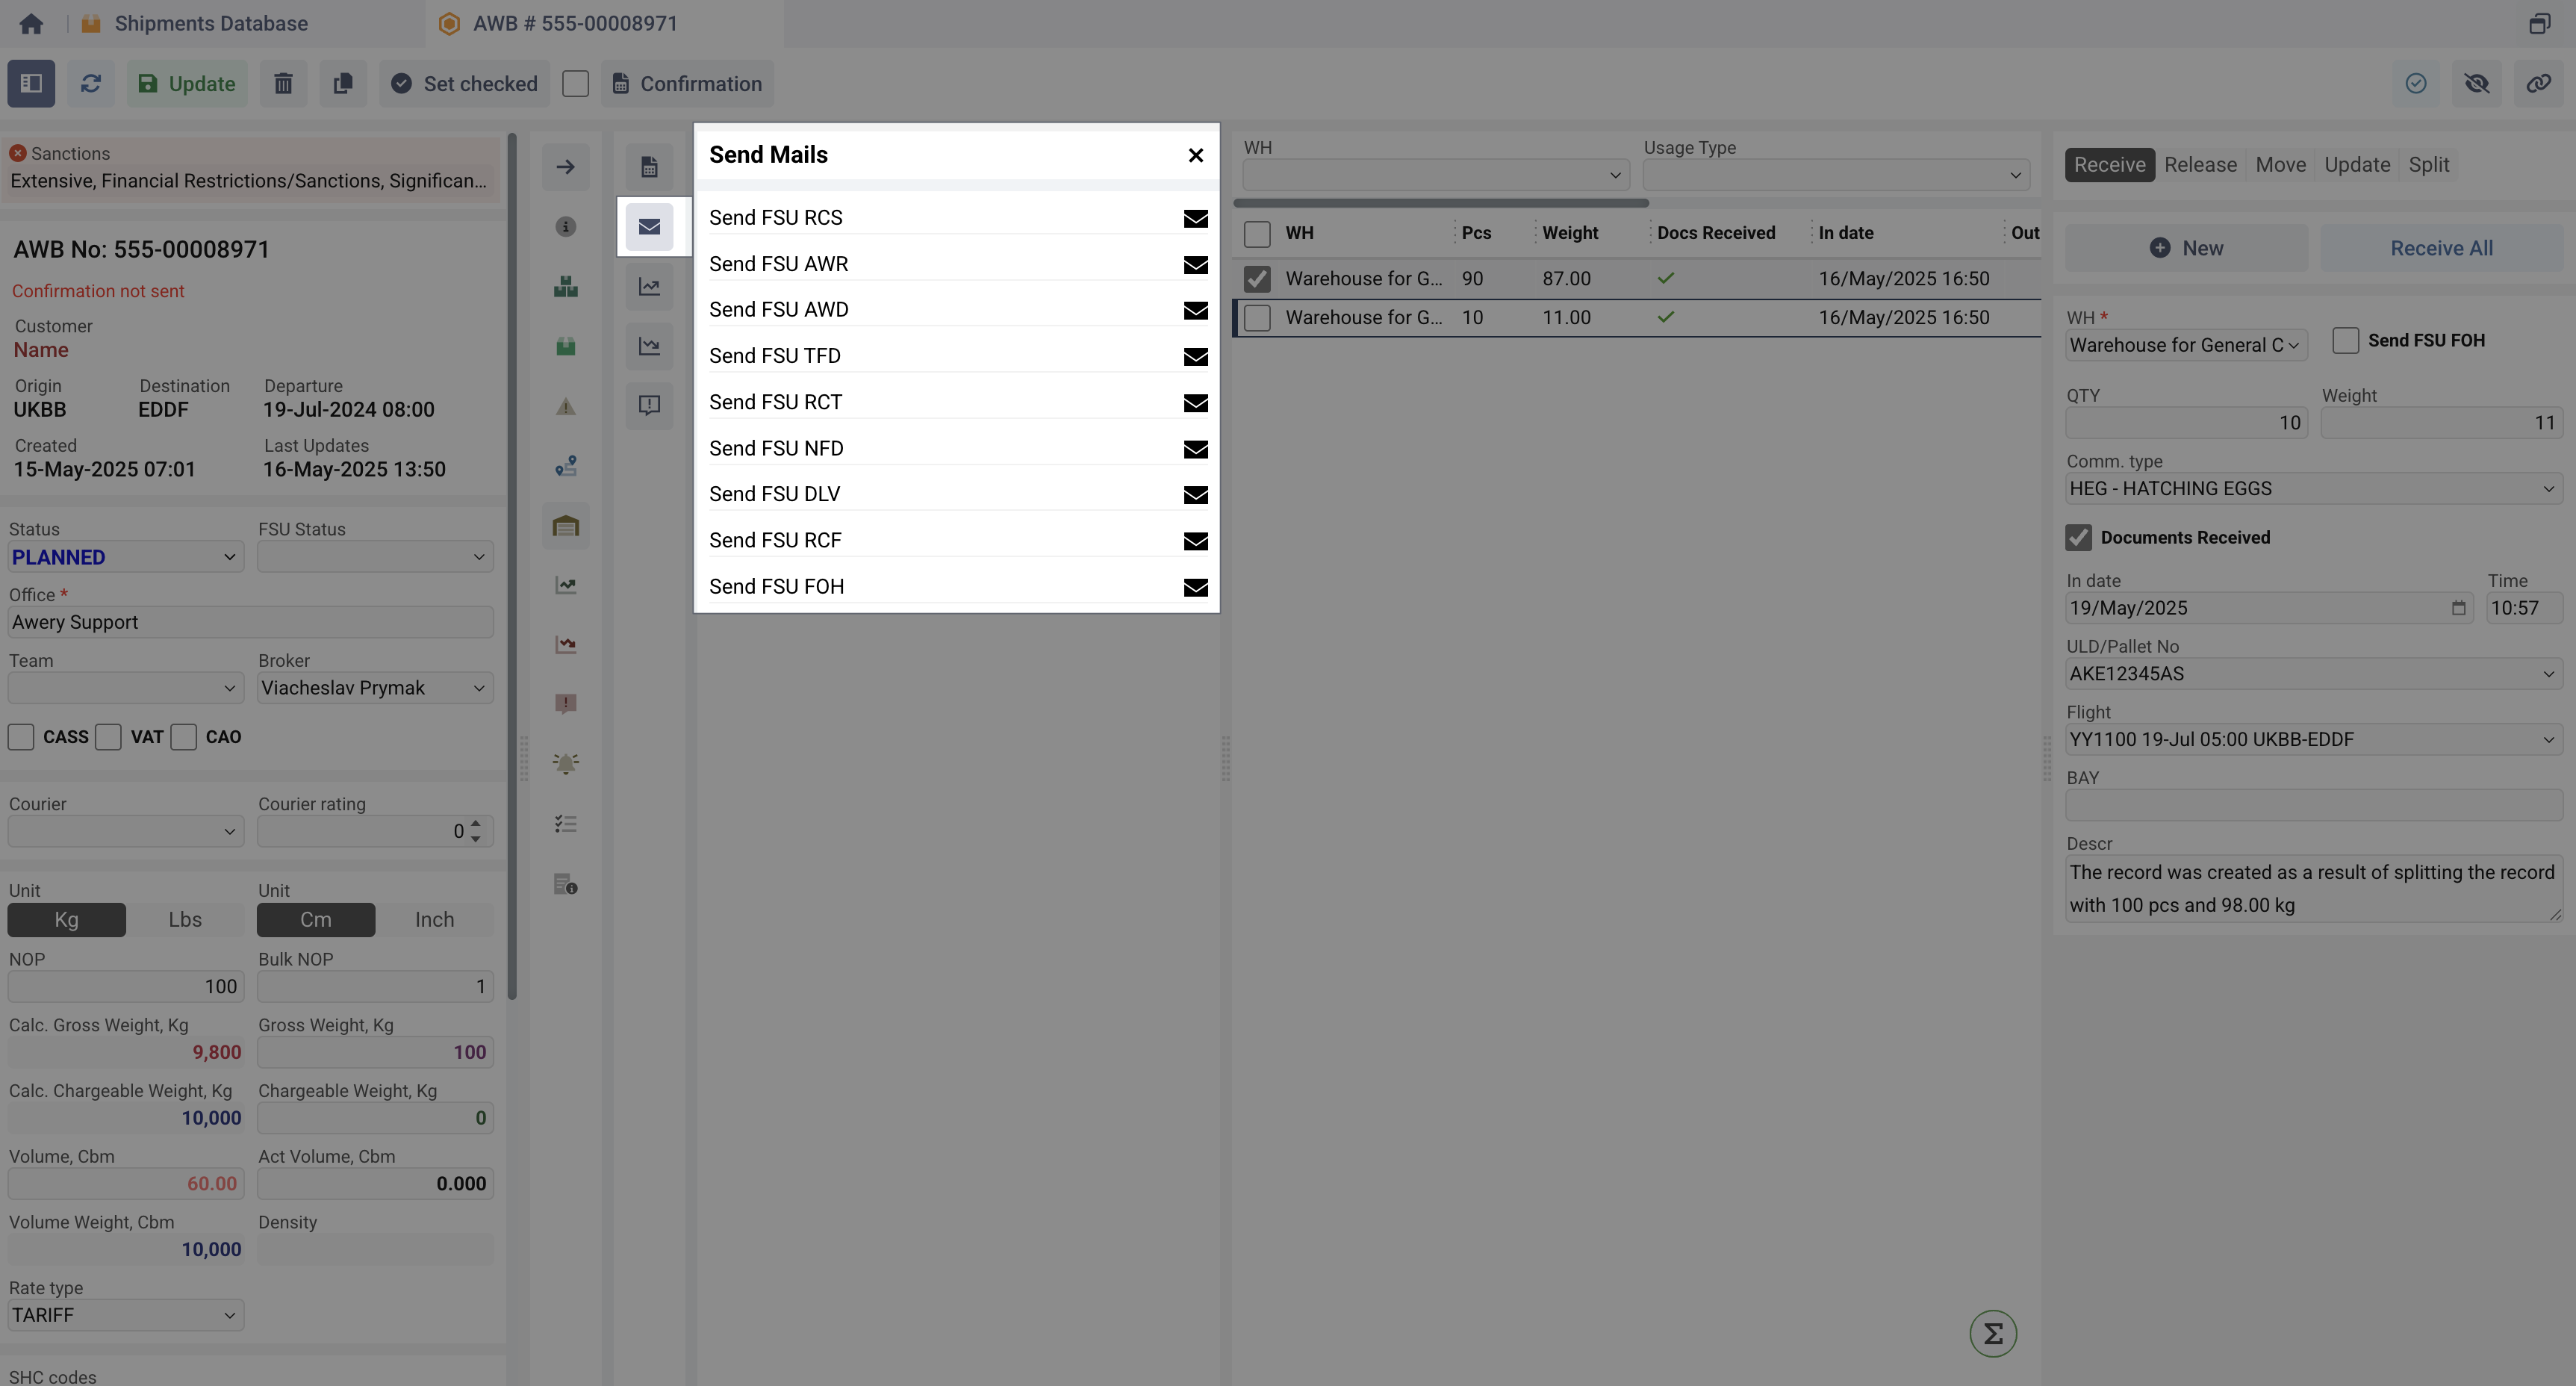
Warehouse messages
Awery system supports almost all the main FSU messages that concern cargo handling, to get acquainted with them you need to:
-
Select 1 or more entries from the tabular part, with check-boxes.
-
Click the Send Mails tab.
-
Select the appropriate FSU message.
Different messages correspond to the current stage of the cargo and the action taken.
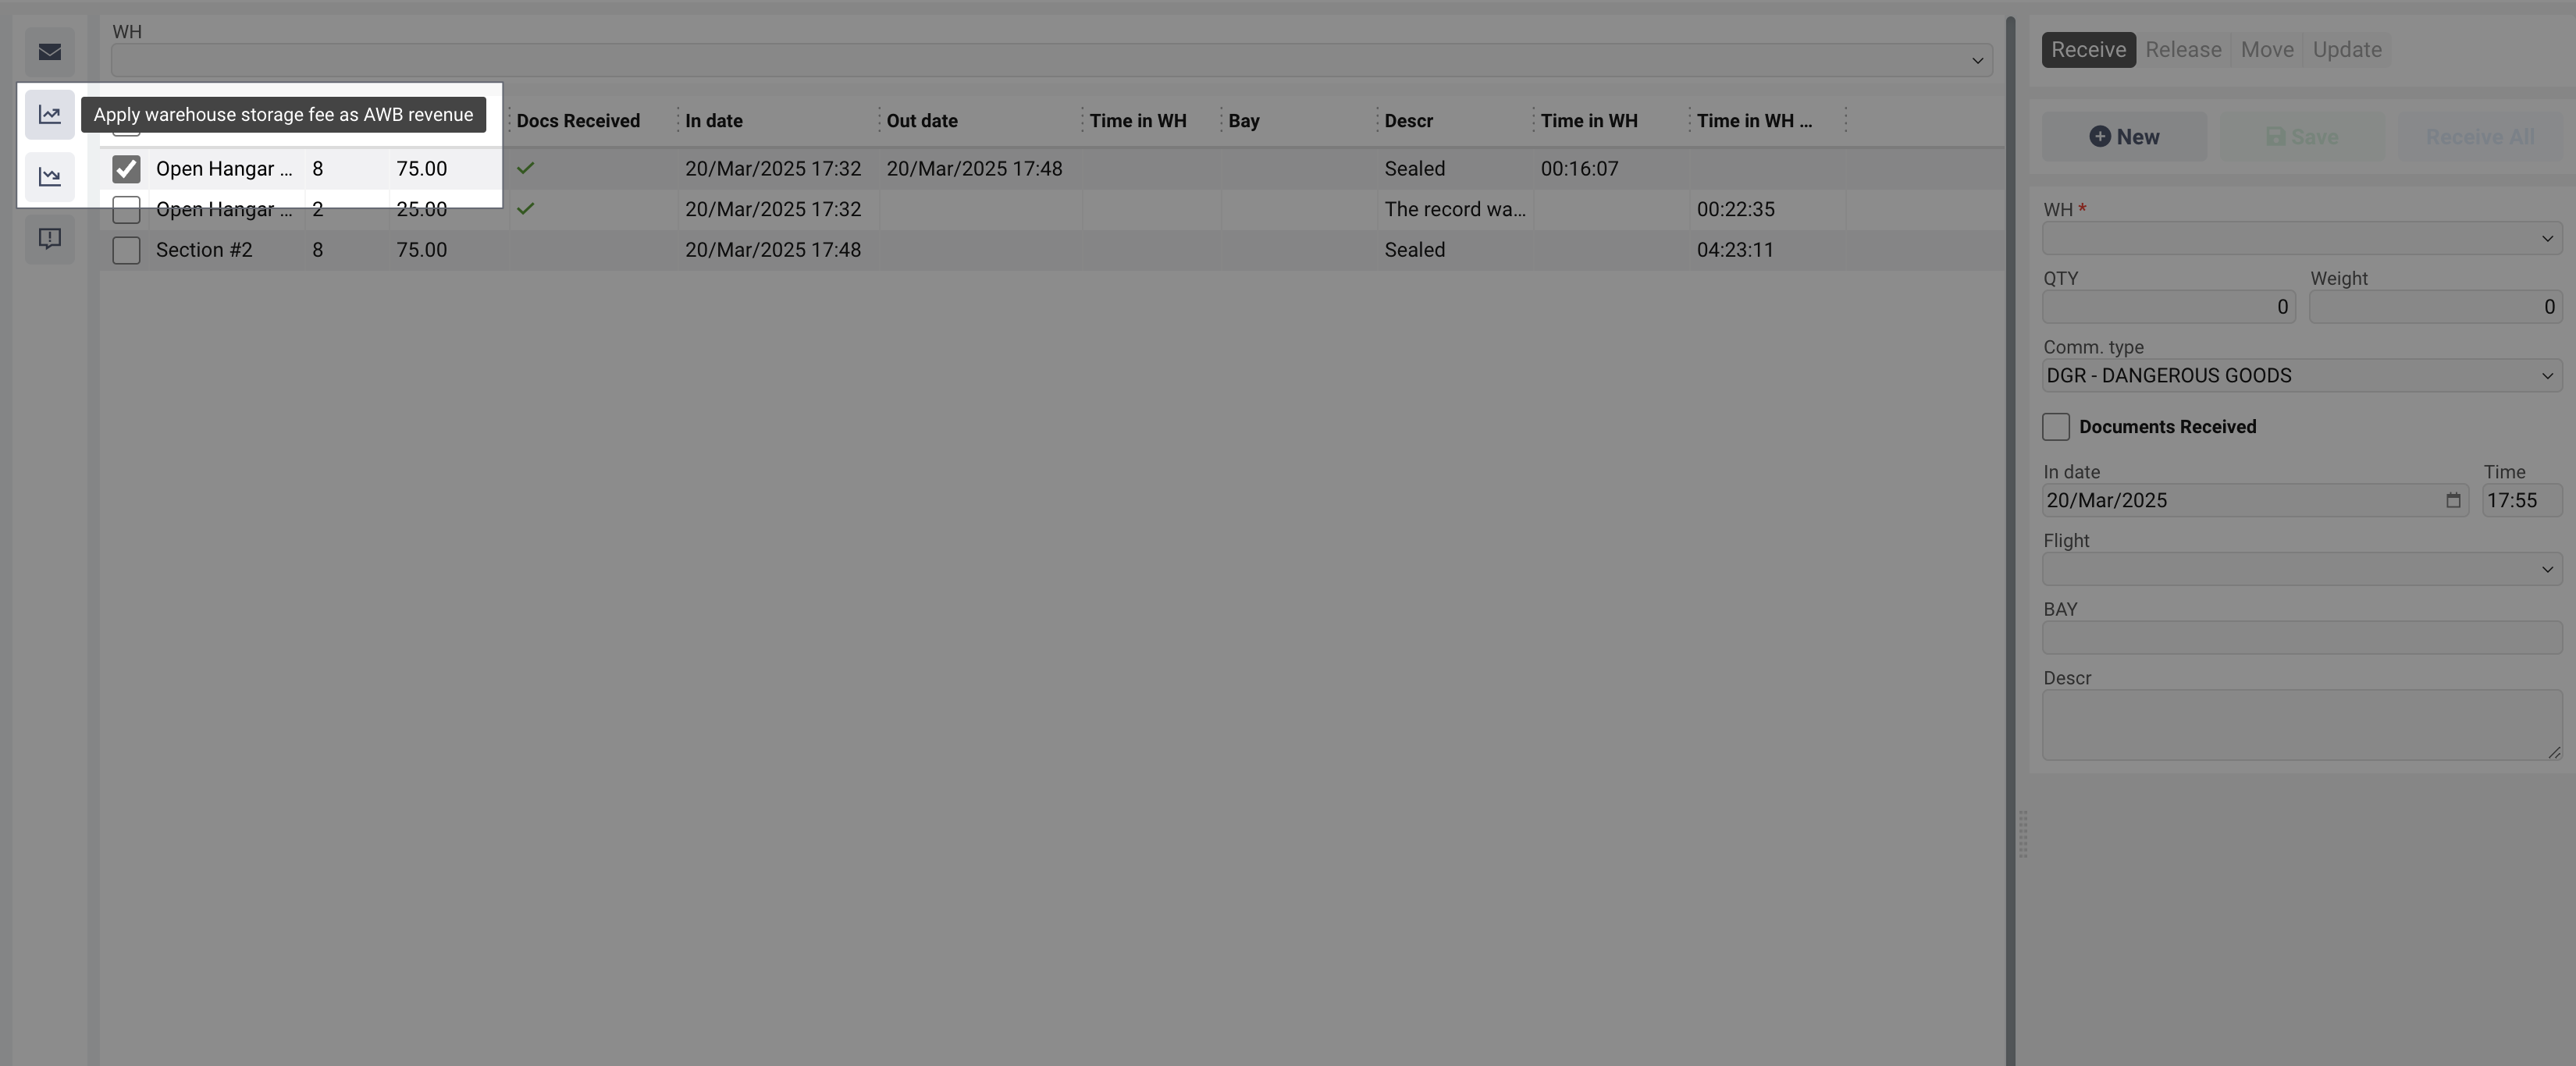
Warehouse Storage Fee
Using the following buttons, you can apply warehouse storage costs:
-
Apply Warehouse storage fee as AWB revenue
-
Apply Warehouse storage fee as AWB expenses
The storage fee will be automatically calculated based on all created warehouse data records based on the time in WH. The system will only consider data warehouse data that has a storage usage type. If the record does not have an "End Date", it will be taken as "Now". The main factors that affect the calculation are:
-
Weight
-
Commodity Type
-
Warehouse and its settings (number of accrual days, exclusion of days of receive and release)
-
AWB airline
-
AWB origin and destination airports.
If the storage fee has been calculated previously, it will be updated. All charges are managed in the 'Cargo Surcharges' module of Awery ERP system.
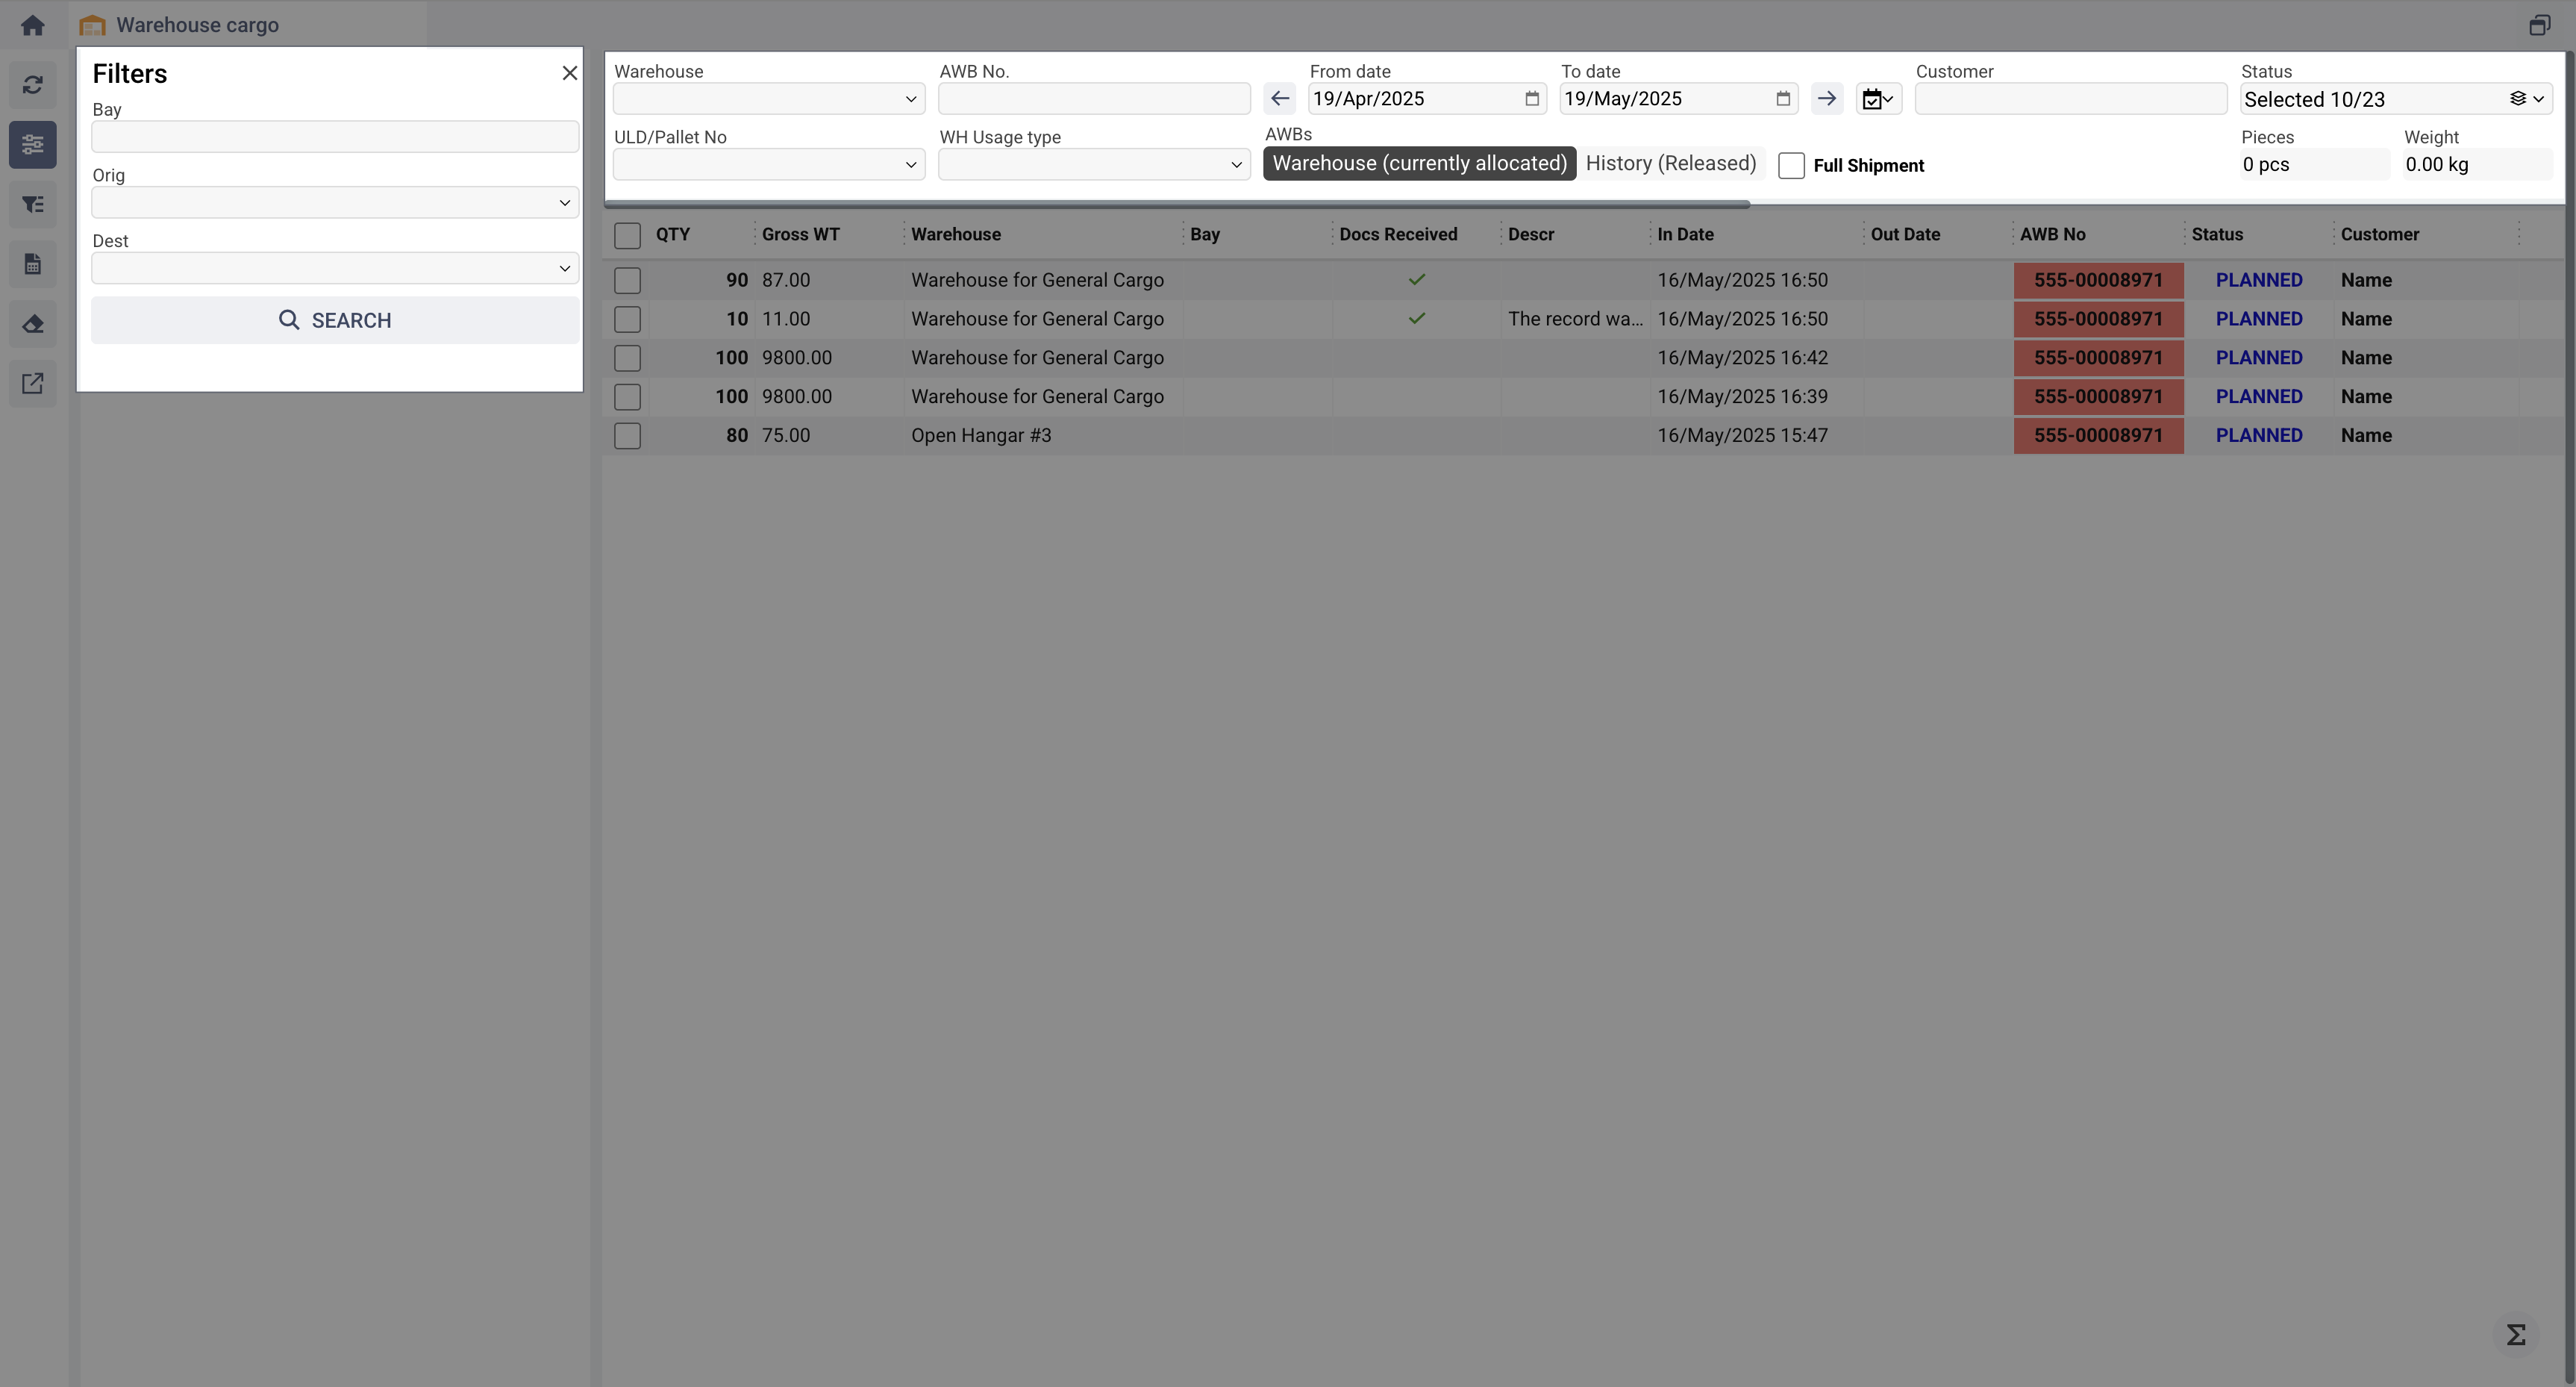
Warehouse Cargo Module
The Warehouse Cargo module you can find after following the path: Home → Cargo Handling → Warehouse Cargo provides complete information on warehouse data for a batch of shipments.
Filters section
-
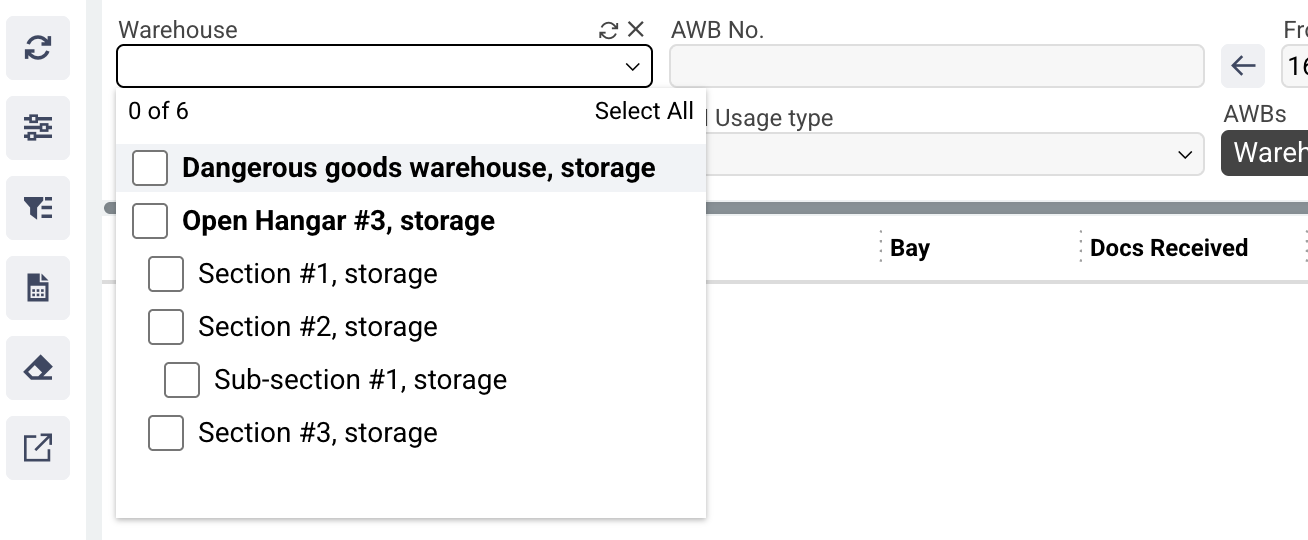
Warehouse
-
To show only records where the selected WH is specified. Selecting the Parent record will automatically select all children. Selecting it again will select only the parent record itself.
-
-
AWB no
-
To show only records related to the specific shipment.
-
-
From/To dates
-
To show only entries with in/out dates within the selected date range.
-
-
Customer
-
To show only entries related to the shipments with entered customer
-
-
Statuses
-
To show only records related to the shipments in selected statuses.
-
-
ULD/Pallet No
-
To show only records where specific ULD/pallet is specified
-
-
WH Usage Type
-
To show only records where Warehouse data with specific usage types of Warehouse.
-
-
Warehouse (currently allocated)
-
To show only records without out date
-
-
History (Released)
-
To show only records with out date
-
-
Full Shipment
-
Show only those records where the number of pieces in WH matches the number of pieces in AWB.
-
-
Bay
-
To show only record with specified Bay
-
-
Orig/Dest
-
To show only records related to the shipment with specific origin or destination.
-
All filters work on the "AND" principle, meaning that selecting multiple filters will work together to sum up all the factors.
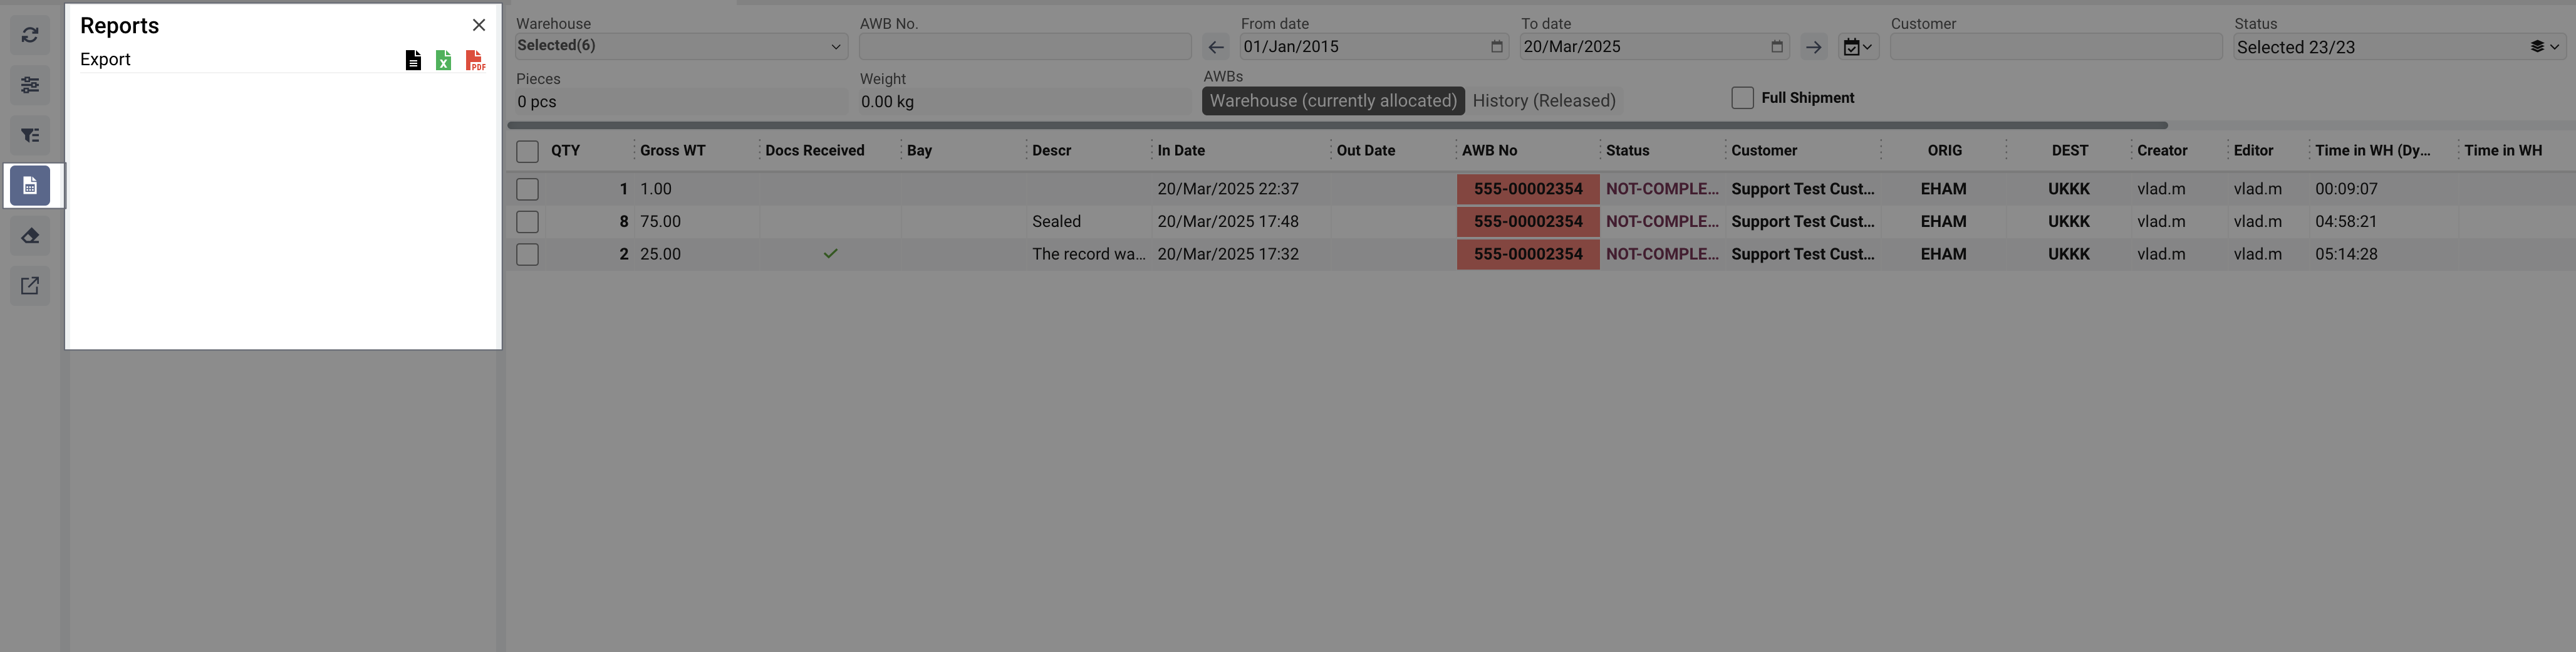
Additional actions
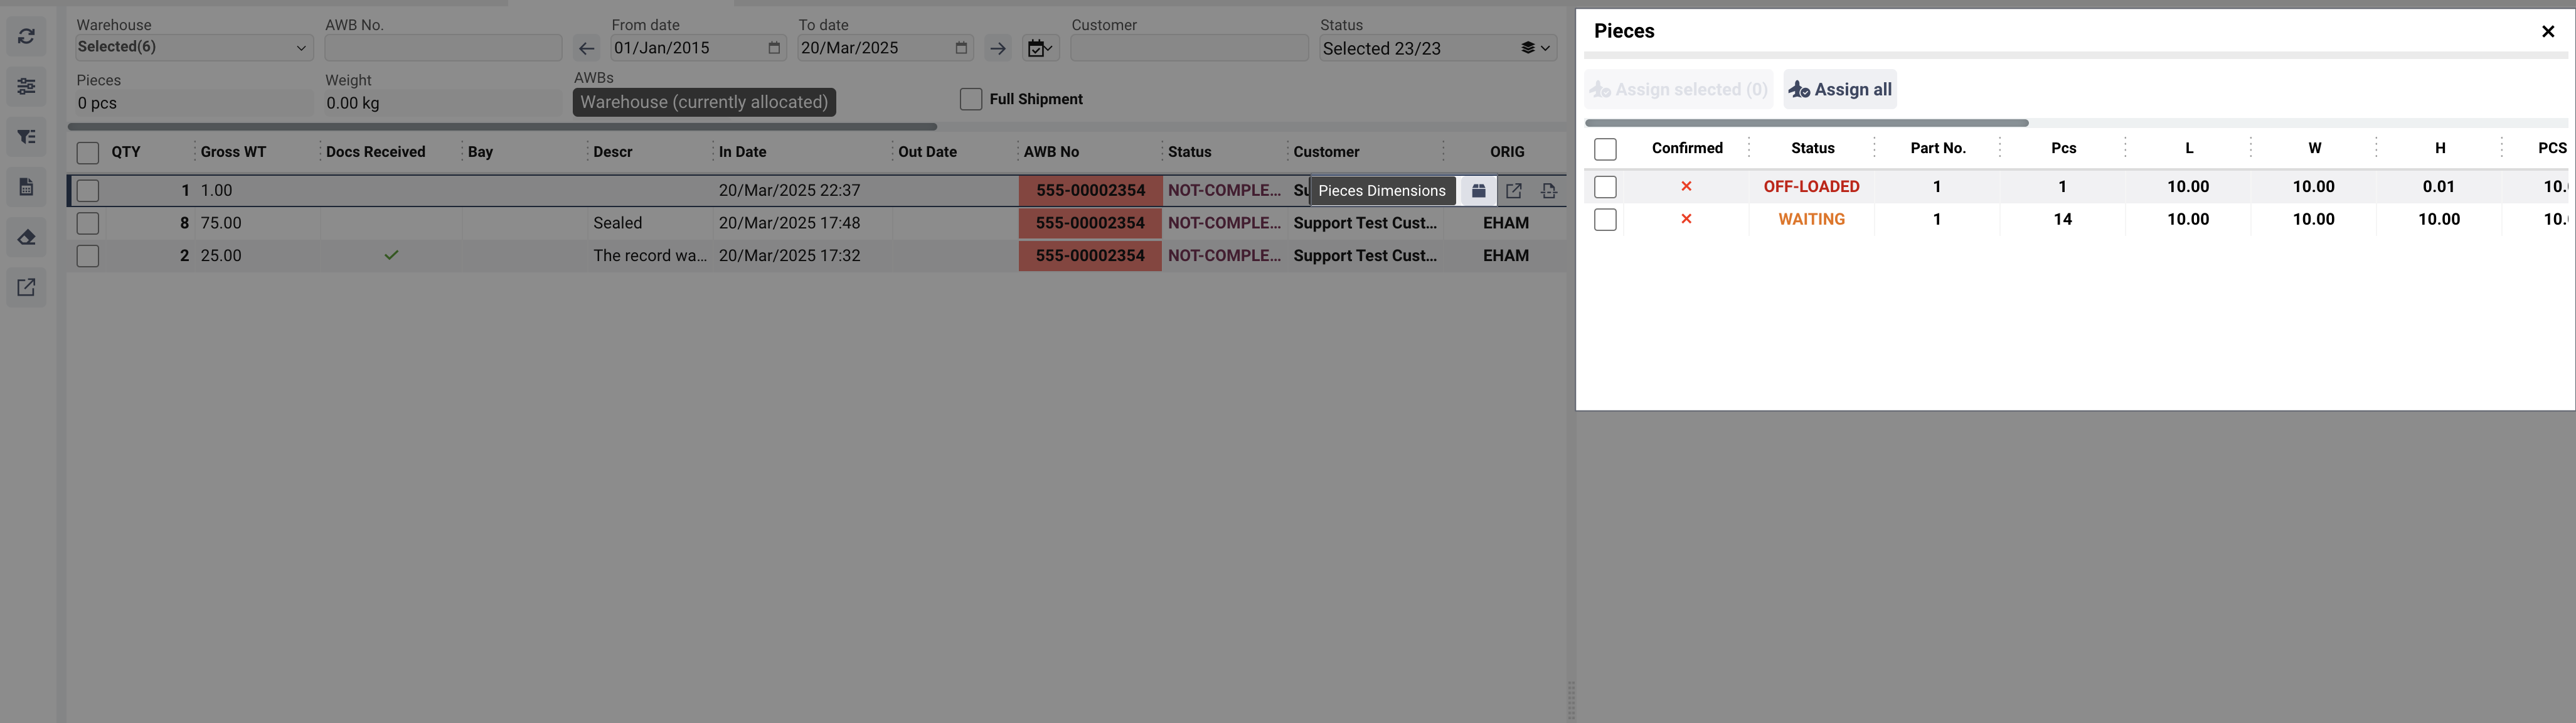
-
The "Pieces Dimensions" button displays all the details of the shipments, allowing you to plan them on the flight. The information about the AWB pieces does not correspond to the quantity in the Warehouse Cargo. Section intended for information and quicker accessibility.
-
Release Button allows Releasing cargo in the same way as on Warehouse Cargo tab.

-
Split Button opens the same Split module cargo in the same way as on Warehouse Cargo tab.

-
The Reports tab generates generic in AWERY reports for warehouse data.