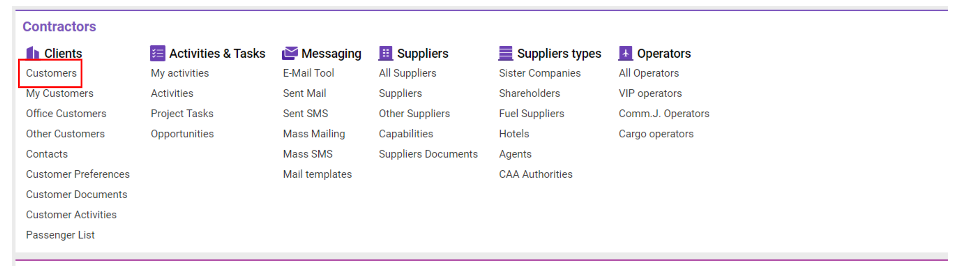
Skip table of contents

Customer's Interior Page


Home→ Contractors→ Clients→ Customers→ open any

The elements of the interior interface:

1.The Main Info tab

  • Main information block
  • The Main type, Parent type, Parent, Booking type, Source, Office, Status, Marketing status, Payment type, Company size, Billing currency, Department, Location, Descr selectors
  • The Date on board datepicker
  • The Name, Registered company name, Principal owner name, Industry, Address, City, Phone, Email, CODE, Key decision maker, Title of key decision maker input fields
  • Also an agent checkbox
  • Space for Upload, Download and Delete logo

Other details:

  • The Name, Office and Country fields are required
  • You have an opportunity to fill in the CODE field by yourself or automatically, using the Generate Customer Code Number button

  • Fill in the Source field to see the information in the Descr selector
  • The default bank will be automatically shown in the Bank field, according to selected company in the Office field
  • The Additional fields block
    • The Fax, Mobile, Frequency, Web site, AFTN, ARINC, Fuel margin, Notes input fields
    • The Country of registration, Country, State, Region, Inv type, Margin type selectors
    • The Review date datepicker
    • The Prospect, Intercompany checkboxes

2.The Contacts tab

  • Click the + New contact button in case you need to create contact. The sidebar will be displayed

  • The elements of the sidebar:

The Contact Data tab (elements):

  • The Contact first name, Contact middle name, Contact surname, Prefix, Suffix, Description, Mailing category input fields
  • The Airport, Country selectors
  • The Default, Default for country, Default for airport, Decision maker, Default for ops, Opt out, Airport contact checkboxes
  • Block with information about tel, fax, address etc

Fill in the necessary fields and click the SAVE button. Pay attention that the Contact first name field is required

The Additional Fields tab

  • The Compliance, SLX ID, Status, Contact known as, Known as input field
  • The Broker and Teams selectors. 

Pay attention that you have an opportunity to add one or more team, clicking the Add button                   

The Airports tab

  • The Airport selector

Pay attention that you have an opportunity to add one or more airports, clicking the Add button


The Access types tab

  • The Access type selector

Pay attention that you have an opportunity to add one or more access types, clicking the Add button


Additional options

  • You have an opportunity to add new item(s) to selected contact quicker.
    • Click the New item button 

  • Fill in the Type and Data fields and click the Save button

  • In case you need to add more items, click the + Add button and the new form will be displayed

  • Click the 
     
     button in case you need to make changes in the contact
  • Click the 
    button in case you need to delete the contact
  • Click the 
     
    button in case you need to add the same contact for another customer
    • Select the necessary customer and click the Apply button

3.The Linked Customers tab

In case your customer has child customers, you will see them on this tab

4.The List of Aviation Staff tab

The list of aviation staff will be shown in case the customer is linked to them All Aviation Staff

5.The Customer Preferences tab

The list of customer preferences will be shown in case the customer is linked to them Customer Preferences

6.The Mail Tool tab

The list of mails will be shown in case the customer is linked to them E-Mail Tool

7.The Activities tab

The list of activities will be shown in case the customer is linked to them Activities

8.The Operational Info tab

The elements of the interface:

  • The Select flight category selector. 

Pay attention that you have an opportunity to add one or more flight categories

  • The Notes field

9.The Passengers tab

  • The Main block

How to create new passengers

  • Click the + New Passenger button to open the sidebar
  • Fill in the necessary fields
  • Click the CREATE button

The elements of sidebar:

  • The First name, Middle name, Last name, Phone, Email, Passport number, Passport number 2, Visa notes, Preferred type, Age of aircraft, Entertainment notes, Catering notes, Drinks notes, General notes, Children notes, Allergies, Transportation required, Preferred type transport, Transport company, Client profile notes, Remarks, Pets notes, Marital status, Hobbies, Passenger id, Contact id, Account id input fields
  • The Gender, Passport in use, Nationality, Nationality 2, Residency selectors
  • The Date of birth, Passport issue date, Passport issue date 2, Passport expire date, Passport expire date 2 calendars 

List description:

  • First name – the name of passenger
  • Last name – the surname of passenger
  • Date of Birth – the birth date
  • Passport – the number of passport
  • Passport issue date – the issue date of passport
  • Passport expiration – the passport expiry date


You have an opportunity to Clone and Move passengers

  • Clone – the same passenger will be created on selected customer
  • Move – the passenger will be moved from your customer to the selected one

  • The Additional block

How to create documents

  • Click the + New button to open the sidebar
  • Fill in the necessary fields
  • Click the CREATE button


The elements of sidebar:

  • The Name, No, Type, Value, Issued by, Note input fields
  • The Issue country selectors
  • The issue date, Expire date calendar
  • The Expired, N/A checkboxes

List description:

  • Name – the name of the document
  • No – the number of the documents
  • Type – the type of the document
  • Issued by – the issuing authority
  • Is. Count. – the country that issued the document
  • Issued – the issue date
  • Expires – the expire date
  • Valid – the validation of the document
  • The tick
     
    is shown in case the document is valid
  • The cross
    is shown in case the document is expired
  • Left – the number of days between the current and expired date
  • The N/A is shown in case the document is not active
  • The violet background is shown in case of more than 1 day difference
  • The red background is shown if up to 7 days are left before the end date
  • The orange background is shown if up to 30 days are left before the end date
  • The yellow background is shown if up to 60 days are left before the end date
  • The strong yellow background is shown if up to 90 days are left before the end date
  • F – the clip
     
    is shown in case of attachments


10.The External Links tab

The elements of interface:

  • The Relate type, Company selectors
  • The External company ID, External customer ID input fields

Pay attention that all fields are required

11.The Accounting Details tab

The elements of the interface:

  • The Company billing name, Fuel margin, Quotation margin, SLX ID, Commission amount, Notes, GTS no (), PAN no (), Credit amount, Credit days, Security deposit amount, Short name, Late fee, Amount, Company background and assets, Account manager comments, Finance comments input fields
  • The Margin type, Inv type, Commission currency, Payment type, Billing currency, Security deposit currency selectors
  • The Bank commission checkbox
  • The Guarantee valid calendar
  • The Email/Fax/Print radio buttons  

12.The Bank Accounts tab

The list of bank accounts will be shown in case the customer is linked to them Bank Accounts

13.The Accounting Codes tab

The elements of interface:

  • The Company, Bank, Type, Currency selectors
  • The CODE input fields

Pay attention that all fields are required

14.The Sales and Marketing tab

The elements of interface:

  • The Linked in, Twitter, Facebook, Instagram, Key decision maker, Title of key decision maker, Flight service provider, Fuel provider, Fuel carnet cards, Flight planning, Ground handler, Notes input fields
  • The Source, Descr, Service of interest, Business unit, Segment, Linked greetings, Company size selectors
  • The Date on board calendar

Additional opportunities:

  • You have an opportunity to add one or more entries to the Services of interest, Business Unit, Segment, Linked greetings fields
  • The Descr selector will be empty in case the Source field is not filled

  •  
    1- click to open the link of social network

15.The Flights tab

The list of flights will be shown in case the customer is linked to them  Flights Database

16.The Services tab

The list of services will be shown in case the customer is linked to them Services Database

17.The Enquiries tab

The list of enquiries will be shown in case the customer is linked to them Office Enquiries

18.The AWBs tab

The list of AWBs will be shown in case the customer is linked to them Shipments Database

19.The Cargo Quotes tab

The list of cargo quotes will be shown in case the customer is linked to them Cargo Quotations

20.The Stock AWBs tab

The list of stock AWBs will be shown in case the customer is linked to them AWB Stock. List

21.The Agent Rates tab

The elements of the interface

  • The Agent, Currency selector
  • The Bulk, Percent, Notes, Min Weight, Per kg input fields
  • The Date From calendar
  • The Kg/Lbs and Flight/AWB/Service radio buttons


The List Description

  • Type – the name of type
  • From date – the start date
  • Agent – the name of contractor
  • Min Weight – the value of minimum weight
  • % - the percent
  • Per KG – the rate’s value
  • Bulk – the bulk value
  • Cur – the name of currency
  • Notes – the space with additional information

Additional information

  • Pay attention that the Min Weight and the Per kg fields are blocked in case of the Flight and Service types

22.The Currency Rates tab

The elements of the interface:

  • The Search currency, Currency, Relative to selectors
  • The Rate input field
  • The Date calendar

How to create currency rate:

  • Fill in the necessary fields 
  • Click the Add button

Pay attention that the Currency and Rate fields are required

23.The Fuel Rates tab

The list of fuel rates will be shown in case the customer is linked to them Fuel Rates

24. The Documents and Special Documents tab

How to create documents:

  • Click the +New button to open the sidebar
  • Fill in the necessary fields and click the CREATE button

The elements of the interface:

  • The Name, No., Value, Issued by, Note input fields
  • The Type, Issue country, Office, Aircraft, FAS, Access type selectors
  • The Issue date, Expire date calendars
  • The Expired, N/A checkboxes

List description

  • Name – the name of the document
  • No – the number of the document
  • Type – the type of the document
  • Office – the name of the company
  • Issued By – the issuing authority
  • Is. Count. – the country that issued the document
  • Expires – the document expiration date
  • Valid – the validation of the document
  • The tick
     
    is shown in case the document is valid
  • The cross
    is shown in case the document is expired
  • Left - the number of days between the current and expired date
  • The N/A is shown in case the document is not active
  • The violet background is shown in case of more than 1 day difference
  • The red background is shown if up to 7 days are left before the end date
  • The orange background is shown if up to 30 days are left before the end date
  • The yellow background is shown if up to 60 days are left before the end date
  • The strong yellow background is shown if up to 90 days are left before the end date
  • F – the clip
     
    is shown in case of attachments


25.The Guarantee Documents tab

How to create documents:

  • Click the +New button to open the sidebar
  • Fill in the necessary fields
  • Click the CREATE button

List description:

  • Bank – the name of bank
  • Amount – the total
  • Issued – the from date
  • Valid to – the to date
  • Left – the number of days between the current and to date
    • The N/A is shown in case the document is not active
    • The violet background is shown in case of more than 1 day difference
    • The red background is shown if up to 7 days are left before the end date
    • The orange background is shown if up to 30 days are left before the end date
    • The yellow background is shown if up to 60 days are left before the end date
    • The strong yellow background is shown if up to 90 days are left before the end date
  • Currency – the name of currency

26.The Statements tab

The list of statements will be shown in case the customer is linked to them Customer Statements

27.The Bookings tab

The list of bookings will be shown in case the customer is linked to them Customer Bookings

28.The Discounts tab

The element of interface:

  • The From cost (AED), Percent, Bulk input fields

29.The Jobs tab

The list of jobs will be shown in case the customer is linked to them Jobs List

30.The Usage tab

The information about last activities in different categories is shown

31.The Change Log tab

The information about user’s activity is shown on this tab

Permissions


JavaScript errors detected

Please note, these errors can depend on your browser setup.

If this problem persists, please contact our support.