AUTO ARCHIVE:
If a task has "Customer Testing" or "Done" status and there were no updates in task for 2 weeks, task will be auto-archived with notification to the creator and all watchers.
Awery Support Guide
Slide 1. What is the Awery Support Tool?
The Awery support portal provides users with the opportunity to initiate requests for system improvements, request any necessary modifications and promptly report any errors or problems you may encounter while using the system.
Here is a web link that will redirect you to the portal - https://support.awery.com/
Tip - 💡To start using the Support Tool requires previous registration.
Slide 2. How to submit requests.
There are three options for submitting a request:
-
You can send a request by email to - support@awery.aero
-
Or submit the new task directly from the Awery Support Tool.
-
Alternatively, you can report problems using the ERP directly. In the upper right corner, click on the "Support Centre" button.
Slide 3. General information about the types of requests which can be submitted on the portal.
Types of support request:
BUG:
The feature is not working how it was supposed to do (based on technical specifications) or working differently after acceptance of that feature, and in any case is not the improvement or new feature or new requirement. - first priority tasks
SUPPORT:
Requires setup, explanation, help to resolve the query, access permissions, etc. Tasks which do not require any development or developers involvement, but task that can be resolved by project managers and support staff – covered with support.
IMPROVEMENT:
Change to the current functionality (new way of working, extra conditions, filters, export/print format changes, new templates requirements, etc.) - extra tasks – billable
NEW FEATURE:
New feature request - extra tasks - billable
Slide 4.
Types of task priorities you can submit:
-
Blocker – can’t use the system.
-
High – may affect the life operations and processing of data.
-
Medium – the workaround explainable for users is available.
-
Low – do not affect the process directly or can be treated on a non-urgent basis.
-
Bugs – rectifications are covered with support, except bugs in developing features – which are not yet accepted by clients.
Slide 5. Interface description of the Support Tool
Dashboard Tab displays general statistics of the work on the support tool.
-
Tasks section shows general statistics, the ratio of closed and created tasks for a certain period of time. You can select the period for which you want to see the number of created/closed tasks in the upper right corner.
-
Tasks Created shows the amount of created tasks for the last 6 months. When hovering the cursor on the one of tiles – it shows the amount of created tasks by day.
-
Tasks Solved shows the amount of tasks which were solved within 6 months. When hovering the cursor on one of the tiles – it shows the amount of resolved tasks by day.
Below is displayed the history of recent interactions with tasks.
Slide 7. Creating new tasks:
-
Click the button “
-
Briefly describe the main idea of a query in the Title field of the Main info section. It is a subject of the query. Describe your request in detail in the Description field. You are allowed to format the text with the instruments on the top of the field and insert screenshots into the body of the description.
-
Choose an appropriate Milestone for the task. Leave the Assignee field without a responsible person, as our support team will follow up and assign it to the responsible manager. The Parent task field is handled by our team.
-
Choose the appropriate Task type for a query from the drop-down list and set the Priority for it.
-
The Custom section is intended for more detailed information about the environment you’re working in. This information will be useful for our developer’s team.
-
In the Attachments section, you can add screenshots, screen records, reports, and other files. Our managers team will be very appreciative if you will add more additional information with the description, it helps to find issues faster and understand your request more precisely.
-
Click on Create Task
Slide 8. Created task
After the task is created, you will see it in the new window
The task data contains:
-
TS-13 – the Task number for this particular case.
-
Assignee – an executor of an issue, who performs and tracks this task according to its status.
-
Responsible – a person in charge of handling tasks. Usually, this role is played by AWERY team members.
-
Status – an indicator of the current stage of the task.
-
Watchers – Support Tool authorized users who receive task update notifications if they are mentioned in a task.
-
Contact Watchers – external users who are not authorized in the Support Tool but receive task update notifications if they are mentioned in a task.
-
Estimated Hours – the time period expected to be spent on the solution.
-
Actual Hours – the amount of time managers and developers spend resolving a problem.
-
Billed – for internal use only.
-
Total work time – for internal use only.
Slide 9. Additional actions with the created task
-
You can edit the Title and Description fields by simply clicking on them. To save the changes, click on the green tick. You can also upload the other attachments.
-
You can change the values of the fields Milestone, Type, Priority in the created task, clicking on them.
-
You can add Watchers by clicking on the empty area right under the existing Watcher to get a drop-down list of the existing watchers. After the Watcher is selected, click on the green tick to add.
-
Log shows the history of changes to the task
-
You can write questions, provide additional information for the team in the Comment section. To address to the particular recipient, you should type @ and select user to mention from the list. Send the completed comment by clicking on the SEND button. The mentioned recipients will get the message by email and can reply the same way.
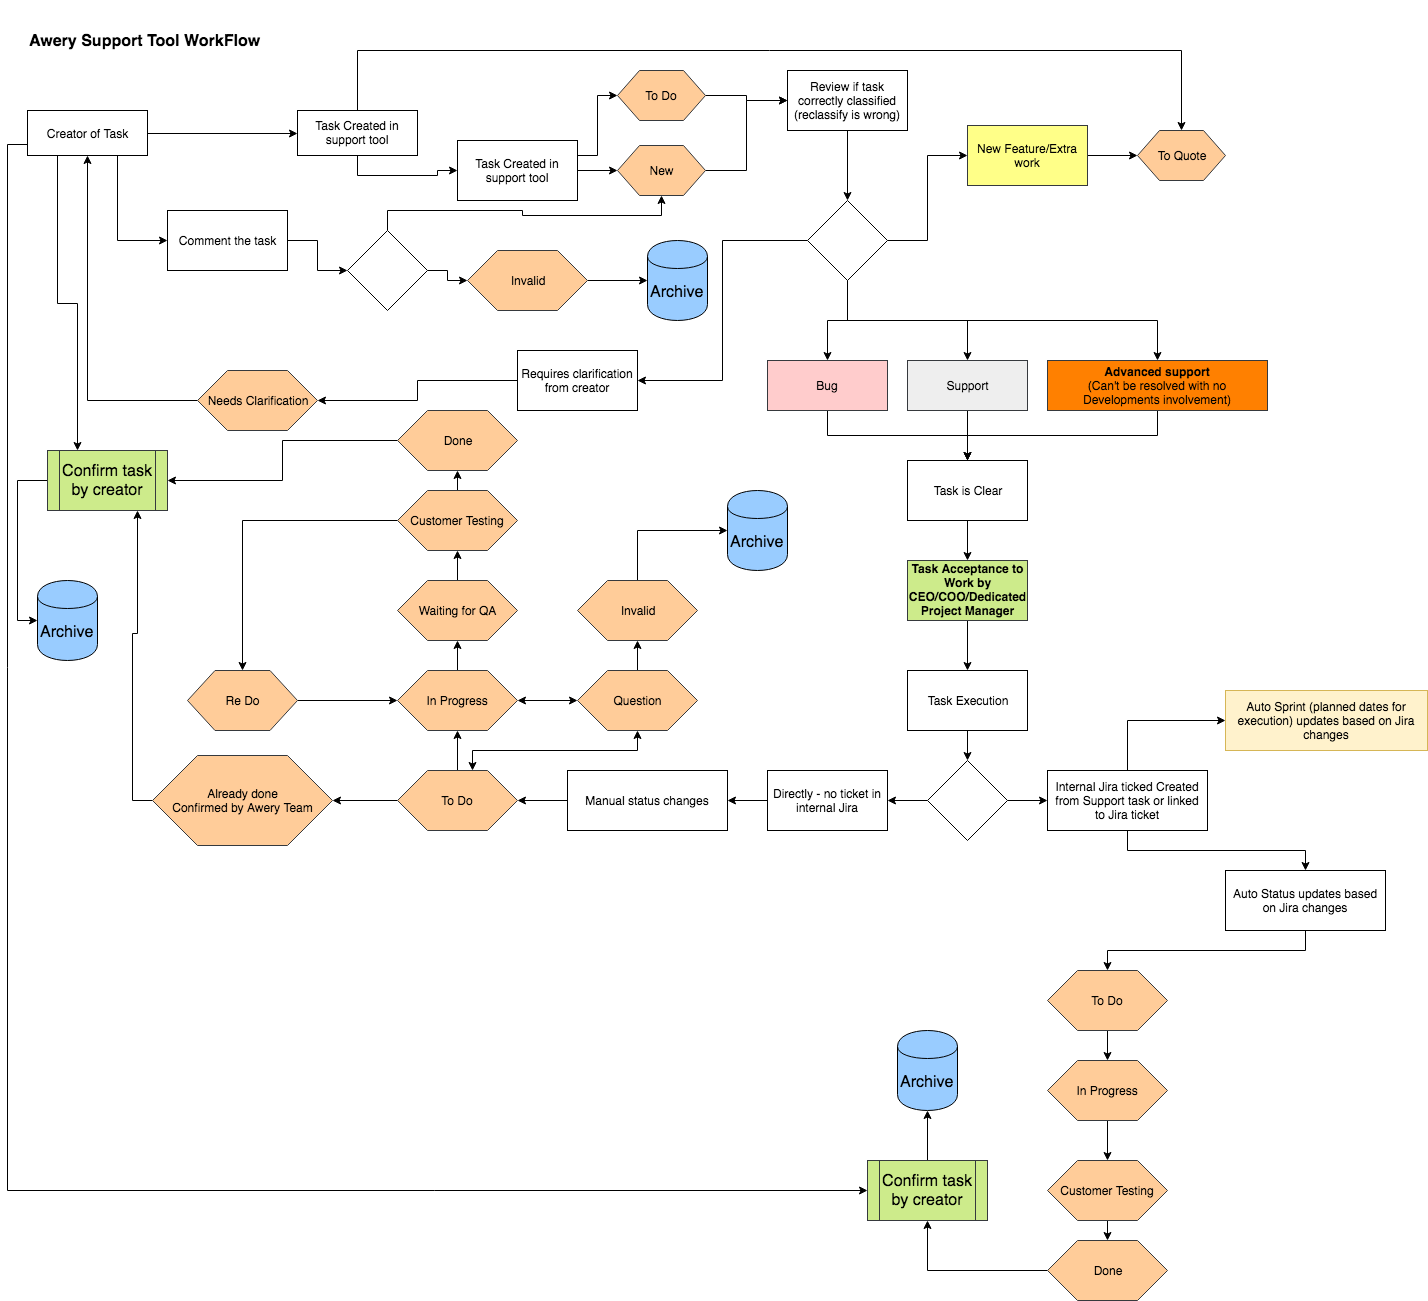
Slide 10. Workflow with support
-
You can follow up the status of your task, ask questions, write comments, provide the team with additional information.
-
When the task status has been changed to Customer Testing, the Creator will be assigned as Assignee to check the result. If the issue is solved, Assignee confirms the task, clicking on the button
-
The guide is attached in PDF format Awery Support Guide.pdf